In today’s fast-paced digital landscape, an efficient and effective keyboard can make a significant difference, whether for gaming, work, or a combination of both. The TS91 RGB Backlight Keyboard stands out as a compelling option, blending functionality with aesthetic appeal. Let’s delve into the features that make this keyboard a worthy investment for any tech enthusiast.
Visual Appeal with RGB Backlighting
At the heart of the TS91 keyboard is its customizable RGB backlighting. With a range of light colors and modes, users are afforded the luxury of personalizing their keyboards to suit their moods or gaming atmospheres. The vibrant colors can shift dynamically or remain steady, and users can easily adjust the brightness and breathing speed to their liking. This not only enhances the overall décor of your workspace but also provides practical benefits when gaming or working in low-light environments. The illuminated keys ensure that every keystroke is visible, adding to the ease of use during late-night sessions.
Compact and Functional Design
The TS91 features a classic 60% compact layout, making it a practical choice for users who prefer to maximize their desk space. By eliminating the number pad, this design grants more freedom of movement for your mouse, essential in fast-paced gaming scenarios where precision is key. Moreover, it’s also an excellent option for typists who appreciate the benefits of proximity while typing.
This laptop-sized keyboard is not just about aesthetics; it emphasizes function, making it suitable for both home and office use. Its small form factor allows easy transportability, ideal for business travelers or gamers who wish to bring their keyboard to LAN parties.
Built to Endure
One standout feature of the TS91 is its waterproof circuit board (IPX4 Certified), which significantly mitigates the worries surrounding accidental spills. Whether you enjoy snacks or beverages while gaming or working, this keyboard’s robust design allows you to do so with ease. Cleaning it is hassle-free—simply wipe it down without the fear of damaging the electronics. However, it’s essential to note that the USB interface itself is not waterproof, so taking care when plugging and unplugging is advisable.
Ergonomic Comfort for Long Sessions
For gamers and professionals who spend prolonged hours typing, ergonomics cannot be overlooked. The TS91 incorporates an ergonomic design that minimizes fatigue, making it comfortable to use for extended periods. The key height mimics that of mechanical keys, providing a satisfying tactile response without the loud clacking typical of traditional mechanical keyboards. This makes the keyboard not only an excellent choice for gaming but also for typing and general everyday use.
Compatibility Across Platforms
One of the major strengths of the TS91 is its wide compatibility. It seamlessly works with various versions of Windows, including Windows 10, 8, 7, Vista, and XP. This extensive adaptability ensures that users will find it easy to incorporate the keyboard into their existing setups without additional hassles or compatibility problems.
Easy Setup and Versatile Use
Whether you are tech-savvy or a casual user, setting up the TS91 keyboard is straightforward and intuitive. The accompanying video guides you through the unboxing process and initial setup, ensuring you can be up and running in no time. Additionally, users can explore the features through a comparative analysis of other products showcased in the instruction video, helping them to understand the advantages the TS91 offers.
The versatility of the TS91 extends beyond gaming into the realms of business and casual use. Its compact design and simple functionality make it an excellent addition for anyone needing a reliable keyboard for various environments—be it a home office, a coworking space, or a gaming setup at home.
Conclusion: The Perfect Blend of Form and Function
In conclusion, the TS91 RGB Backlight Keyboard is an impressive piece of technology, combining aesthetics with practical features that cater to gamers, typists, and anyone requiring efficient keyboard functionality. With its customizable RGB lighting, space-saving design, waterproof features, ergonomic comfort, and compatibility across a range of platforms, it meets the demands of modern users.
Investing in the TS91 means not just purchasing a keyboard but enhancing your overall computing experience. Whether you’re deep in a gaming session or grinding away at work tasks, this keyboard ensures you remain comfortable and efficient. In a sea of options, the TS91 stands out as a worthy contender, making it an excellent choice for anyone seeking a reliable and attractive keyboard.
Price: $19.99 – $17.99 (as of Jul 22, 2025 02:07:23 UTC – Details)
Google’s Pixel 10 launch event is just under a month away, but the company is already revealing the official design of the base phone.
You can currently see a video of the phone on Google’s website (and below). It looks just like the official renders that leaked earlier today, which showed that the phone will have a third back camera (which is rumored to be a telephoto sensor).
That third camera appears to be the biggest change – otherwise, the Pixel 10 strongly resembles the Pixel 9. Google’s video shows the phone in a gray-ish blue color that I personally think looks quite nice.
While Google didn’t share anything else beyond this brief look at how the phone looks, we won’t have to wait too much longer to learn more about it, as the Pixel 10 launch event is scheduled for August 20th.
This isn’t the first time Google has spoiled the design of its new phones ahead of its own reveal. Almost exactly a year ago, the company revealed the look of the Pixel 9 Pro before sharing all of the details about the phone a few weeks later.
We spend hours testing every product or service we review, so you can be sure you’re buying the best. Find out more about how we test.
EVenture Limited subsidiary Hide.me is a Malaysia-based company that has been making waves in the VPN business since 2011.
Hide.me currently boasts around 2,600 servers in 91 different locations worldwide. That’s a pretty decent spread that’ll be more than enough for most users, but NordVPN blows it out of the water when it comes to coverage, with servers in a whopping 118 countries.
Several protocols are available to choose from, including the super-speedy WireGuard and battle-tested OpenVPN, and IKEv2, SoftEther, and SSTP are in the mix, too. It’s also nice to see that Hide.me offers DNS, IP, and IPv6 leak protection, and that port forwarding is there for anyone who needs it (perhaps while doing a spot of torrenting).
Hide.me is compatible with most of today’s biggest and best platforms. Apps are available for Windows, macOS, Android, iOS, and Linux. You’ll also be able to use Hide.me on smart TVs, consoles, and routers, as well as enjoy 10 simultaneous connections. If you need help getting set up on any of these devices, or just want help picking out the best server, 24/7 live chat is happy to help.
MultiHop lets you connect from one location and exit from another to prevent tracking (Image credit: Hide.me)
Advanced features include MultiHop VPN, allowing you to connect to one location and exit from another. This makes it even more difficult for anyone to trace back and identify you.
Hide.me claims to support P2P on most servers. We verified this by connecting to five different locations and had hassle-free torrenting in each case.
We also like that Hide.me is clear about its unblocking capabilities, listing the platforms it’s able to access on its site. This is great news for fans of Netflix, BBC iPlayer, Hulu, Prime Video, and more, and sets Hide.me apart from other services that rely on vague promises that they’re not always able to live up to.
While there have been some recent updates and improvements, they’re more focused on enhanced the existing Hide.me service rather than adding new and innovative tools. It’s why Hide.me can’t quite keep up with innovators like NordVPN and ExpressVPN, but they’re still worthwhile improvements. In particular, upgrading the servers from 1 Gbps to 10 Gbps is exciting, and Hide.me labels which servers have received the upgrade in its list. It’s the kind of transparency we love to see.
Hide.me pricing
Hide.me’s monthly plan is fairly priced at $9.95. Most providers charge somewhere in the $10-$13 range, although a few are significantly cheaper (Mullvad asks around $6).
The annual plan is available for an above-average $5.82 a month. Hide.me used to throw in 2TB of Internxt cloud storage, but no more. Now, it’s the VPN only. Most providers are a little cheaper at around $4-5 for annual subscriptions, and a few cost even less (you’ll pay a monthly $3.33 for Private Internet Access, $2.08 for FastestVPN).
The two-year plan offers the best value at $3.45, but even here, there’s money to be saved elsewhere. Atlas VPN’s three-year plan costs $2.08 a month, for instance. Looking at the totals, paying $89.95 to Hide.me gets you coverage for two years with two months free – but three years of protection (with three months free) at Atlas VPN costs $71.52.
You can pay for your plan by credit card, PayPal or even with cryptocurrency (Image credit: Hide.me)
Regardless of the plan length you go for, you’ll find a number of ways to pay for your subscription. This includes the usual credit and debit cards, PayPal, Bitcoin, Google and Amazon Pay, and others – though the exact list varies from location to location.
If you fork out for a Hide.me plan and ultimately decide that it’s not for you, don’t panic! All plans are covered by a 30-day money-back guarantee that’ll let you reclaim your cash without any quibble or questions. However, this only applies to users who haven’t previously received a refund from Hide.me.
Plus, for folks who’d rather not part with a single penny, the free version of Hide.me is better than ever. It now boasts servers in 8 countries, which is pretty generous for a free VPN, and doesn’t demand that you make an account and hand over your personal details. Most impressively, however, is the fact that Hide.me free doesn’t impose any data limits or monthly caps on your usage – you can stay connected for as long as you like.
Of course, there are downsides to consider, including a lack of streaming support, port forwarding, and multihop functionality.
Hide.me keeps no logs on its users (Image credit: Hide.me)
Privacy
Hide.me has a strict no logging policy. The company claims, “We do NOT keep logs of your VPN sessions, browsing behavior, websites you visit, or any activity related to your VPN connection. In addition, we NEVER store VPN connection logs and timestamps that match your incoming and outgoing IP address or session duration.”
Hide.me does briefly record your randomly generated username and internally assigned (non-public) IP address when you connect, but this is only for troubleshooting purposes, and the company says even this troubleshooting log is securely wiped every few hours.
Hide.me says it will comply with court orders received by recognized legal authorities with jurisdiction over them. But again, that’s to be expected, and if the logs don’t show anything significant, that won’t matter at all.
The company claims this is supported by a comprehensive audit, and that ‘Hide.me has been certified as the most anonymous VPN service in the industry.’
It turns out that the audit dates from 2015, though. There’s little information on the scope of the audit and no report you can read. Hide.me deserves real credit for realizing the importance of audits so long ago – some providers still don’t get it, even today – but we think it’s probably time to take another, something more thorough and transparent, where everyone can read the full results.
In the meantime, there’s a simple metric we use to get a feel for how any provider is handling your privacy, and that’s how many trackers and third-party cookies are used on its website. The Blacklight privacy inspector gave us the answer; none at all. That’s not unique – Mullvad, Proton VPN, Windscribe, and a handful of others are also tracker-free – but it’s unusual, and suggests Hide.me is making a real effort to maintain your privacy.
This is the user interface of Hide.me’s Windows app (Image credit: Hide.me)
Apps
Hide.me’s Windows app has a clear and straightforward interface. A large Enable button plugs you into the nearest server, the full location list (countries, expandable to cities in some cases) is just a click away, and a navigation bar has buttons for the streaming service, app settings, and more.
Hide.me displays its available servers in a list instead of on a map (Image credit: Hide.me)
The flexible location list can sort your options by name, or use ping time to show the fastest servers at the top. Begin typing a city or country name in the Search box and the list updates to display any matches (typing MIA cuts the list to just Miami, for instance.) A Favorites system enables grouping your most-used servers together for speedier access later.
A Streaming tab connects you to the best locations to unblock streaming platforms in a lengthy list of countries: Argentina, Australia, Austria, Brazil, Canada, Croatia, France, Germany, Italy, Japan, Norway, Poland, Portugal, Spain, Switzerland, Turkey, United Kingdom, and United States. That’s nine countries added since our last review. Impressive!
We found Hide.me’s connections times to be fair. Typically, we were able to connect to a server within 1 or 2 seconds, which meant we weren’t waiting around. There doesn’t appear to be a connection timeout, however, and we encountered a few instances where Hide.me was stuck on its “initializing service connection” animation for minutes at a time.
Digging into the details, it looked like Hide.me’s Windows service had failed, and the app wasn’t able to restart it. That can happen, but the top providers do a better job of handling it. ExpressVPN’s Windows app recognizes a service failure immediately, for instance, without leaving you waiting for minutes. Then, it either fixes the problem all on its own or tells you what to do next.
Typically, though, connections ran smoothly, with the app making good use of notifications to keep you informed about what it’s doing. Switch back to your other apps, and Hide.me will let you know when you’re protected, and when you’re not.
Hide.me’s MultiHop feature gives you another option, good news when you need the best possible privacy. Choose an entry server of New York, say, and that’s where you’ll connect, but you’ll be redirected through Hide.me’s network to your pick of exit servers. Websites will think you’re in the UK, and even if an attacker manages to compromise the London server, they won’t be able to link the activity to your account as you’ve accessed it using the New York server, not your own IP.
You can tweak many aspects of Hide.me’s VPN service in its settings menu (Image credit: Hide.me)
Settings
There’s real depth here. The app supports no less than five protocols (WireGuard, OpenVPN, IKEv2, SoftEther, SSTP), for instance, with a stack of configuration options including IKEv2 stealth mode, custom and random ports, tunnel via IPv4 or IPv6, and the option to enable Bolt (Hide.me’s custom speedup technology). More on that later.
That’s just the start. While most VPN apps ignore IPv6 entirely, or at best give you an option to disable it, Hide.me offers complete support and control. You can have the app connect via IPv4 only, IPv6 only, prefer IPv4 but use IPv6 as a fallback, or prefer IPv6 but use IPv4 as a fallback. That’ll probably get you better speeds if you can use IPv6, and Hide.me’s ability to handle both protocols reduces the chance of data leaks.
The advanced features continue everywhere you look. For example, split tunneling support enables defining which apps use the VPN, and which will use your regular connection. Plus, the client doesn’t just have a single on/off kill switch setting to define what happens if the connection drops. It can run customs scripts, too. You get it to close apps, run others, whatever you like. You can also define whether scripts are run as the current user or an administrator.
Hide.me allows you to search for specific features in Settings, and will highlight them to point them out clearly (Image credit: Hide.me)
There’s a lot to explore, and sometimes we couldn’t remember where to find a particular setting. Fortunately, the app has a settings Search box. If you know you want to customize the Best Location feature, just type ‘best’ in the Search box, click the link, and the app will take you to the right page, and even highlight the option for you. A neat touch we’ve not seen with anyone else.
The Mac app looks pretty much identical to the Windows version, but doesn’t have all its advanced features (Image credit: Hide.me)
Mac app
We were glad to see that Hide.me’s apps are similar across all platforms. The Mac app, in particular, is practically a clone of the Windows version, with the exception of a few small visual details.
Connection times were much faster than we saw on Windows, and we didn’t have any connection failures. Real-world use was otherwise much the same. The app was easy to use, there were no unexpected drops, and everything worked more or less as we’d expect.
There’s a decent set of advanced options, too. WireGuard, OpenVPN, and IKEv2 protocol support, a kill switch, auto-connect when you access untrusted networks, and split tunneling. If any of this technology doesn’t quite deliver, you can even raise a ticket from within the app.
There are a lot of advanced Windows features that haven’t made it to the Mac. There’s no VPN-wide custom DNS option, no custom MTU, no way to tweak how Best Location is chosen, no IPv6 tunnel option, no IKEv2 configuration tweaks, and no real kill switch configurability beyond on or off.
If you’re not interested in VPN technicalities, then none of that is likely to matter very much, and this is still a quality Mac app. It’s not difficult to use, performance is good, and it has far more features than most.
Hide.me provides some impressive mobile apps (Image credit: Hide.me)
iOS app
Most VPNs focus their development time on desktop apps, and iOS users in particular are expected to be grateful for whatever scraps are left. Fortunately, no one told Hide.me that this is the way things are supposed to be. Its own iOS offering is surprisingly powerful.
This isn’t visible initially, because the app has the same simple and appealing interface as the rest of the range. It has the blue and white color scheme, a big connect button, and not a whole lot else. Don’t let that fool you, we tapped a few buttons and quickly got a feel for just what the app can do.
The Location picker has all the features we saw on the desktop, including the Favorites, the Streaming and Multihop lists, the search box, sorting, and more. You probably won’t need all of that, but just the ability to bring favorite servers to the top of the list can make your VPN life so much easier.
IOS apps typically have almost no settings, but this one outperforms some of the Windows competition. There’s support for IKEv2, OpenVPN UDP, OpenVPN TCP and WireGuard, for instance. The app can automatically connect when you use Wi-Fi or mobile networks. There’s a kill switch. You can choose a custom DNS server. You even get to control whether the tunnel uses IPv4 or IPv6, assuming you’ve a reason to care and if you don’t, no problem, the app has sensibly chosen defaults.
The feature list is still a little shorter than the desktop apps (no split tunneling, for instance), but that’s inevitable, iOS just doesn’t allow anything like the same level of system control. Despite that, this is a top-notch iOS app. It’s easy to use and way more configurable than most of the competition.
Hide.me’s Android app is very similar to the iOS version, but also includes split tunneling (Image credit: Hide.me)
Android app
Hide.me’s Android app didn’t spoil the excellent record for cross-platform consistency. Hide.me has paid real attention to detail with app design, and essentially the Android edition has the same appealing interface and capable location list as the rest of the family.
A better-than-most feature list includes WireGuard, OpenVPN, and IKEv2 support, auto-connect for unsecured networks, and a custom DNS option.
The Android app beats iOS with split tunneling, where you’re able to define which apps use the VPN tunnel, and which don’t. But it does lack some functionality. For example, it doesn’t allow you to decide whether to use IPv4 or IPv6.
Overall, this is an impressive mix of power and ease of use. You don’t have to register to use Hide.me’s free plan, or hand over any personal details – just install it from your app store, explore the various screens, and see how it works.
And if you don’t understand something, or there’s some other problem? You can even raise a ticket from within the app. Now that’s what we call convenient.
Hide.me provides a kill switch, and it’s highly configurable, but not without issues (Image credit: Hide.me)
Kill switch
We checked out the Windows app kill switch by manually closing WireGuard, OpenVPN and IKEv2 connections and everything worked as it should – our internet access was blocked right away, a notification warned us about the problem, and the app reconnected within seconds.
The kill switch didn’t always work when we switched locations, though. The app appears to close the first connection, then try to connect to the new server, and our device was sometimes able to use its regular internet connection until the tunnel was re-established.
This is unlikely to be a big issue for most users. If you’ve decided to switch locations, that’s a very strong indication that you’ve finished your torrenting, your online banking or whatever else you’re trying to protect, and a few seconds of unprotected internet access may not matter at all.
It is still a weakness, though, and one that could be a concern in the most privacy-critical situations.
Hide.me promises a lot on the unblocking front, but it delivers, too (Image credit: Hide.me)
Privacy tests
Hide.me’s Windows apps boast plenty of protocols, but are they set up for maximum security? We can’t see every detail of what’s going on, but checking app configuration files and logs provides some useful information.
The results were broadly positive, with OpenVPN using AES-256-CBC encryption and SHA256 authentication. IKEv2 connections provided the same reliable AES-256 shield, while SoftEther appeared to use its standard (and very acceptable) default settings.
The app’s WireGuard and OpenVPN files were more than a year old, which means they’re missing plenty of patches and bug fixes. This is unlikely to have any real practical impact on your privacy, but we’d like to see Hide.me update these more often, just to keep any risks to a minimum.
We spotted a slightly dubious design decision with the app’s OpenVPN connections, as it saved our username and password to disk in plain text. This also isn’t that big a deal (if you’ve got malware reading files, Hide.me’s logins are the least of your worries), but it’s unnecessary, and most apps do a better job of concealing your credentials.
Once we got connected, Hide.me excelled on the privacy front, with IPleak.net, DNSleak.com, and DNSleaktest.com confirming that it correctly shielded our IP, allocated us a new address from our chosen country, and blocked DNS leaks at all times.
Virtual locations
Most VPNs have very long location lists, but their servers aren’t always where you expect. If they’re in a country that maybe has poor internet connectivity, then a provider will often host them elsewhere.
This can often be a good idea. If a VPN offers a Monaco location, and allocates you a Monaco IP address when you connect, but the servers are really in a super-fast French data center just a few miles away, should you care very much? We’d say no.
But what if you’re in Cambodia, and you connect to a Cambodia location, but the server is really located in New York? That’s likely to deliver a big and very unexpected performance hit.
We tested ten Hide.me locations to get a feel for what the company is doing.
In most cases, Hide.me’s servers turned out to be in the advertised locations and some appeared to be virtual locations but weren’t far away. Still, we found a couple of notable exceptions. Hide.me’s Mexico location appears to be hosted on the US east coast, and its Morocco servers are closer to Quebec or Ontario.
This may not be an issue for everyone. The servers correctly give you Mexican and Moroccan IP addresses, so they’ll work just as you expect, and if you’re in North America, having servers closer by might improve performance.
Providers should be transparent about their use of virtual locations, though, in order that potential customers can make up their own minds. Hide.me doesn’t highlight which locations are virtual, or tell users where they really are (which ExpressVPN does), and we’d like to see that change.
Netflix and streaming
Most VPNs claim they can help you access geoblocked websites, and Hide.me is no exception, with the company promising that you’ll ‘avoid annoying censorship.’
And this turned out to be correct, as Hide.me got us access to Netflix in the US, UK, Australia, Canada and Japan.
It scored with our other test US platforms, too, working with both Amazon Prime Video and Disney Plus.
The good news kept coming, too. Not only did Hide.me unblock BBC iPlayer, ITV and Channel 4 in the UK, but it delivered with Australia’s 9Now and 10 play, too.
That’s a perfect 100% unblocking score, a great result. Hide.me did just as well in our last review, too, which suggests the company didn’t just get lucky – it’s working hard to unblock everything possible, and then make sure those services stay available long-term.
(If you plan on testing Hide.me for yourself, keep in mind that you only get this level of success from the paid product – the free plan doesn’t support unblocking streaming sites.)
We used several different speed testing services to help determine Hide.me’s performance (Image credit: Speedtest.net)
Performance
We assess VPN speeds by running multiple automated speed tests using several platforms including SpeedTest’s website and command line app, Measurement Lab, and Cloudflare.
Hide.me’s data center results were pleasantly unexpected. WireGuard speeds reached a decent mid-range of 580Mbps and switching to regular OpenVPN got us an above average 260Mbps. Using OpenVPN with Hide.me’s Bolt got us an amazing 950Mbps.
That’s a huge achievement, but there’s an important point to keep in mind. Bolt is only available in the Windows app. If you’re using Bolt on any other platform, performance is going to be more ordinary, though still very acceptable for most purposes. Would you really be upset if your VPN ‘only’ managed 580Mbps? Didn’t think so.
Hide.me review: Final verdict
Hide.me boasts some seriously impressive speeds and works like a charm when it comes to unblocking services – narrowly missing out on a perfect score. However, other big-name providers have more intuitive apps and a better roster of features, meaning Hide.me remains a half-step behind the competition.
My old laptop still performs well, so it felt like a waste to replace it just because it lacked a dedicated GPU. I’d always known that DIY eGPUs existed, but I avoided them because I thought they’d be too much work to build—I was wrong.
Why I Built My Own eGPU
The decision to build my own eGPU (external GPU) came down to pure practicality. My Lenovo X1 Carbon performs beautifully for writing, web browsing, and most productivity tasks. But the moment I tried to play anything more demanding than basic indie games, or when I needed to edit QHD video footage, the limitations became obvious.
I considered buying a gaming laptop, but that felt like throwing money at a problem that didn’t need such an expensive solution. Also, many gaming laptops are heavy, have shorter battery life, and I love the portability of my current laptop. The X1 Carbon fits perfectly in my bag, always runs quietly, and gives me all-day battery life.
A DIY eGPU offers the perfect compromise. I get close to desktop-level graphics performance when I need it, but I can still grab my laptop and head to a coffee shop without lugging around a massive gaming machine. Plus, building my own setup costs significantly less than buying a pre-built eGPU enclosure from major manufacturers.
The tipping point came when I realized how much time I was spending managing multiple devices. Before my eGPU dock, I had to connect four or five different cables every time I sat down at my desk. Now, I plug in one Thunderbolt 4 cable and everything works. The dock handles my monitor, charges my laptop, and provides all the ports I need for my peripherals.
Step-by-Step Guide to Building Your Own eGPU
There are a few things you need to know about an eGPU before you start building one. However, if you’re primarily looking for flexibility, like I do, building an eGPU is likely the best solution.
What You Need to Build an eGPU
Jayric Maning / MakeUseOf
Building an eGPU requires just a few key components:
Graphics Card: I chose an RTX 2070 because it’s what I already have, but any desktop GPU will work, depending on your performance needs and budget.
Power Supply Unit: I used a Seasonic Focus 500W ITX PSU, which provides plenty of power for most graphics cards. You can use just about any PSU you have. Most eGPU docks today provide mounting brackets that can accommodate most standard PSUs.
eGPU Dock: I’m using a TH3P4 Thunderbolt GPU Dock with an 85W power delivery option, serving as the foundation. Unless your laptop has an OCulink port, getting a Thunderbolt eGPU dock should be the most convenient option.
Thunderbolt Cable: Usually included with the dock, this handles both data and power delivery. If you plan to buy your own, remember that USB-C and Thunderbolt Cables aren’t always the same thing. Make sure to check cable specifications.
Thunderbolt Control Center Software: Available from the Microsoft Store for managing connections.
GPU Drivers: Download the latest drivers from NVIDIA or AMD, depending on your graphics card.
The total cost for my specific setup would be around $430 (including the GPU and PSU), which is significantly less than purchasing a pre-built eGPU enclosure and a graphics card. Most commercial eGPU solutions start at $300 for just the enclosure, before you even add a graphics card. Of course, if you already have a spare GPU and PSU, you’ll only have to pay for the dock, which is around $120. You could probably get cheaper docks as well, but I chose the TH3P4 dock because it includes built-in power delivery and supports daisy-chaining additional Thunderbolt devices.
How to Assemble and Configure the eGPU
Setting up your eGPU might sound daunting, but you’ll find it’s much simpler than most would expect. You won’t need to mess with complicated software or hidden settings. Just assemble the parts, install the drivers, and you’ll be good to go.
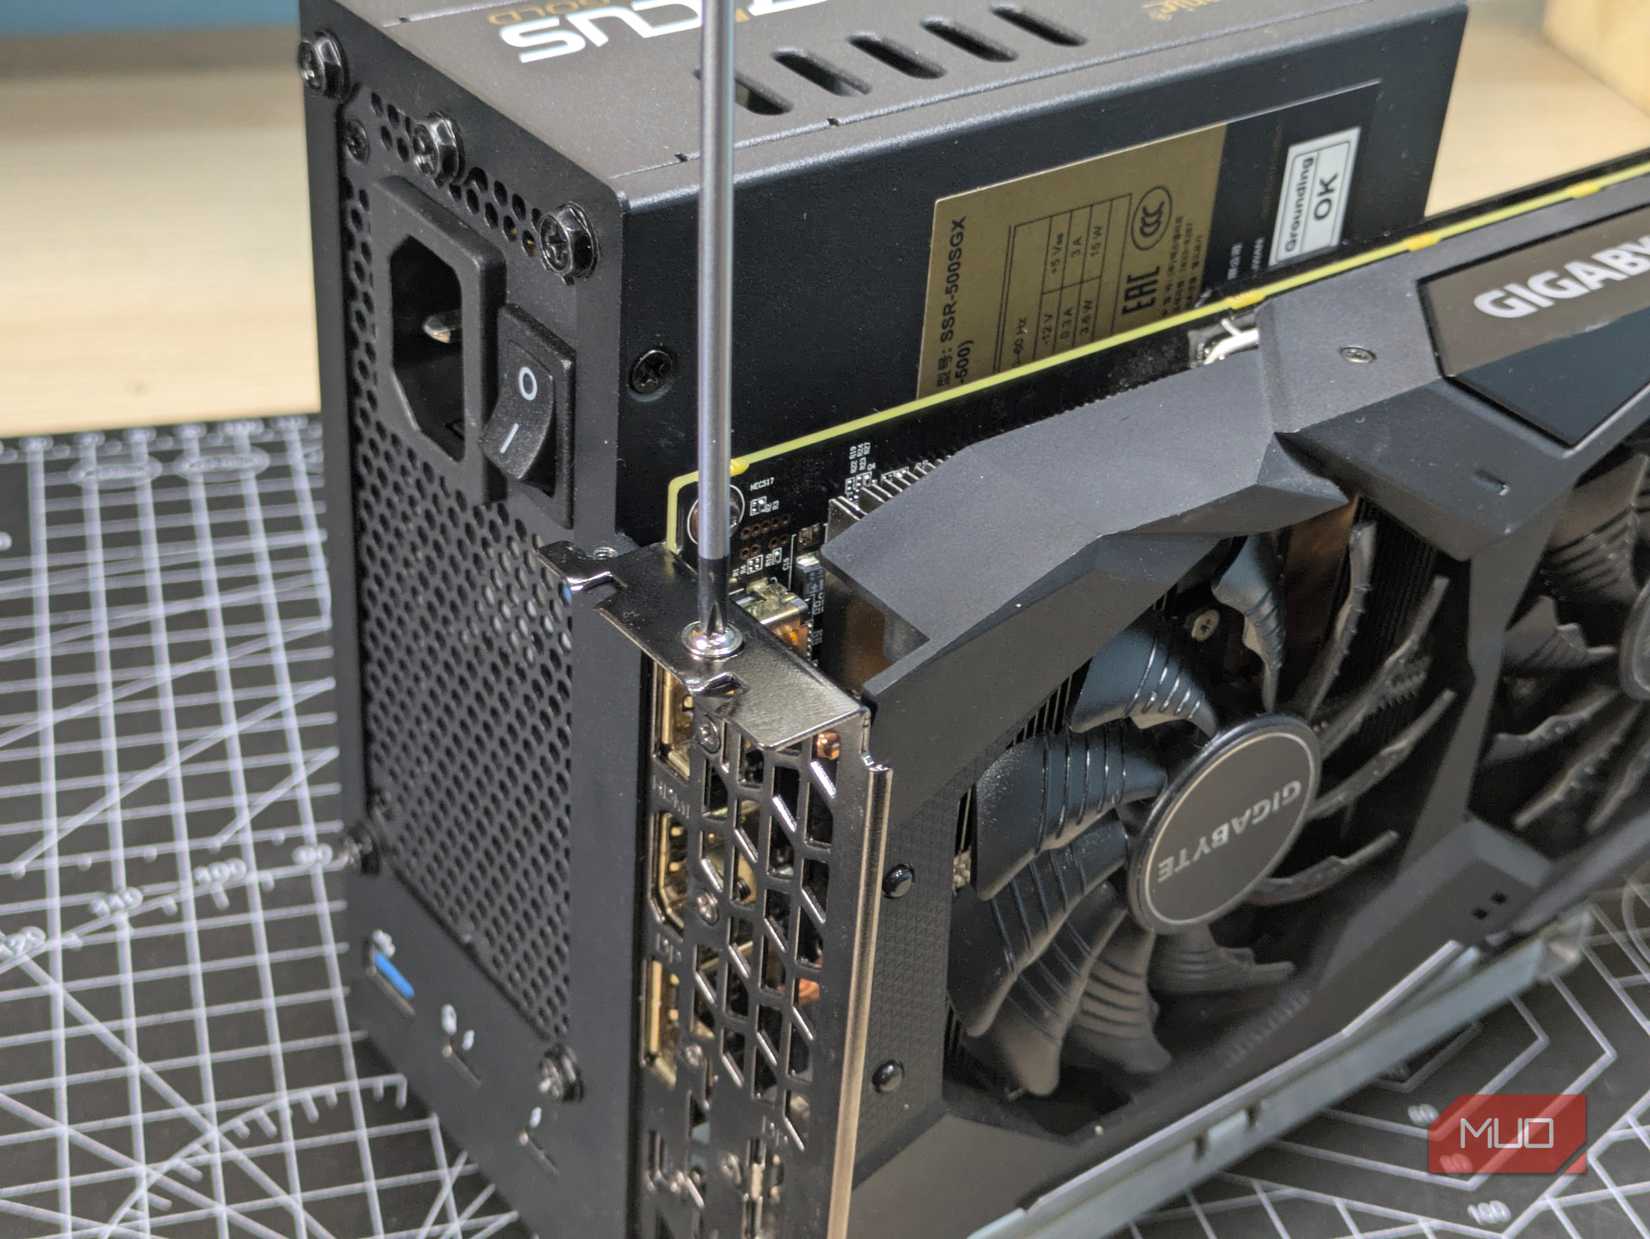
Start by preparing your eGPU dock. Attach the mounting bracket, which will hold both your graphics card and power supply unit securely in place. The brace makes sure nothing shakes loose once you’re up and running.
Jayric Maning / MakeUseOf
Once you’ve got the bracket on, secure the power supply unit. It’s best to position the PSU so the fan faces outward, making sure your GPU doesn’t block the airflow once the eGPU gets fully assembled.
Now pick up your graphics card and gently slide it into the PCIe slot on your dock. When it’s lined up and fully seated, fasten it to the bracket with a screw to keep it solid.
Jayric Maning / MakeUseOf
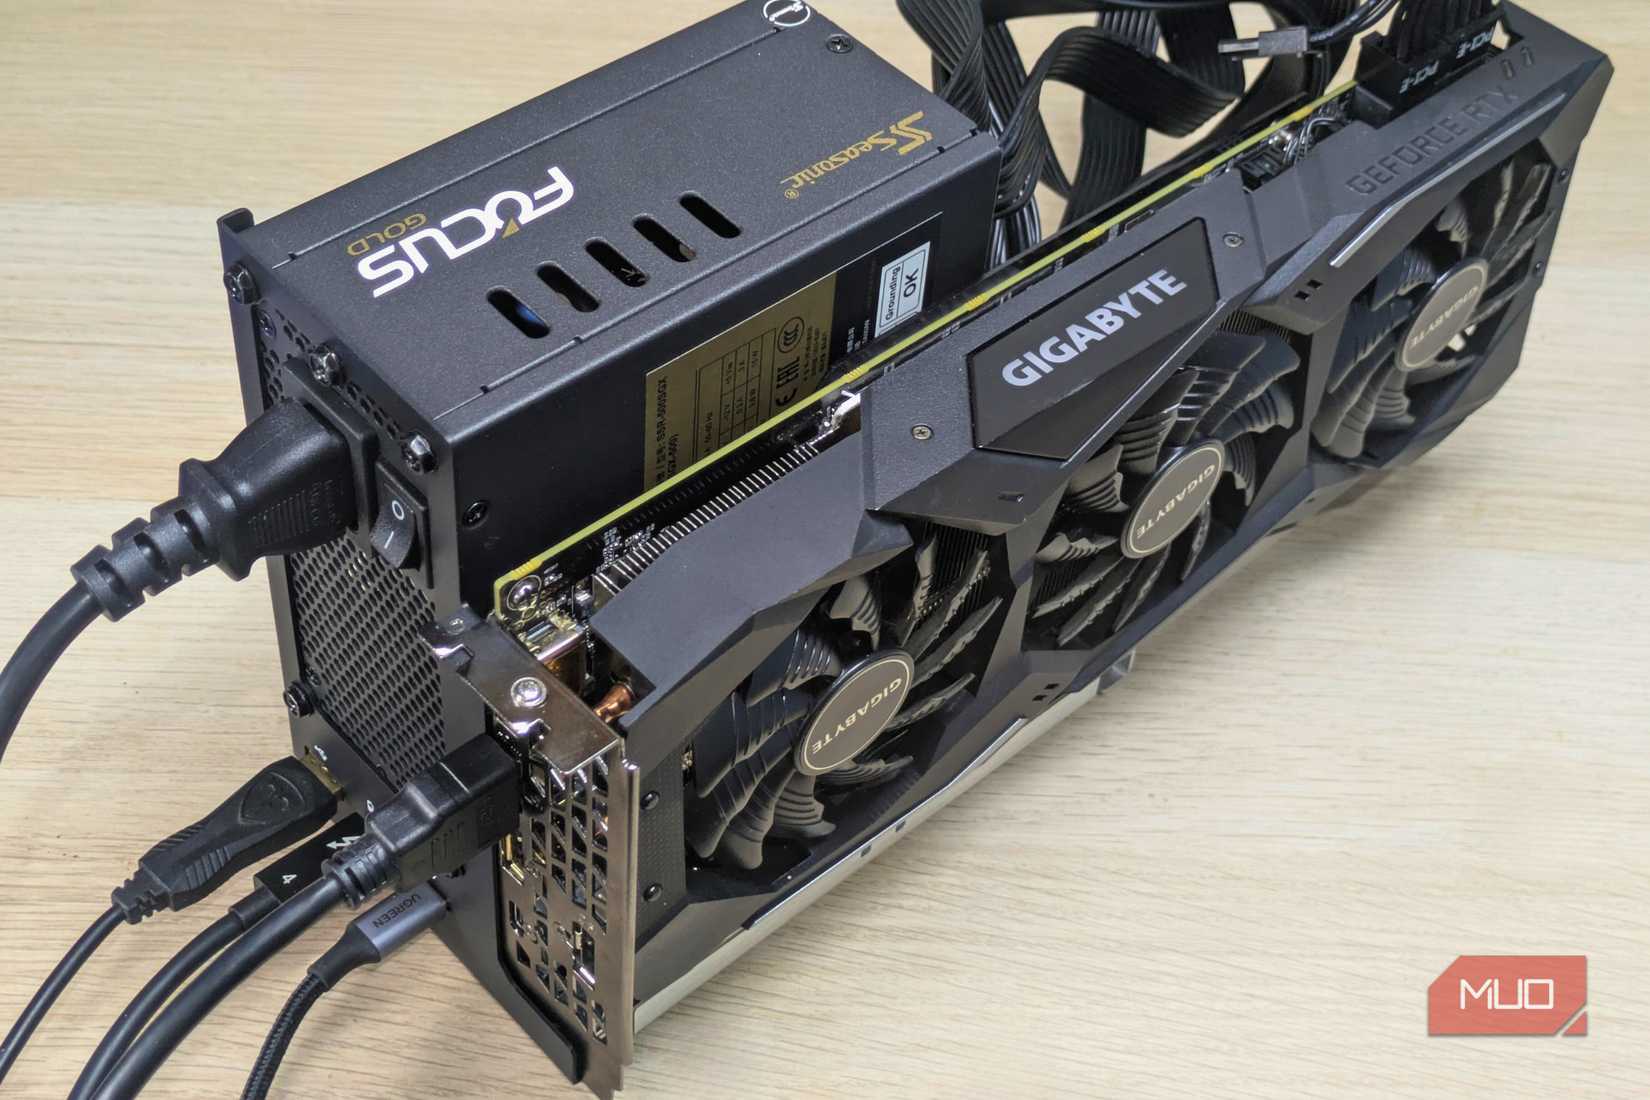
The next step is to plug in all your power cables. Connect the 24-pin (motherboard) cable to the dock, add the 4+4-pin (CPU) cable for peripheral charging, and then attach both the 8-pin and 6+2 PCIe connectors to the GPU itself. Double-check that every connection is snug.
Jayric Maning / MakeUseOf
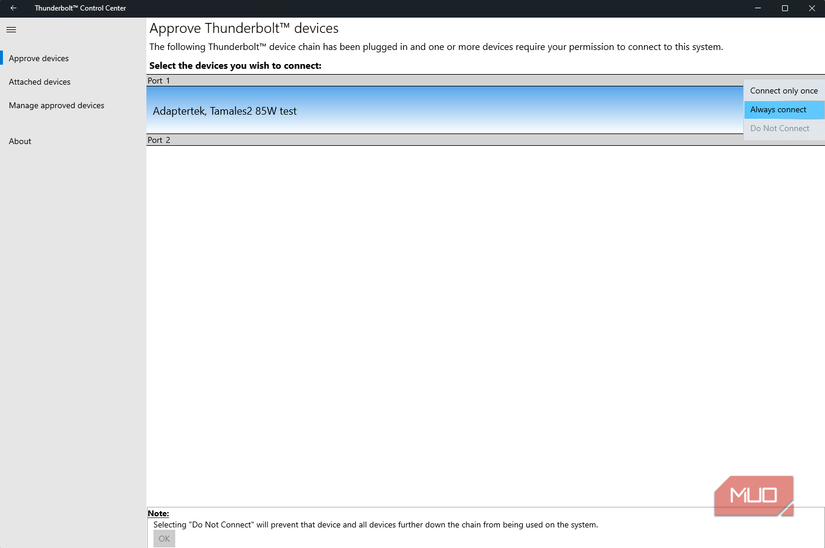
Once the hardware is in place, move over to your laptop. Download and install Thunderbolt Control Center from the Microsoft Store. This app helps your computer see and manage all Thunderbolt devices, making it a breeze to connect your eGPU.
Now, take your Thunderbolt cable and connect the eGPU to your laptop. Make sure that you connect the cable to your laptop’s Thunderbolt port (one with Thunderbolt logo) and not the regular USB-C port. An eGPU requires the Thunderbolt protocol, which is not present in all cables using the USB-C interface.
Open Thunderbolt Control Center. Your new eGPU should show up almost immediately. If it doesn’t connect automatically, you can click Connect and set the preference to Always connect. That way, you won’t have to approve the connection every time you dock.
Next, go to the NVIDIA or AMD website to download the latest drivers for your graphics card. Install them, and look for the GPU control panel icon to appear in your system tray. If you see it, you’re all set. Of course, you can also install GPU-Z to check if everything is working with the eGPU.
For the best results, connect your external monitor directly to the eGPU’s video outputs. This makes sure all the heavy lifting is done by your desktop GPU instead of your laptop’s built-in graphics. You’ll see an instant performance boost in demanding creative apps and when using high-resolution displays.
You can expect the whole process to take about twenty to thirty minutes, most of which comes from assembling the hardware. The software side is quick and automatic. Once your drivers finish installing, you’re ready to enjoy your upgraded setup.
An eGPU Dock Isn’t Just About Gaming
Jayric Maning / MakeUseOf
Beyond the obvious graphics performance boost, my eGPU dock has transformed how I work at my desk. The 85W power delivery means my laptop charges while connected, so I never have to worry about battery life during long gaming sessions or intensive work projects.
The dock works well with Thunderbolt-supported gaming handhelds and mini PCs. When a friend visits, they can bring their laptop or gaming handheld; I let them use the eGPU, and I use my desktop PC. This way, we both play co-op games together.
Port expansion easily makes an eGPU dock one of the best docking stations you can get today. My eGPU dock includes multiple USB ports, which I use for my keyboard, mouse, and other peripherals. Before, I constantly ran out of ports on my laptop and had to use a separate USB hub. Now, one Thunderbolt cable is all my laptop needs.
Overall, the setup feels genuinely plug-and-play thanks to the Thunderbolt Control Center app. When I arrive at my desk, I connect one cable and, within seconds, I have access to a dedicated graphics card, a larger monitor, and all my peripherals. When I need to leave, I safely disconnect through the software and grab my laptop.
Building my own eGPU has been one of the most satisfying DIY tech projects I’ve completed. It solved my graphics performance problems without forcing me to compromise on portability or spend a fortune on a new laptop. This setup gives me the flexibility to handle graphically intensive tasks when I need to do so and stay mobile when I travel.
Whether it’s your nephew who wants a new iPad, your sister who needs a new pair of AirPods or your parent who could benefit from an easy-to-use MacBook, Apple devices are some of the most in-demand devices you can get today. That means, unfortunately, that big discounts are few and far between, and they’re often the first to sell out when sales do arise. But make no mistake: you can find good Apple deals across the web, you just have to know where to look.
Engadget keeps track of deals like these regularly, so we’re here to help. We’ve collected the best Apple deals on items like AirPods, MacBooks, iPads and more that you can get right now. Just note: you’ll find the best Apple deals from retailers like Amazon, Best Buy, Walmart, Target and others — not directly from Apple. Unless you shop refurbished, you’ll always pay top dollar direct at Apple, and for some things (like iPhones), that might be the best route to take.
Best Apple Watch deals
Apple
Apple’s flagship wearable is the best smartwatch you can buy, period. While the Series 10 was an iterative update, that’s not necessarily a bad thing. It sports a slightly longer battery life, a slimmer design and wide-angle OLED screen for better viewing angles. It tracks workouts accurately and delivers alerts to your wrist efficiently. Also at Walmart.
$299 at Amazon
Apple Watch SE for $169 (32 percent off): We wouldn’t be surprised to see an update to Apple’s budget smartwatch sometime soon (and we have a few suggestions on the matter). But thanks to some serious discounts, the Apple Watch SE has turned out to be the most affordable way to get an iPhone companion for your wrist. Despite the lackluster screen and limited extra features, it handles the basics well. Also at Best Buy and Walmart.
Best AirPods deals
Apple
Best iPad deals
Apple
This is Apple’s most affordable large-screen iPad. Engadget’s Nate Ingraham awarded it a review score of 89 upon its debut this March. When you pair it with accessories like a keyboard folio and mouse, it becomes a true productivity machine — though those add-ons make it a pricey package. Good thing iPads are on sale for Prime Day. This $120 discount represents the lowest price we’ve seen. Also at Best Buy.
$699 at Amazon
iPad Pro (M4, 11-inch) for $899 ($100 off): The most powerful iPad is the iPad Pro, and it’s the one to get if you’re even toying with the idea of using your new slab as a laptop replacement. Both the 11- and 13-inch models have gorgeous displays, thinner and lighter designs, a repositioned front camera and the excessively powerful M4 chip inside. Also at Best Buy.
Best MacBook deals
Apple
Apple’s latest MacBook Air is another device that only came out in March but already has a modest discount at some retailers. One of the things we appreciated most in our review was the slight price drop for the base configuration. Instead of starting at $1,099 like the 13-inch M3 MacBook Air, the M4 starts at $999. Add in this discount and the fact that the ultraportable packs Apple’s latest M-series chip, and you’ve got yourself a pretty good deal on a capable laptop — one that happens to be our favorite laptop overall. Also at B&H Photo.
$849 at Amazon
Apple MacBook Air (15-inch, M3, 24GB RAM) for $1,299 ($400 off): The last-gen M3 MacBook Air has officially been discontinued, but it remains a superb laptop while the last bits of stock remain available. We gave this 15-inch model a score of 90 in our review — outside of its slower chip (which is still plenty fast for everyday use), marginally improved camera and inability to power two external displays with the lid open, it’s virtually identical to the newer version. This deal applies to the model with the larger 24GB of memory in the Starlight colorway.
MacBook Air (M3, 15-inch) for $949 ($350 off): The base model M3 MacBook Air is also available at a sizeable discount..
Apple MacBook Air (15-inch, M4) for $1,049 ($150 off): The 15-inch MacBook Air is nearly identical to the smaller version but features more robust speakers and a more spacious trackpad alongside its roomier display. Also at B&H.
Best Apple accessories deals
Apple Pencil (USB-C) for $69 ($10 off): This more affordable Apple Pencil doesn’t support pressure sensitivity, but it still makes for a useful stylus for the basics. If you’re a casual note-taker and can live without wireless charging, you’ll save a few bucks by picking this one up. Also available at Walmart.
Apple Pencil (2nd gen) for $90 ($39 off): The Second gen Pencil both attaches and charges magnetically, supports tilt and pressure sensitivity and allows for tool changes with a tap of the flat edge. It’s an older pencil and isn’t compatible with the latest iPad models. This is the lowest price we’ve tracked this year, but it went as low as $80 for last year’s Black Friday sales.
Read more Apple coverage:
Follow @EngadgetDeals on X for the latest tech deals and buying advice.
Amazon has 40-Pack Frito Lay Fun Times Mix Variety Pack (Cheetos, Doritos, Rold Gold & More) for $15.67 – 15% off when you ‘clip’ the coupon on the product page – 5% when you check out via Subscribe & Save = $12.54. Shipping is free w/ Prime or on $35+.
Note: You must be logged into your account. Coupons are typically one use per account. You have the flexibility to manage your Subscribe & Save subscription at any time after your order ships. View Subscribe & Save filler items and our current Subscribe & Save Frontpage deals to unlock up to an extra 15% savings when you have 5 or more items in your current monthly subscription.
Thanks to Deal Hunter dubba-low for finding this deal.
Might get thinner bezels and slightly thicker design.
Google’s launch event is set for August 20.
Google’s next hardware event is locked in for August 20 in New York City, where the spotlight will be on new Pixel phones, earbuds, and a fresh version of the Pixel Watch. The invite doesn’t give much away, but the timing lines up with the usual fall product cycle, and leaks are already hinting at a few meaningful changes for the next-gen watch.
Rumors point to a slightly thicker watch body that could make room for a bigger battery, which is great news if you’ve been frustrated by charging your Pixel Watch every night. And while it’s expected to keep the signature round look, leaks suggest thinner bezels for a more modern face. If you’ve been hoping for longer battery life and wireless charging, this might be the upgrade you’re looking for.
The Bottom Line
The Google Pixel Watch 4 is rumored to offer wireless charging, a larger battery, and thinner bezels that could make it more practical and stylish. We’ll know for sure at the August 20 launch event.
The HP Omen Max 16 (2025) is a solid gaming laptop with decent levels of power, a good port selection and bright, punchy IPS screen. Against key rivals though, the battery life isn’t as strong, it leaves some performance on the table, and the design isn’t as eye-catching.
Bright IPS screen
Solid power
Good set of ports
Poor battery life
Leaves some performance on the table
Key Features
Intel Core Ultra 9 275HX and RTX 5080
The Omen Max 16 (2025) has a beefy set of internals, with both a potent Intel processor and Nvidia GPU inside.
16-inch QHD+ 240Hz IPS screen
There is also a solid IPS screen here, complete with a high resolution and refresh rate combo.
83Whr battery
This HP laptop also has a decent-sized battery inside to cope with its beefy components.
Introduction
The HP Omen Max 16 (2025) is one of the first laptops out of the gate to be fitted with one of Nvidia’s new 50-series laptop GPUs.
To be specific, it comes with an RTX 5080, alongside a powerful core with an Intel Core Ultra 9 275HX processor, 32GB of RAM and a 1TB SSD. You also get a large 16-inch IPS screen complete with a high 2560×1600 resolution and smooth 240Hz refresh rate, as well as a good port selection and meaner black frame.
This HP option is going to run you £2999/$3119.99, which makes it slightly more expensive than its rivals, including the Medion Erazer Beast 16 X1 Ultimate (RTX 5080) and MSI Vector 16 HX AI A2XW (2025). The Asus ROG Zephyrus G16 (2025) is in the mix too, although it is slightly more expensive than all of the above.
Advertisement
I’ve been testing the Omen Max 16 (2025) for the last couple of weeks to see if it can do enough to take the crown as the best gaming laptop we’ve tested. Let’s take a closer look.
Design and Keyboard
Blander all-black chassis
Solid port selection
Tactile keyboard and smaller trackpad
Of the slew of these high-power premium gaming laptops I’ve tested recently, the Omen Max 16 (2025) just feels a little dull in the aesthetics department. It’s a thick black slab with a little bit of flair with HP’s Omen branding across the lid and on the inside, but there isn’t much else to it, whereas MSI and Medion have used contrasting colours and finishes to create something that looks altogether more exciting.
It’s a solid chassis, though, and feels substantial with a smooth, matte finish. There is a smattering of RGB across the front underside of the Omen Max 16 (2025), though for a little bit of welcome flair. At 2.68kg, it tips the scales with a similar weight to the competition, and can feel quite bulky and heavy. That is the way of these larger-screen gaming laptops, though.
Image Credit (Trusted Reviews)
Advertisement
The Omen Max 16 (2025) is blessed with a good selection of inputs, with the left side housing a pair of Thunderbolt 4-capable USB-C ports and a 3.5mm jack, while the right side has a USB-A port. This is joined on the rear by a second USB-A port alongside an HDMI 2.1 port and 2.5-gig Ethernet for wired networking. That’s pretty solid.
The keyboard here is a full-size one with a number pad, arrow keys and function row. It comes with a solid scissor-actuated feel that benefits from good tactility and a crisper keypress. There is some bright RGB lighting under finger if you want it for aiding after-dark working and adding to the overall aesthetic.
Image Credit (Trusted Reviews)
As for the trackpad, while responsive and accurate, I couldn’t help but it feel it was a little on the smaller side against the competition that can provide more real estate for your fingers.
Display and Sound
Bright screen with decent dynamic range
Okay colour accuracy and black levels
Speakers can be tinny at higher volumes
The Omen Max 16 (2025) can be specced either with an IPS or an OLED screen, depending on which model you go for; the SKU I have is the former, with a 16-inch 2560×1600 240Hz panel that benefits from a large, high-res and high refresh rate screen for detailed and responsive output.
Advertisement
It’s certainly one of the punchiest IPS screens I’ve used in recent times, with a peak SDR brightness of 522.2 nits alongside solid contrast and dynamic range with a measured 1080:1 contrast ratio. At that peak brightness, the 0.48 black level can leave them with a tinge of grey, although the 6500K colour temperature is perfect.
Image Credit (Trusted Reviews)
Colour accuracy is a mixed bag, with 99% sRGB coverage helping this laptop to be perfectly suited for productivity and workloads involving mainstream colours. However, the 79% DCI-P3 and Adobe RGB results are just shy of the 80% requisite level where I could theoretically recommend this screen for more colour-sensitive and creative tasks.
The Omen Max 16 (2025)’s speakers are fine for casual listening, although they can sound quite shrill and tinny at higher volumes. As is typically the case, you’re better off using a dedicated set of desktop speakers or a headset for much more immersive, high-quality audio.
Performance
Core Ultra 9 275HX provides fantastic performance
RTX 5080 in here is performing closer to a 5070 Ti
Immensely fast SSD
It’s gotten to the point where once I know the price of one of these 2025 gaming laptops, I can guess the specs – this Omen Max 16 (2025) doesn’t exactly spring any surprises with its internals, but that isn’t necessarily a bad thing.
Advertisement
It comes with the same power core as both the recent MSI and Medion options I’ve tested, with a potent Intel Core Ultra 9 275HX and RTX 5080 laptop GPU. This, in theory, means some serious gaming performance, not least from having Nvidia’s second-in-command laptop GPU inside.
The Core Ultra 9 275HX is a highlight, with a monstrous 24 cores and 24 threads split asymmetrically between eight Performance and 16 Efficiency cores, as well as a boost clock of up to 5.4GHz when needed.
In the Omen Max 16 (2025), it shows itself as one of the best laptop chips we’ve tested across the board in both the Geekbench 6 and Cinebench R23 tests. It’s on par with the Medion and MSI compatriots that also utilise this Arrow Lake Ultra chip to good effect, with strong single and multi-threaded results, even if Intel has ditched hyperthreading in recent times.
Test Data
HP Omen Max 16 (2025)
Cinebench R23 multi core
24489
Cinebench R23 single core
2242
Geekbench 6 single core
3079
Geekbench 6 multi core
18053
Image Credit (Trusted Reviews)
It’s with the presence of the RTX 5080 that things can either go very well or be quite disappointing. It can depend on whether this card is being used to its full power, as to whether we get class-leading results, or whether it performs more like a slightly better 5070 Ti, as it does in the ROG Zephyrus G16 (2025), where it is instead paired with a Core Ultra 9 285H.
Advertisement
I’m afraid to say that it’s more of the latter with the Omen Max 16 (2025), with results some way below both MSI and Medion’s competitors. At 1080p with no ray-tracing or upscaling, we’re getting 103.92fps in Cyberpunk 2077 and 106fps in Returnal. This comes alongside 125fps in Rainbow Six Extraction, which feels quite low for an esports title.
Going up to 1440p, Cyberpunk 2077 drops to 72.89fps, while Returnal sits at 79fps average. Weirdly, Rainbow Six Extraction’s result increased to 134fps – this was seen again with the ROG Zephyrus G16 (2025). These results are still more than playable, but they are just disappointing given how much better the competition is.
Image Credit (Trusted Reviews)
The DLSS Transformer model upscaler in Cyberpunk 2077 helped the 1080p result up to 104.35fps, and at the Omen Max 16 (2025)’s native 2560×1600 output, it was as high as 91.14fps – that is a win over MSI’s option. DLSS helped push the RT: Ultra result up from 47.66fps at 1080p all the way to 71.02fps, while at 2560×1600, it went from 29.37fps to 54.78fps – still some way behind.
Of course, coming with a 50-series card inside, the Omen Max 16 (2025) has Nvidia’s Multi-Frame-Gen tech inside that adds in up to three ‘fake frames’ for every traditionally generated one using the powers of AI for a perceivably smoother experience. This is designed to take advantage of higher refresh rate displays without much of a latency penalty, just as long as your base frame rate is high enough to mean the displayed image with MFG isn’t choppy or laggy.
Image Credit (Trusted Reviews)
Advertisement
With the maximum 4x multiplier applied, it took RT: Ultra Cyberpunk 2077 to 163.36fps at 2560×1600 resolution, and 225.77fps at 1080p, getting rather close to the 240Hz refresh rate of the screen.
The Omen Max 16 (2025) has 32GB of DDR5 RAM inside and a 1TB SSD that is of a solid capacity for storing a decent set of games and apps. It’s one of the fastest laptop SSDs I’ve tested, too, with measured speeds of 11381.14MB/s reads and 8662.27MB/s writes.
Software
Clean Windows 11 install
Minimal HP-specific apps
Not enough AI horsepower to be a Copilot+ PC
The Omen Max 16 (2025) comes with a clean Windows 11 install, with only the HP-specific app preinstalled. It’s Omen Gaming Hub, the brand’s catch-all app that allows you to do everything from checking on your system’s vitals to configuring its RGB lighting, and a lot more besides, including playing games over the cloud with Nvidia’s GeForce Now service.
As much as there is a Copilot key on this laptop for waking Microsoft’s AI assistant, this laptop isn’t powerful enough on the AI front to become one of Microsoft’s Copilot+ PCs with its extra AI gubbins.
Battery Life
Lasted for 2 hours 19 minutes in the battery test
Barely capable of lasting for half a working day
Advertisement
For the Omen Max 16 (2025), HP has put in a large 83Whr cell, which is slightly smaller than the 90Whr and 99.9Whr cells I’ve seen fitted to this laptop’s key rivals. As with MSI too, they don’t make any specific claims about endurance.
In the PCMark 10 battery test with the brightness at 150 nits, this HP laptop only lasted for 2 hours and 19 minutes, which is a disappointing result. Virtually-identically specced laptops from Medion and MSI have lasted for twice or three times as long as the Omen Max 16 (2025), and it’ll mean you’ll be spending a lot of time plugged into the mains. Of course, to get the maximum power out of this laptop, you’ll need to do that anyway.
It comes with a 240W DC charger that does a reasonable job of getting juice back into the Omen Max 16 (2025) fast, taking an hour or so to get back to 50%, while a full charge took two hours and 10 minutes.
Should you buy it?
The Omen Max 16 (2025) is a beefy laptop with its Core Ultra 9 275HX processor and RTX 5080 laptop GPU which means it performs decently in games.
You want better battery life
Where this HP laptop isn’t anywhere near as strong as its rivals is with its endurance, as it only lasts for a couple of hours before conking out.
Final Thoughts
The HP Omen Max 16 (2025) is a solid gaming laptop with decent levels of power, a good port selection and a bright, punchy IPS screen. Against key rivals though, the battery life isn’t as strong, it leaves some performance on the table and the design isn’t as eye-catching.
Both the Medion Erazer Beast 16 X1 Ultimate (RTX 5080) and MSI Vector 16 HX AI A2XW (2025) are slightly cheaper, have similar or better screens and much stronger endurance. They’re also more powerful, in spite of having the same components at their core. For the £2999/$3149.99 asking price of HP’s option, you can do better. For more options, check out our list of the best gaming laptops we’ve tested.
Advertisement
How We Test
This HP gaming laptop has been put through a series of uniform checks designed to gauge key factors, including build quality, performance, screen quality and battery life. These include formal synthetic benchmarks and scripted tests, plus a series of real-world checks, such as how well it runs popular apps and a series of standardised game tests that take advantage of the laptop’s internal power.
FAQs
How much does the HP Omen Max 16 (2025) weigh?
The HP Omen Max 16 (2025) weighs 2.68kg, making it quite a heavy laptop.
Test Data
Full Specs
HP Omen Max 16 (2025) Review
UK RRP
£2999.99
USA RRP
$3119.99
CPU
Intel Core Ultra 9 275HX
Manufacturer
HP
Screen Size
16 inches
Storage Capacity
1TB
Front Camera
1080p webcam
Battery
83 Whr
Battery Hours
2 19
Size (Dimensions)
356 x 269 x 33 MM
Weight
2.68 KG
Operating System
Windows 11
Release Date
2025
First Reviewed Date
11/07/2025
Resolution
2560 x 1600
Refresh Rate
240 Hz
Ports
2 Thunderbolt™ 4 with USB Type-C® 40Gbps signaling rate (USB Power Delivery, DisplayPort™ 2.1, HP Sleep and Charge); 1 USB Type-A 10Gbps signaling rate (HP Sleep and Charge); 1 USB Type-A 10Gbps signaling rate; 1 AC smart pin; 1 HDMI 2.1; 1 headphone/microphone combo; 1 RJ-45[19,42]
You can use a paperclip or small pin to gently open your iPhone’s SIM card tray.
Gently pushing the pin into the hole next to the SIM card slot will pop it open.
You can also try using a small earring or toothpick to open the SIM tray.
This article explains how to open an iPhone SIM card without an ejector tool. Instructions in this article apply to all iPhone models with a physical SIM tray.
How to Open iPhone SIM Card Tray With a Paper Clip
A paper clip is one of the easiest and most common objects to use when you don’t have an ejector tool.
Start with a small or medium-size paper clip.
Unfold one straight side, so it’s sticking out.
Stick the straight side of the paper clip into the SIM card ejector hole as far as it will go.
With the paper clip in the hole, use your thumb to press firmly until the tray protrudes. It should slide out slowly rather than pop out.
Finding the iPhone SIM Card Ejector Tool
The SIM card tool for ejecting the tray from the side of the iPhone comes in the box as long as your country and network-specific iPhone include it.
In the U.S., iPhones include documentation, such as legal notices and getting-started guides. The SIM ejector tool may be hidden in these papers. It’s a small piece of metal attached to a white piece of paper; this makes it easy to throw out accidentally.
If you can’t find the tool or bought an iPhone secondhand, there are other ways to open the SIM tray to add or replace a SIM card.
Try These Items to Eject a SIM Tray
The opening used to eject a SIM card tray is tiny. Although plenty of straight objects might work, the SIM hole requires something sturdy with a narrow dimension.
Watch your thumb when pushing any of these tools you may have around the house into your phone. Most of them are sharp and could pierce the skin.
Here are some ideas that have worked:
Paper clip: Most small and average size paper clips work by bending one side. If you don’t have a SIM removal tool, a paper clip works well.
Safety pin: Not all sizes of safety pins work. Find the smallest safety pin possible to fit inside the hole.
Earring: An earring works in a pinch. Take off the earring back and insert the post into the SIM tray hole. Be careful because soft materials such as gold bend easily.
Staple: A standard staple can come through in a pinch, but it may be hard to use because it is thin and flexible. A thicker, industrial staple is a better choice.
Mechanical pencil: To use a mechanical pencil, give it a few clicks to extend it farther than you would to write. Poke the point in the hole and give it a firm push. It’s challenging to use because of how brittle the lead is, but it’s a common item found around the house or in a backpack.
Toothpick: Most toothpicks are a little too wide for the iPhone SIM hole. Whittle away some of the wood to make it fit and break off the tip.
Fishing hook: Fishing hooks come in various shapes and sizes, so if you’re off on a boat and need an emergency SIM swap, try one of these.
Many cellphone carrier stores have extra SIM card ejector tools if you’d prefer to stay with a proven and guaranteed method of extraction.
iPhone Models and SIM Tray Locations
The SIM tray, a narrow oval with a tiny circle beneath it, is on the phone’s right side on most iPhones and sits flush with the side of the phone and isn’t visible if you’re using a phone case. On the earliest models, it’s on the bottom edge of the phone.
The iPhone XS Max was the first iPhone to switch the SIM card’s direction rested on the SIM tray. Instead of sitting in the tray facing you, the SIM card sits on the backside of the tray.
FAQ
How do I remove my SIM card from my iPhone safely?
To replace your SIM card, gently take the old SIM card out of the SIM tray and place the new one into the tray. A small notch indicates the SIM card’s orientation. Reinsert the tray the same way it came out.
Why does my iPhone say there’s no SIM card installed?
Tesla’s long-in-the-works 1950s-inspired diner and drive-in Supercharger station in Los Angeles is expected to officially open today – and the company may build more of them down the line.
Basically, it feels like one giant ad for everything Tesla, and this could be just the first of many. If the diner “turns out well,” Tesla CEO Elon Musk says that the company will establish more of them in major cities and “at Supercharger sites on long distance routes.” The company’s brand has taken a huge hit as of late due to Musk’s now-deteriorating relationship with President Trump and cratering sales.
Musk first announced his intention to build “an old school drive-in, roller skates & rock restaurant at one of the new Tesla Supercharger locations in LA” all the way back in January 2018, and Tesla filed a permit for it soon after. Progress slowed considerably since then, and although Musk promised in 2023 that the diner would be open “later this year,” the restaurant’s chef wasn’t revealed until earlier this year.
![“Unlock Gaming Excellence: MageGee Mini 60% RGB Keyboard – Ultra-Compact & Ergonomic for Gamers!”: Available now at [price_with_discount]](https://i1.wp.com/techdeals.net/wp-content/uploads/2025/07/Unlock-Gaming-Excellence-MageGee-Mini-60-RGB-Keyboard-–-Ultra-Compact.jpg?w=1920&resize=1920,0&ssl=1 "“Unlock Gaming Excellence: MageGee Mini 60% RGB Keyboard – Ultra-Compact & Ergonomic for Gamers!”: Available now at [price_with_discount]")


")


")
:max_bytes(150000):strip_icc()/GettyImages-1733640705-a498c6466a514c09aee883f8fec46ed8.jpg?w=1920&resize=1920,1267&ssl=1 "Pixel Watch 4 on the Way? Google Sets Event Date")
:max_bytes(150000):strip_icc():format(jpeg)/GettyImages-1733640705-a498c6466a514c09aee883f8fec46ed8.jpg)
 Review")


:max_bytes(150000):strip_icc()/GettyImages-743692241-5c2a56a346e0fb0001114b5e.jpg?w=1920&resize=1920,1267&ssl=1 "Open iPhone SIM Card Tray Without Ejector Tool")
:max_bytes(150000):strip_icc():format(jpeg)/IMG_4468-5c490d70c9e77c0001da2190.JPG)
