A good screencast is useful for all kinds of things, from making a how-to video to showing off a program you coded. Spectacle, an app you might know already for taking screenshots, is one of the easiest way to do that on Linux.
Spectacle Has Screen Recording (With the Right Setup)
Spectacle has been around for a long time as the KDE project’s screenshot tool that’s the default for Plasma desktops and available for many non-Plasma Linux desktops too. You can search your distro’s software browser for “spectacle” and it should come up.
It isn’t news to anyone on the cutting edge of Linux software using Spectacle, but the screenshot app as of version 23.04 a couple of years ago got the ability to make video recordings in addition to regular screenshots. I was happy to find this out because until then I’d been relying on SimpleScreenRecorder for screen captures. Its less-than-simple interface can be overwhelming, and the project appears to be abandoned; at the time of writing, it hasn’t seen an update since 2021, and unanswered bug reports are piling up. An up-to-date but simple screen-capturing app was just what I needed.
There are a couple of big caveats, though. For one, video capture only works with the Wayland windowing system. If your Linux distro is using X11, even the latest version of Spectacle won’t show you the screen record option. Depending on your distro, you might be able to switch from X11 to a Wayland session at your login screen, so try logging out and looking for that option.
Related
ShadowPlay for Linux? Make Screencasts With GPU Screen Recorder
This tool for recording games is just as good but built for Linux.
Another drawback to be aware of is that Spectacle currently does not record audio of any kind. It won’t capture sound from the software you’re recording, and it doesn’t integrate with your microphone to record your voice either. Audio capture is currently on the feature “wishlist” for Spectacle, but for now you’ll have to go without. I’ll cover some possible solutions at the end.
The Fastest Way to Start Recording
To start recording, you can open Specatcle from the application launcher and then click the Recording button. Why do that though when there are handy keyboard shortcuts? To start recording a specific part of your screen with Spectacle, just hit Meta+R, click and drag to form the area you want to record, and double-click.
A little red dot will appear in your system tray, and you can click it to immediately stop the recording. It may remain for a few seconds while the video saves, then you can then find the video file in your Videos/Screencasts directory.
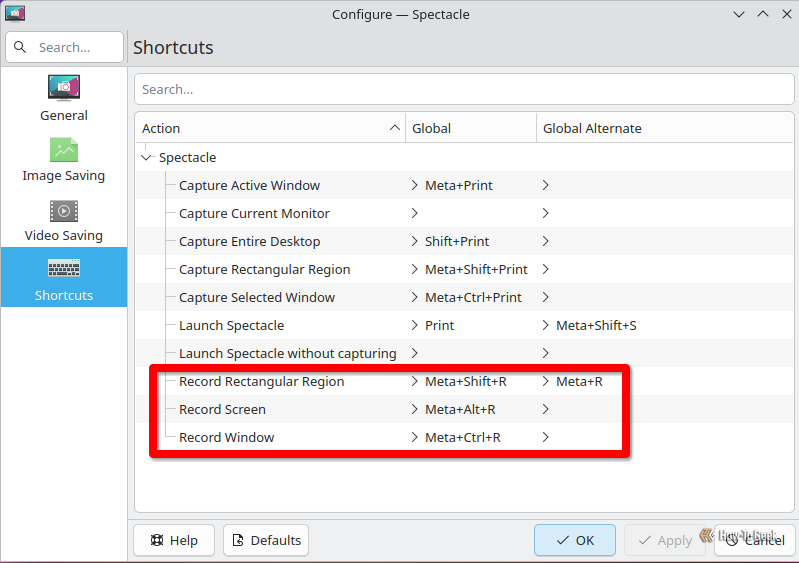
You have more options, though. Here’s a complete list of commands:
- Meta+R or Meta+Shift+R: Record a specific region of the screen
- Meta+Alt+R: Record the entire screen when you click
- Meta+Ctrl+R: Record the next window you click on
Every Useful Configuration Option for Spectacle Recordings
After playing around with Spectacle and fiddling with its settings, I figured out there were a few settings that might be worth changing.
Adjust the Keyboard Shortcuts
Three-part keyboard shortcuts can be hard to remember, and fortunately Spectacle lets you change them. If, for example, you record whole windows most frequently, you could assign the Meta+R global alternative to window recording instead of the rectangular region option. That way the shortcut you use most is the one that’s easiest to remember.
Of course you could assign any shortcut you want. Just make sure it isn’t an already existing shortcut, especially for any application you plan to record.
Force Spectacle to Remember a Region
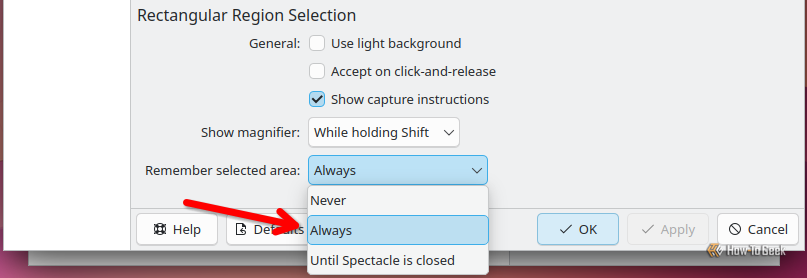
If you’re repeatedly capturing the same region of the screen, you can tell Spectacle to default to using the same screen region you recorded last, even after closing Spectacle. Just click the dropdown menu for “Remember Selected Area” and change it to “Always.”
Change the Video Format
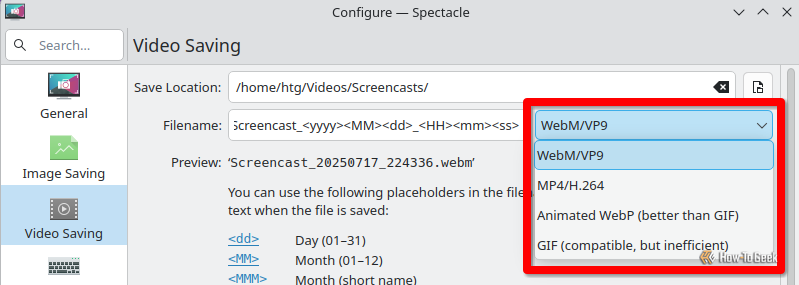
If you don’t want to save your screen capture as a WebM file, you can switch to MP4, to GIF, or to the WebP format in the settings.
Which one you should choose depends most on what application you plan to watch these screen recordings with, or which platforms you’ll be uploading to. YouTube will accept either MP4 or WebM, for example. Before you start making long recordings, make sure the format you’re using is the one you need.
With that said, though, I noticed weird artifacts in the video when I switched to MP4. There’s a possibility it was specific to my setup, but you should make some test videos and watch them to make sure you can’t spot any strange behavior.
Edit the Save File
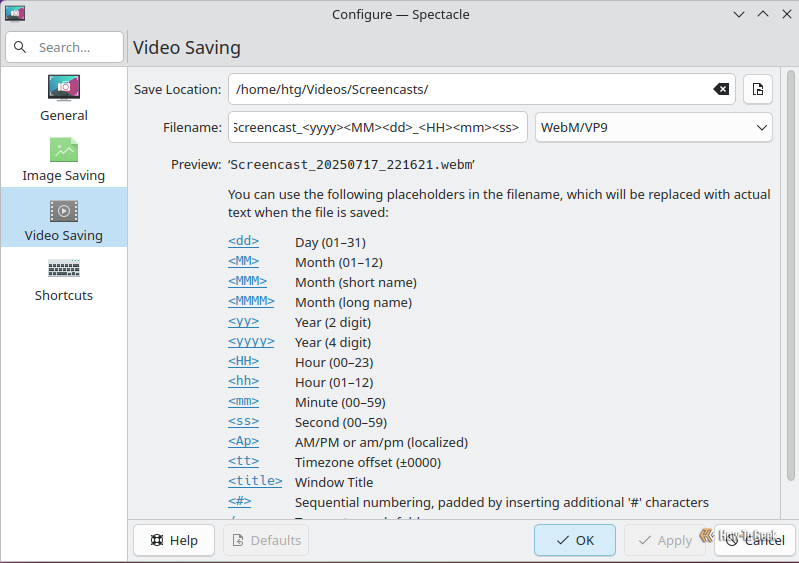
By default, Spectacle saves your file in the Screencasts folder. In the Spectacle configuration menu, though, you can tell Spectacle to put them somewhere else.
One use for this feature is automatic organization. For example, with the / operator you could have Spectacle create new subdirectories for each new calendar day. Just paste this into the Filename field:
/<MM><dd><yy>/Screencast_<yyyy><MM><dd>_<HH><mm><ss>
Or, you could create a subfolder for each window you record, with a number assigned to each new screencast:
/<title>/Screencast_<#>
Want to Record Your Voice? Try These Apps
Like I said earlier, Spectacle unfortunately can’t capture microphone audio. One workaround, if awkward, is to use Spectacle in combination with another KDE app called Recorder. It’s a dead-simple voice recording app that can save in a variety of audio file containers. Just hit the record button in Recorder, then hit Meta+R, and start recording video and audio at the same time.
You’ll end up with two separate files though, and you’ll have to combine them to form a complete video. I recommend Kdenlive for that job. Just import both files into Kdenlive and put the video in the video track and the audio file in the audio track. Since you probably didn’t start recording both at the exact same time, you’ll have to make adjustments in the timeline to the audio track so it syncs up with the video correctly. Then you simply export the project as a new video.
Related
This Linux Tool Makes Terminal Recording Easy
No need for full-fledged screen recorders.
Of course, if you want a fully-featured screen-capturing system, you’re probably going to want to record with OBS Studio. It’s not only free and open source, but it fully supports Linux, and can record software audio and microphone input at the same time.



:max_bytes(150000):strip_icc()/usbfeat-5c51f6e546e0fb00014c3a5d.jpg?w=1174&resize=1174,862&ssl=1)


:max_bytes(150000):strip_icc()/roku-tv-home-03dd537a373743748a21dbaf50932c53.png?w=1174&resize=1174,862&ssl=1)
Leave a Comment
Your email address will not be published. Required fields are marked *