
Quick Links
- Installing Extra Packages
- Updating Mamba Environments
If you’re a programmer, particularly in data science or analysis, you’ve probably suffered headaches over the packages included in a Linux distribution. What if there were a way you could have a separate programming environment for your projects that was isolated from the system without having to set up a virtual machine? Mamba might be what you need.
What Is Mamba?

Mamba is a package manager that’s intended for per-project use. It’s similar to a package manager that you find on a modern Linux system, but instead of managing software packages for the whole system, you create environments just for the packages you need for your project. Mamba is a reimplementation of the Conda package manager. Conda was originally written in Python, but Mamba was rewritten in C++ for extra speed.
Mamba, like Conda, is popular for data science, statistics, biostatistics, and data analysis. It seems to have an affinity with Python, given the snake-themed naming. The name seems to be chosen for the speed of the namesake snake, as Mamba is a faster version of Conda.
Mamba does a lot of the things you would expect a package manager to do, such as searching for packages, installing them, and keeping them updated. You create environments that you can activate or deactivate at will when you want to. You can install multiple environments on the same machine.
Why Mamba?
If you’re using a Linux or other Unix-like system for development, you might wonder why you’d need something like Mamba. Don’t you already have a package manager?
The software that’s installed in a package manager is meant for the system as a whole. Many systems include a Python interpreter, but that’s intended to run scripts and other programs that depend on Python, and not so much to support your programming projects. If you need a newer version of Python for your own code than the system supplies and you upgrade it, other scripts and programs that depend on the version supplied with your system might break.
Related
APT vs Snap vs Flatpak: Ubuntu Package Managers Explained (and When to Use Each)
If there’s one thing you get with Linux distros, it’s choice.
Mamba solves this problem by letting you create environments for a task that are isolated from the underlying system. If you’re working in data science or analytics, you can define an environment just for your work while leaving the base system untouched. You can activate your environment when you want to run some calculations and turn it off when you’re finished.
I’ve used Mamba for several pieces on HTG, including a recent one on building a laptop price predictor.
Installing Mamba
Installing Mamba is pretty simple in most Unix-like systems. I’ll demonstrate installing Mamba on a Debian Linux system.
You can follow some simple instructions to download and install Mamba right from the Mamba documentation page. First, you’ll want to download the Miniforge distribution. This is a minimal version of Mamba that has all the basic files you need to get started.
Assuming you have curl installed, all you have to do is paste in a line to download it on a Unix-like system:
curl -L -O "https://github.com/conda-forge/miniforge/releases/latest/download/Miniforge3-$(uname)-$(uname -m).sh"

After you’ve downloaded it, you can now run the installation script:
bash Miniforge3-$(uname)-$(uname -m).sh

The script will ask you to press Enter if you want to continue, then review some licensing terms. Since Mamba is open source, this probably won’t be a problem for you. You’ll have to type “yes” or “no” to accept or decline the licensing terms. To accept and continue with installation, type “yes” at the prompt.
After that, you’ll have to confirm the directory where you want to install your Conda packages. By default, it will be in your home directory with a “miniforge” subdirectory.
When miniforge is installed, you’ll then get a prompt to edit your shell’s default startup script, such as .bashrc or .zshrc, depending on which shell you’re using, to start Mamba up automatically when you start a shell. You’ll probably want this if you plan on working with Mamba extensively. This’ll make it easier to activate and deactivate Mamba environments. Type “yes” again to confirm it.
Create an Environment
When you open a new terminal, you may have noticed something different about your shell prompt. You’ll see something that says “(base)”. This means that Mamba has been activated with the base environment. That’s exactly what it sounds like: a minimal base environment. You can check this by typing “python” at the prompt. In the introduction message, you can see that this version of Python was “packaged by conda-forge.”

You can install other packages into this base environment, but you don’t want to. The point of Mamba is to have all the packages you need in one environment, and others you need for a different project in another environment.
It’s easy to create environments. To create an environment, you use the mamba create command with the “-n” option followed by the name of the environment you wish to create, then the list of packages you want to install in this environment.
For example, to create an environment for statistical computing named “stats” with the NumPy, SciPy, and pandas Python packages, use this command:
mamba create -n stats numpy scipy pandas

Like any other package manager, it will determine the packages and their dependencies, and finally ask you to confirm their installation. Since the installation is done in your home directory, you don’t need to use sudo or supply a root password.

To activate the stats environment, use the “mamba activate” command:
mamba activate stats

You’ll see the name of the active environment change from “base” to “stats” in the prompt. You can now use the packages you installed in this environment.
Let’s test this out by running the Python interactive interpreter.
We can import NumPy and have it work.
        import numpy as np
np.mean([1,2,3,4])
It will report the answer as a floating-point number of 2.5.
A lot of the time, you realize you might want to add packages to your existing environment. For example, I like the IPython interpreter over the standard interpreter. I can add it in one of two ways.

Related
Linux Terminal for Beginners: How to Install and Remove Software
Let me turn you into a Linux terminal power user!
I can add it using the -n option with “mamba install”
mamba install -n ipython

I can also run “mamba install” within an active environment to install the package in that environment. Since “stats” is already active, I’ll do that. It’ll ask me to confirm the changes and then install IPython.
I can run IPython at the shell:
ipython
To deactivate an environment when I’m done with it, I can use the “mamba deactivate” command. To prove that IPython was installed into the “stats” environment, when I try to run it, I get the “command not found” error after deactivation.
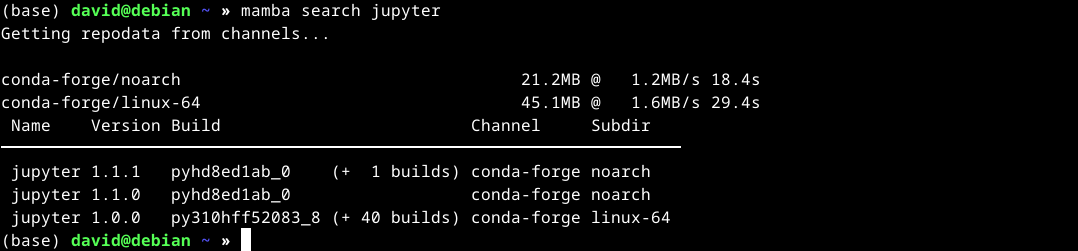
To find packages, you can use either the “mamba search” or “mamba repoquery” search commands.
For example, to find packages relating to Jupyter, a popular notebook interface for scientific computing:
mamba search jupyter
 Updating Mamba Environments
 Updating Mamba Environments
As with other package managers, Mamba is handy at keeping packages updated as new versions become available. You can use the “mamba update” command.
For example, to update all the packages in the stats environment:
mamba update --all -n stats

Alternatively, you can use “–update-all” instead of “–all” in the command, but the latter is shorter. Since this is a fresh install, there’s nothing to update when I run this command.
With Mamba, you can create environments suited to your programming projects, activate and deactivate them, and update them at will. It might seem strange having a package manager on top of your package manager, but using Mamba will make your programming project go much more smoothly.


Leave a Comment
Your email address will not be published. Required fields are marked *