Inbox Zero isn’t about constantly reacting to email—it’s about streamlining your email workflow and reclaiming control. Microsoft Outlook helps me with sorting, filtering, and handling emails to maintain an uncluttered, action-oriented inbox.
Microsoft offers four Outlook experiences, namely New Outlook, Classic Outlook, Outlook on the web, and Outlook.com. The instructions in this article are indicative—the navigation and screen elements might be a little different in your case.
You’re in the middle of deep work, and suddenly your inbox pings with an eye-catching subject like “30% off—today only!” Even if you don’t open it, it steals your attention for a split second. Multiply that by ten or twenty similar emails, many of them unsolicited, and you’re looking at a serious focus drain.
Newsletters, product updates, and promotional emails can be informative—but not urgent. They also clutter your inbox, making it harder to focus on important messages.
Outlook rules allow you to filter emails based on keywords or sender addresses so that you can move them out of your main inbox. This helps reducing distractions and helps you focus on actionable communication.
- In Outlook, go to Settings.
- In the window that opens, click Mail in the left pane, and then click Rules.
- Click Add new rule.
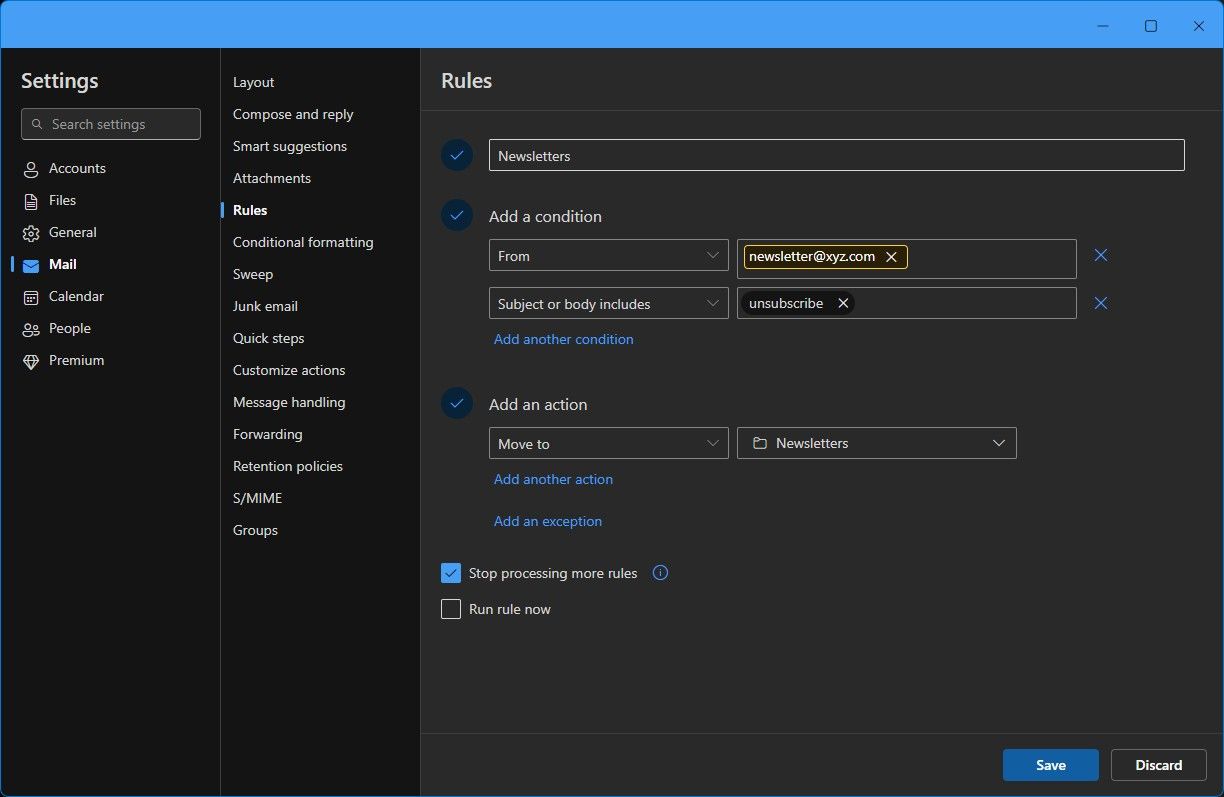
- In the field numbered 1, give your rule an identfiable name.
- In the field numbered 2, you’d need to add the conditions for the rule. You can select From in the drop-down menu and then add known senders of newsletters and promotional mailers.
- Additionally, you can choose Subject or body includes option from the drop-down menu and then specify keywords that are often present in these emails, like unsubscribe, special offer, promo, etc.
- In the field numbered 3, add the action that happens when the conditions specified above are met.
- Choose Move to and then add the folder where all these emails have to be directed to.
Optionally, you can also Add an exception if you want to exclude emails from a specific sender or with certain keywords. It’s a good idea to check the Run rule now option so the rule is processed not just on the incoming email but on the existing email messages in the inbox. Click Save to finish.
It’s often best to combine conditions or create multiple rules targeting different types of newsletters and promotions for better accuracy.
These emails often make up a large percentage of incoming mail, and therefore, this is perhaps the most impactful rule for decluttering your inbox. It also allows you to batch-process these less critical emails at a time that suits you, rather than having them constantly interrupt your workflow.
That said, this rule does come with a risk of missing time-sensitive Information if you don’t check the designated folder frequently enough. If you never check it, it just becomes a digital dumping ground.

Related
5 Best Newsletter Reader Apps to Declutter Your Inbox Today
Free your inbox from newsletter clutter, and read them in a cleaner format in one place through these excellent newsletter reader apps.
Certain emails—like a query from your client or an urgent message from your boss or a site down alert from your hosting service—demand an immediate response. You can set up an Outlook rule to prioritize emails that require immediate action while preventing them from getting lost in the clutter.
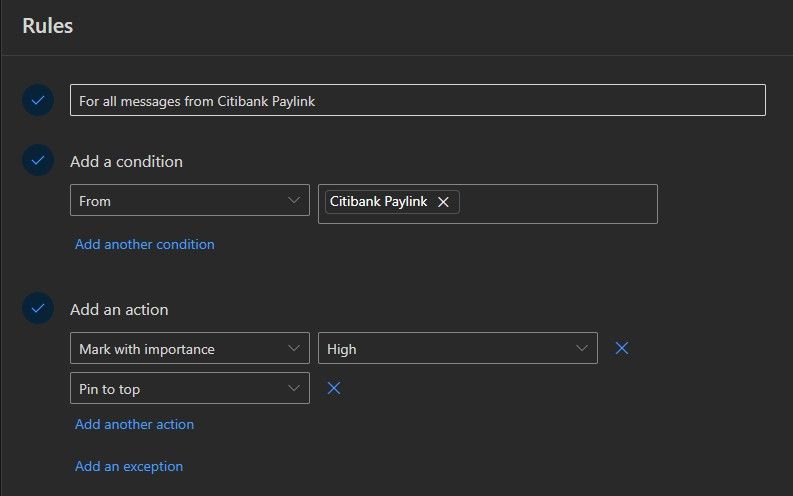
All you need to do is create a rule that applies to emails received from specific addresses or domains.
To specify the condition, choose Mark with importance in the drop-down menu, and then specify the importance as High, Normal, or Low. Or you can choose the Categorize option to specify a category color making those emails stand out visually in your inbox.
Some people also prefer to use the Pin to top option so that the important emails to be addressed are stacked at the top of your inbox.
Not all emails are created equal. Communication from your manager or important clients, key contacts or direct reports, or any email alerts that you have signed up for often requires faster attention or higher priority. This rule automatically flags these incoming emails and helps you prioritize your responses effectively.
Be mindful that over-flagging can lead to alarm fatigue. If you include too many people or use this rule for semi-important senders as well, the visual urgency becomes diluted. Be selective and revise your list quarterly.
4
Auto-File Completed Task Emails
Once you’ve responded to or completed an email-based task, manually filing them can be tedious. Instead, automate the process!
Let’s say you’ve been going back and forth with a vendor about an invoice. Once it’s resolved, you reply with Approved. A rule that detects certain closing phrases or categories can move it to a Completed folder for you.
At work, if you use project management tools or ticketing systems, you likely receive numerous email notifications about task updates, comments, and completions. Emails confirming a task is done or a ticket is closed often just add clutter. This rule ensures your inbox contains only pending items while archiving finished tasks automatically.
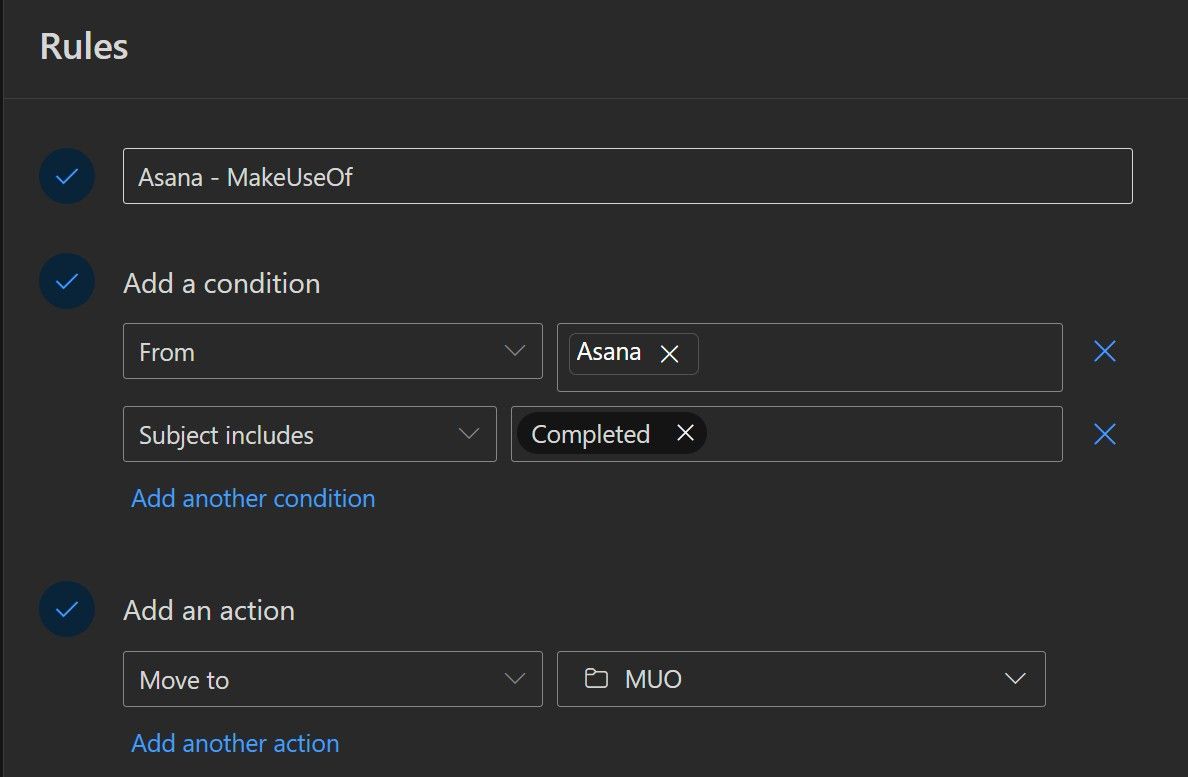
All you need to do is create a rule that moves done emails into a specific folder. There are a couple of ways to do this.
There’s the phrase-based approach. For the rule, add conditions such as specific phrases in the body like resolved, done, completed, or no further action and set the action to move the message to a Completed folder. Alternatively, you can categorize manually and set a rule to move messages of a certain category to your archive folder.
Once an email task is completed, keeping it in your inbox adds to visual clutter. Automatically filing done emails helps maintain clarity while still preserving a record.
This rule can misfire if phrases like completed appear in a different context. It’s best used with a bunch of filters to avoid false positives. You’ll need to be a tad more watchful with this one.
3
Redirect CC Emails to a Separate Folder
In a work setting, team members often CC you on emails for visibility rather than requiring direct action. You’re also often copied on team-wide updates or announcements. It’s useful to stay informed, but it buries your actual action items under a sea of secondary communication.
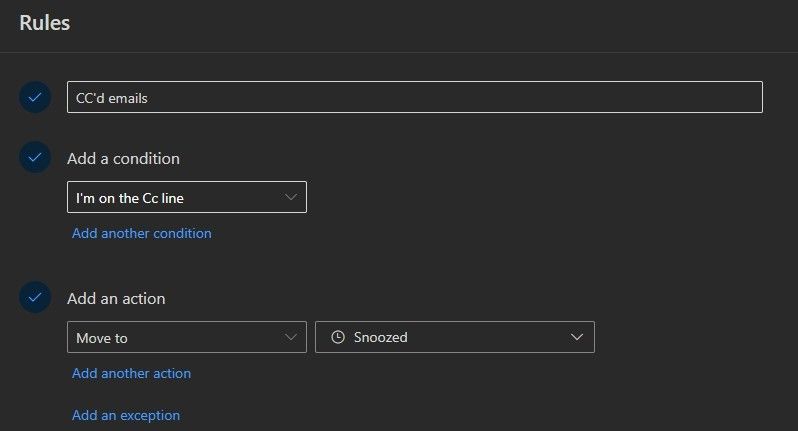
To keep these emails separate from actionable ones, create a rule that moves CC emails into a separate folder. You’d need to set the I’m on the cc line condition with your email address and redirect these emails to a folder like CC Emails.
This rule works best with exceptions. You can choose a From option to add key contacts whose CC emails you always want to se immediately. Or use the Subject or body includes condition to specify certain words, like “urgent” or “action required,” that indicate a CC’d email might still need your attention. And, of course, if the Importance is marked as High, you’d not like to file these CC mails since they may be high priority.
If you’re only CC’d, the email is usually FYI—not requiring immediate action. Keeping CCs out of your main inbox helps reduce noise and preserve focus on items you’re directly responsible for.
However, some CC’d emails do require action. You might miss important info if you assume every CC is passive. Plus, some people use CC incorrectly when they actually expect input. Therefore, I’d recommend reviewing your CC folder once every few hours, not just at the end of the day.
2
Block Spam and Unwanted Emails
You signed up for one webinar, and now you’re getting daily follow-ups and unrelated offers. You’ve tried unsubscribing from a mailing list, but the emails keep coming.
Spam emails and unwanted subscriptions can be annoying. These emails aren’t just irrelevant—they clutter your thinking and distract from meaningful tasks. While Outlook has built-in junk email filtering, explicitly blocking persistent spam and unwanted marketing emails provides an extra layer of defense.
Outlook allows you to block senders and filter specific types of messages. This keeps your inbox cleaner, saves you time deleting repetitive unwanted mail, and helps in reducing the risk of interacting with potentially malicious phishing emails.
Define rules to filter emails containing common spam words like win a prize or limited-time offer and set them to move these messages to the Junk Email folder. Additionally, every time you get an unwanted email, right-click the email, click on Rules, and then click Create rule. You can then set Outlook to move messages from this sender to the Junk Email folder—or even the Deleted Items folder.
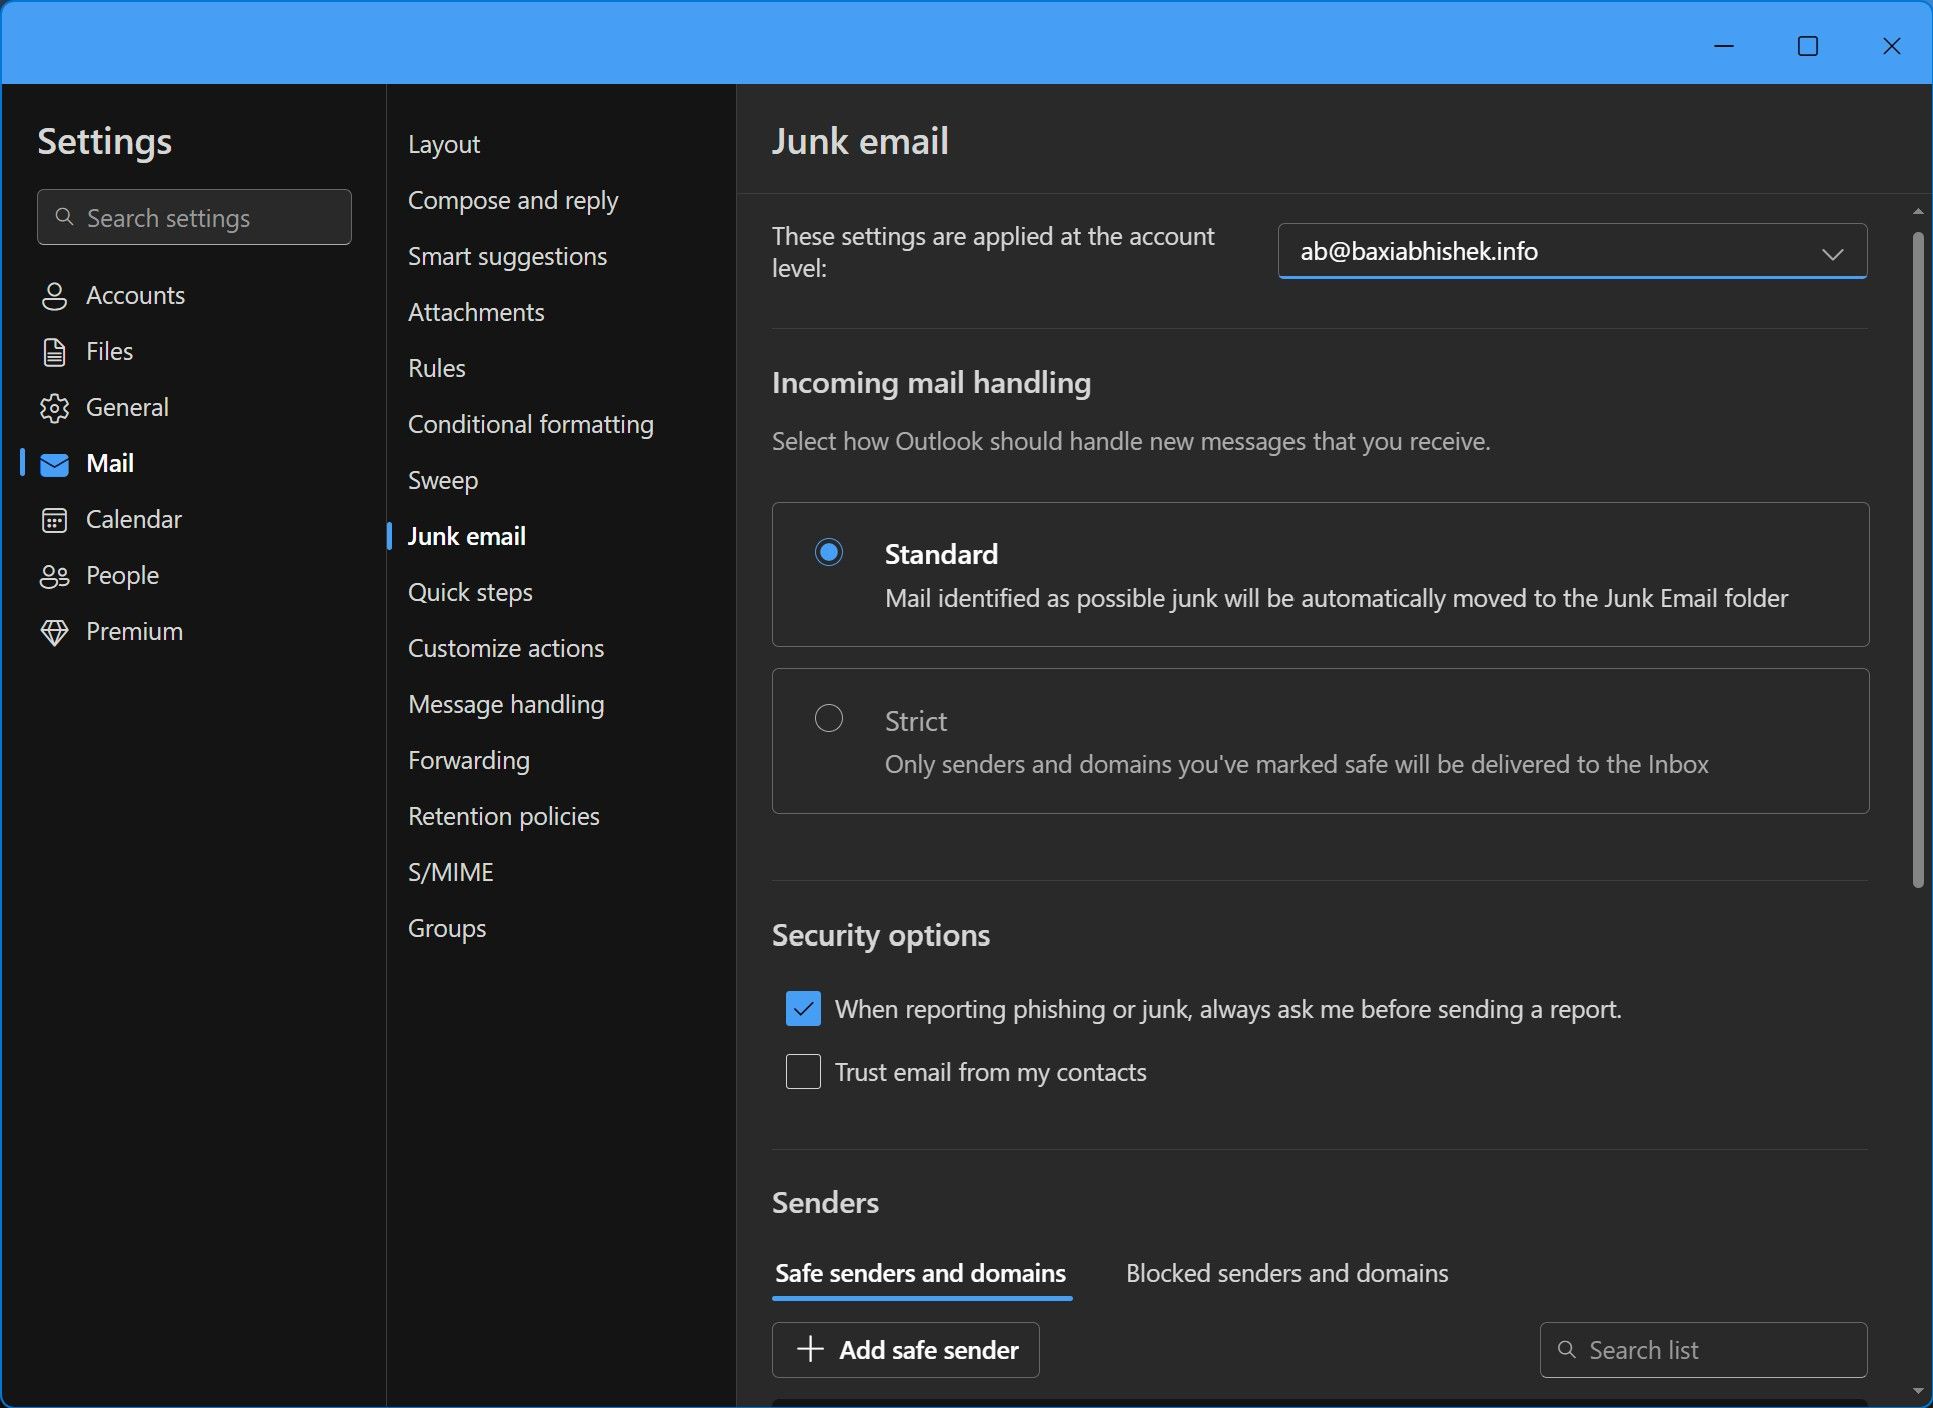
Apart from it, you should set up and customize the Junk email options in Outlook.
- In Outlook, go to Settings.
- In the window that opens, click Mail in the left pane, and then click Junk email.
- Select your preferred option of Incoming mail handling—the Standard option moves messaged identified as junk to the Junk Email folder while the Strict option delivers only the messages from senders and domains you’ve marked safe to your inbox.
- Under the Senders section, you can also Add blocked sender. This adds the sender to your Blocked senders and domains list and future emails from them should go directly to the Junk Email folder.
- Additionally, you can specify the Security options as well as add or modify safe senders.
The biggest risk, especially with deletion rules or overly aggressive Junk settings, is blocking or deleting legitimate emails. If you’re overzealous, legitimate messages can get deleted without notice. Always check your Junk folder once a week to rescue any false positives.
Also, spammers frequently change sender addresses, domains, and subject lines, so manual blocking rules may require constant updating to remain effective.
1
Set Up End-of-Day Cleanup Rules
You’ve read or replied to most messages at the end of your workday, but a few are still sitting around. They don’t need to linger. Before logging off, ensure your inbox is tidy using automated cleanup rules.
This isn’t typically a single, fully automated rule running constantly, but rather a combination of techniques or manually triggered actions. The goal is to achieve that final Inbox Zero state before signing off.
For example, define a rule that moves read mails to the Archive folder. Use conditions like Flag from the drop-down menu and chose the Mark as read option. But instead of enabling these rules to run automatically, you can choose to run the rules manually at the end of the day.
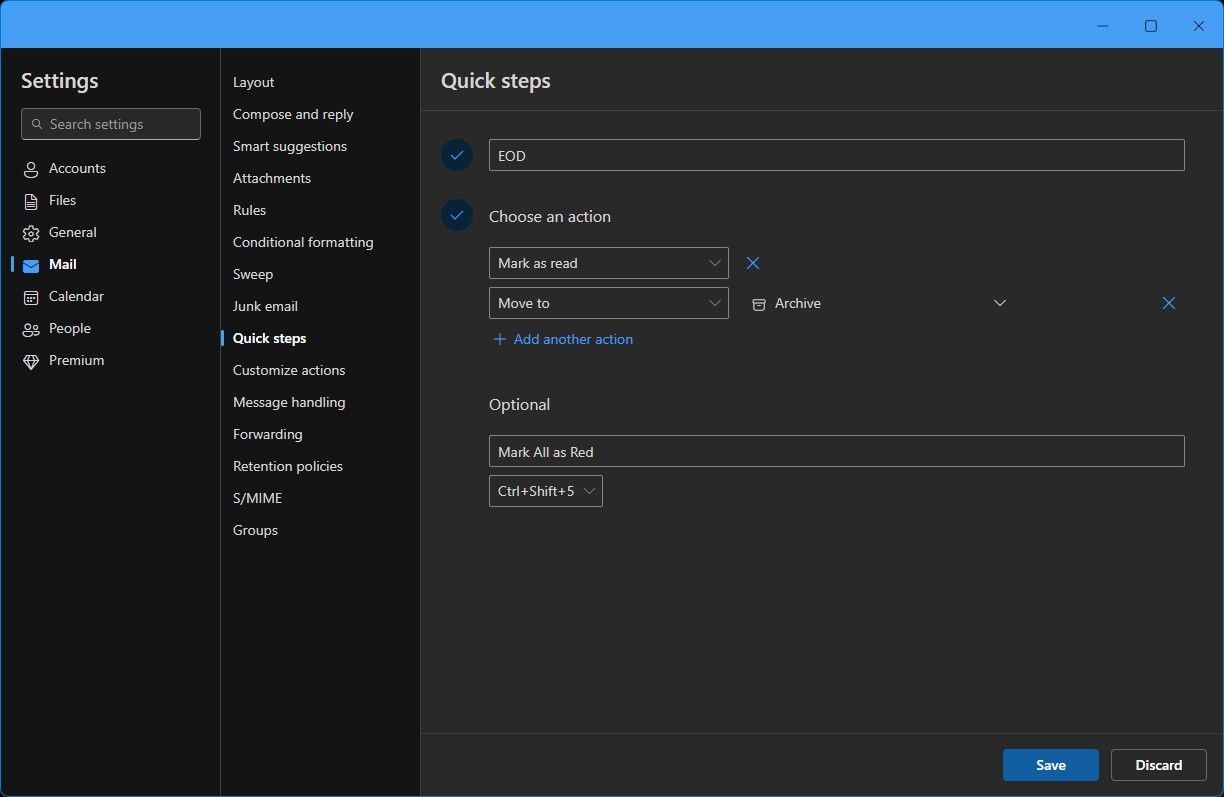
You can also use Quick Steps to automate a series of steps in Outlook. It’s a more practical way to achieve this end-of-day cleanup.
- In Outlook, go to Settings.
- In the window that opens, click Mail in the left pane, and then click Quick Steps.
- Click Add quick step.
- In the field numbered 1, give the step an identifiable name.
- In the field numbered 2, add common actions that you frequently do at the end of the day.
- Specify the description of the quick step, and optionally, assign a keyboard shortcut to execute the action faster.
At the end of the day, all you need to do is select all the emails you want to archive and trigger the relevant Quick Step. A final sweep at the end of the day helps you reset and start the next workday with a fresh, clutter-free inbox.
These rules require some trial and error. Be cautious and adjust filters until they fit your workflow.

Related
How to Fix Outlook Rules Not Working on Windows
Those who say “rules are meant to be broken” have never used Outlook before. Bring structure back into Outlook with these Windows tricks.
Outlook rules provide a powerful framework for taming your inbox and achieving an Inbox Zero workday. But remember, this is a system, not a magic bullet.
It requires initial setup, occasional tweaking as your needs or email patterns change, and the discipline to check designated folders and perform end-of-day cleanups. The payoff—less email stress, improved focus, and faster response times—is well worth the effort.




Leave a Comment
Your email address will not be published. Required fields are marked *