Have you ever wished for a macOS Spotlight-like feature on Windows or wanted to find out exactly which shade of blue is used in How-To Geek’s status bar? You can achieve these features and many more using Microsoft PowerToys, which has been available since the Windows 95 days.
Fun Fact: Microsoft Powertoys Is Almost 30 Years Old
I’m quite sure that you have only been hearing about Microsoft PowerToys for the past couple of years. However, you might be surprised to learn that the tool isn’t new—it was first launched in 1995, just after the release of the iconic Windows 95. At that time, it was called Windows 95 PowerToys and included only a handful of utilities like CabView, Round Clock, CDAutoPlay, and a few others.
The tool performed very well; as a result, the developers released a second edition of Windows 95 PowerToys with many new features such as FindX, XMouse, Tweak UI, and more. Almost a decade later, Microsoft released the next version of PowerToys, designed for Windows XP. The new tool was completely different from its predecessor, and users were required to uninstall the Windows 95 PowerToys in order to install it.
PowerToys for Windows XP included unique tools such as the CD Slideshow Generator, Color Control Panel Applet, Image Resizer, Power Calculator, and many more. Interestingly, Microsoft offered all these tools as separate downloads instead of bundling them into a single package.
For 12 years after the release of PowerToys for Windows XP, the tool did not receive any updates from Microsoft. However, things changed in 2019 when Microsoft re-released PowerToys as an open-source application for Windows 10. The first version of the new PowerToys introduced two new tools: FancyZones and the Windows Key Shortcut Guide.
Since then, the tool has been available on the Microsoft Store and has continuously received updates, with new toys being added with almost every update. With that said, here are some of the latest Microsoft PowerToys features that I use regularly.
Command Palette
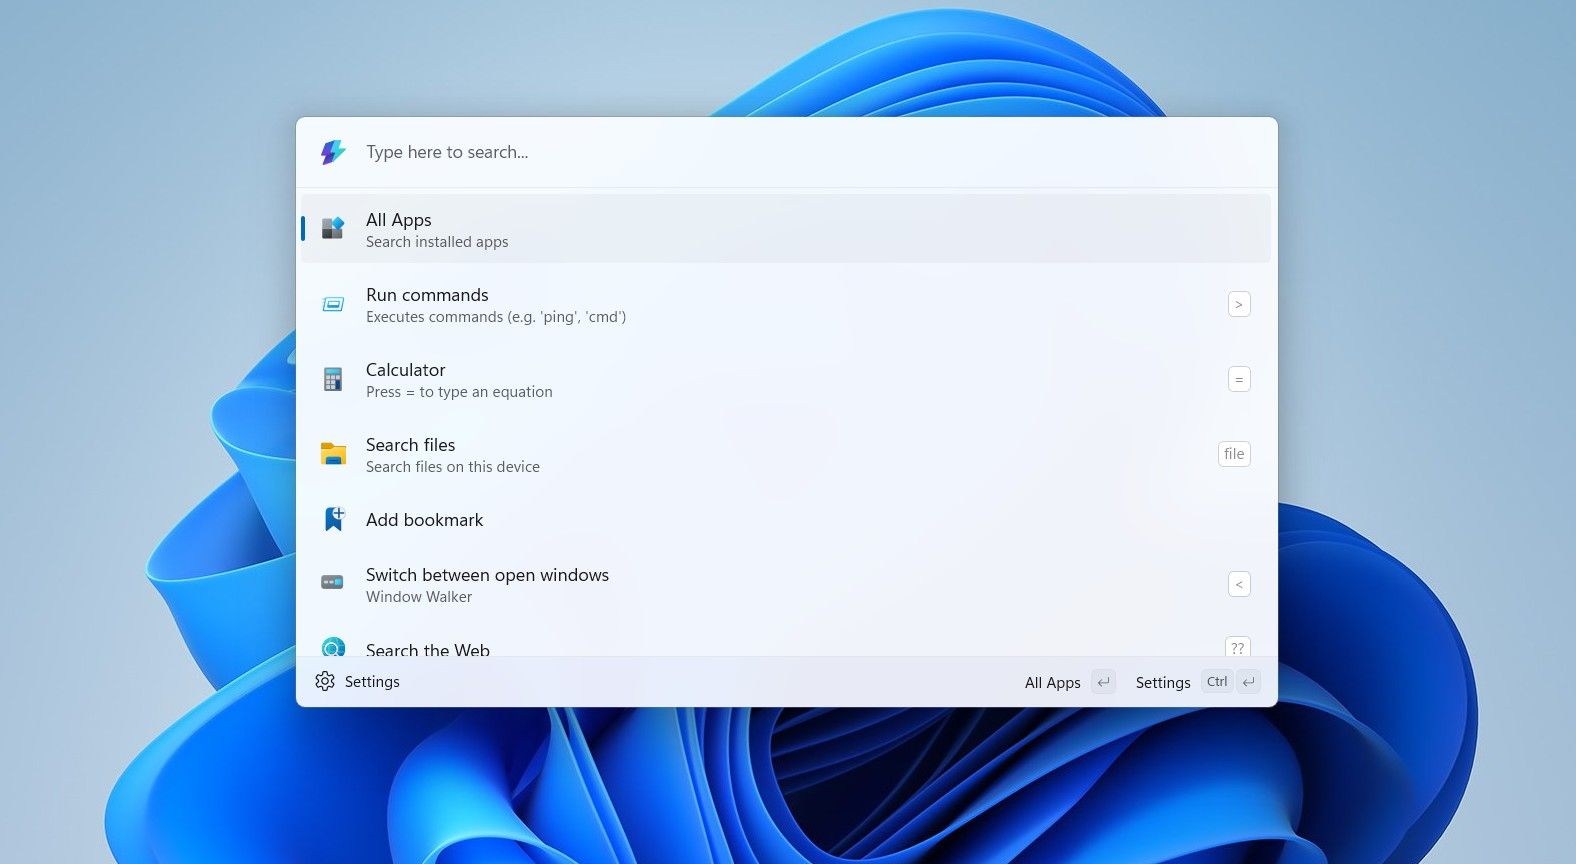
The first time I used macOS, I was really impressed by its Spotlight feature, which allowed me to search for almost anything from anywhere on the system. Microsoft took inspiration from this and introduced its own Spotlight-like feature called Command Palette, which is accessible via PowerToys.
By default, the Command Palette can be accessed by pressing the Win+Alt+Space keys. Note that you can change the key combinations for Command Palette as well as for all the other PowerToys features I mention below through the PowerToys Settings window.
That said, you can use the Command Palette to search for files and apps, perform simple mathematical calculations, and conduct web searches. You can also use it to run commands. For instance, if you want to open Command Prompt through it, then you need to type >cmd and hit Enter.
Always On Top
Always on Top is one of those features in Microsoft PowerToys that you’ll often find me using whenever I am researching for my articles. You can activate the feature using the Win+Ctrl+T key combination, and it allows you to pin the active window above other windows.
For instance, if you’re reading a research paper and want to note down some important details from it in Notepad, you can pin Notepad using the Always on Top feature. This saves you from the extra clicks of opening Notepad from the taskbar every time you want to jot something down.
Once your work is done, you can unpin the window using the same activation shortcut. Just a heads-up that the feature does not work when Game Mode is enabled and you are actively playing a game on your computer.

Related
I Use This Free Tool as My Go-to Solution for Most of My Windows Needs
Managing Windows has never been this easy.
Workspaces
If you have a list of applications that you always open first whenever you boot your Windows computer, then I highly recommend you use the Workspaces feature of PowerToys. Let’s say you always open five applications whenever you turn on your computer; then, instead of manually opening each application one by one every time you start your system, you can create a workspace that includes these applications. Then, you can simply open the workspace to automatically launch all of them at once. Let me make it more clear through an example.
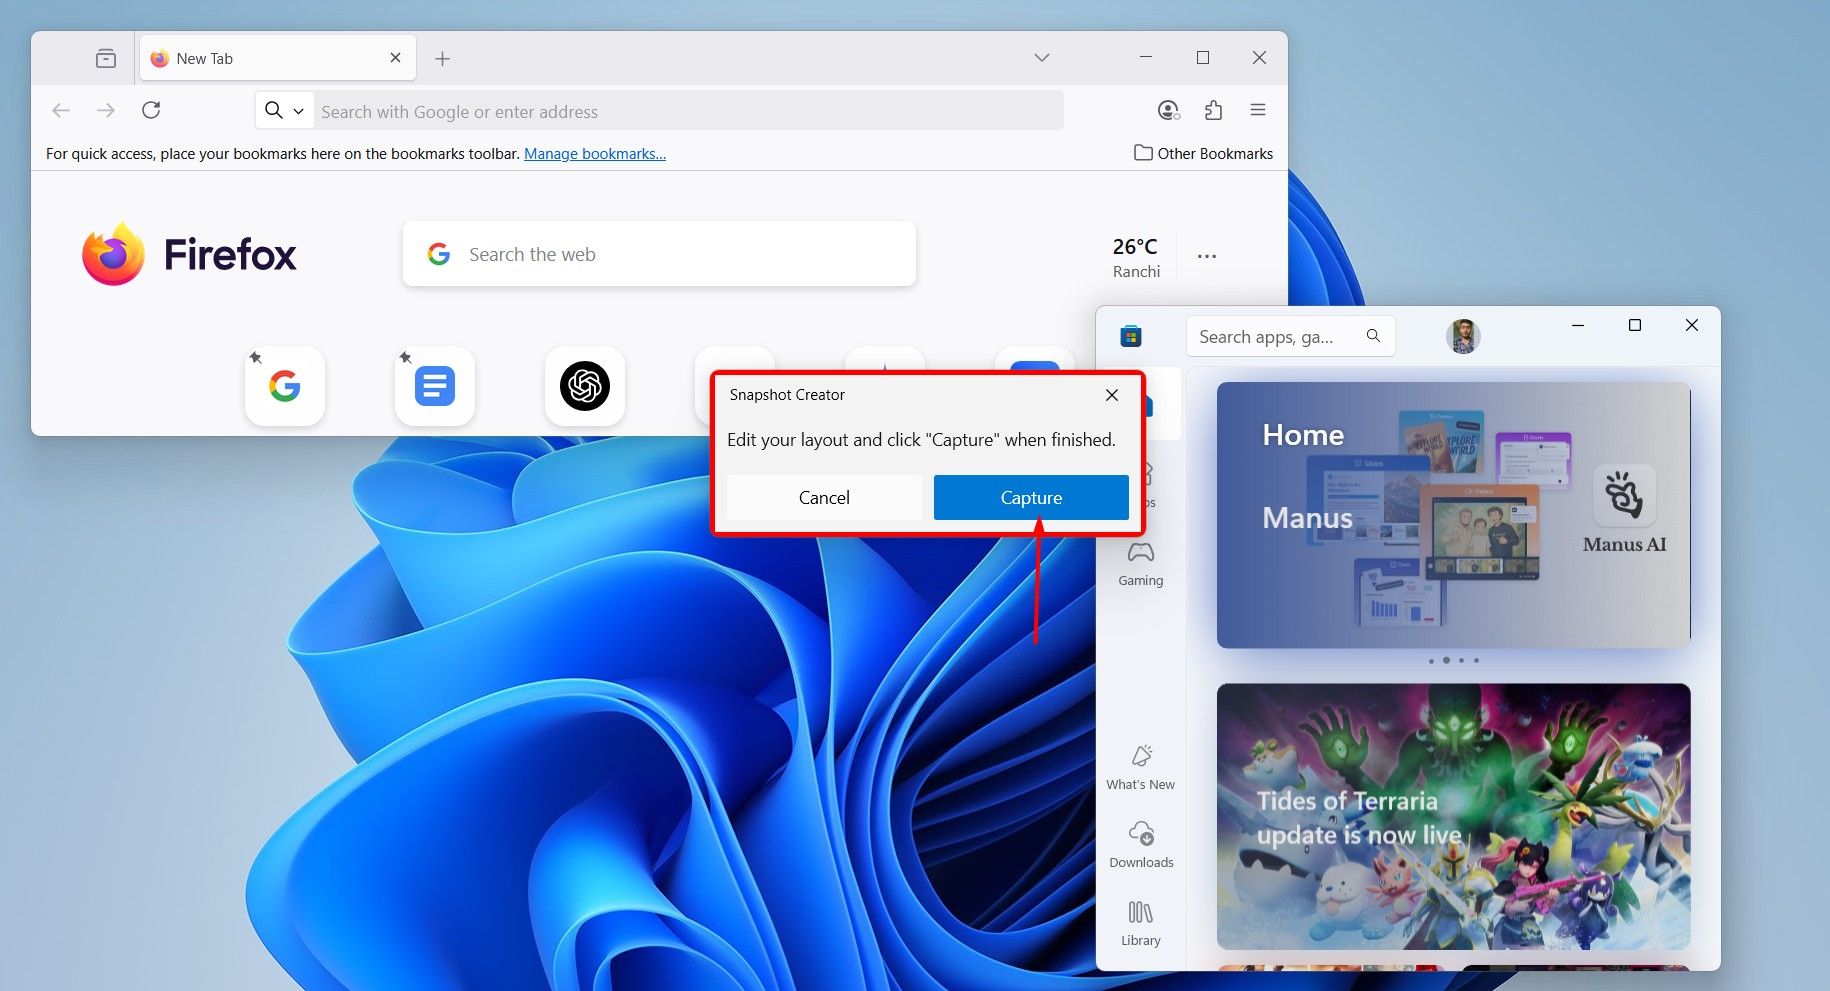
First, press the Win+Ctrl+’ key combination to launch the Workspaces window. Then, click the “Create Workspace” button in the top-right corner to open the Snapshot Creator dialog box. Now, you need to open all the applications you typically launch on each system startup and arrange their locations and window sizes on the screen.
Once you’ve done that, click the “Capture” button.
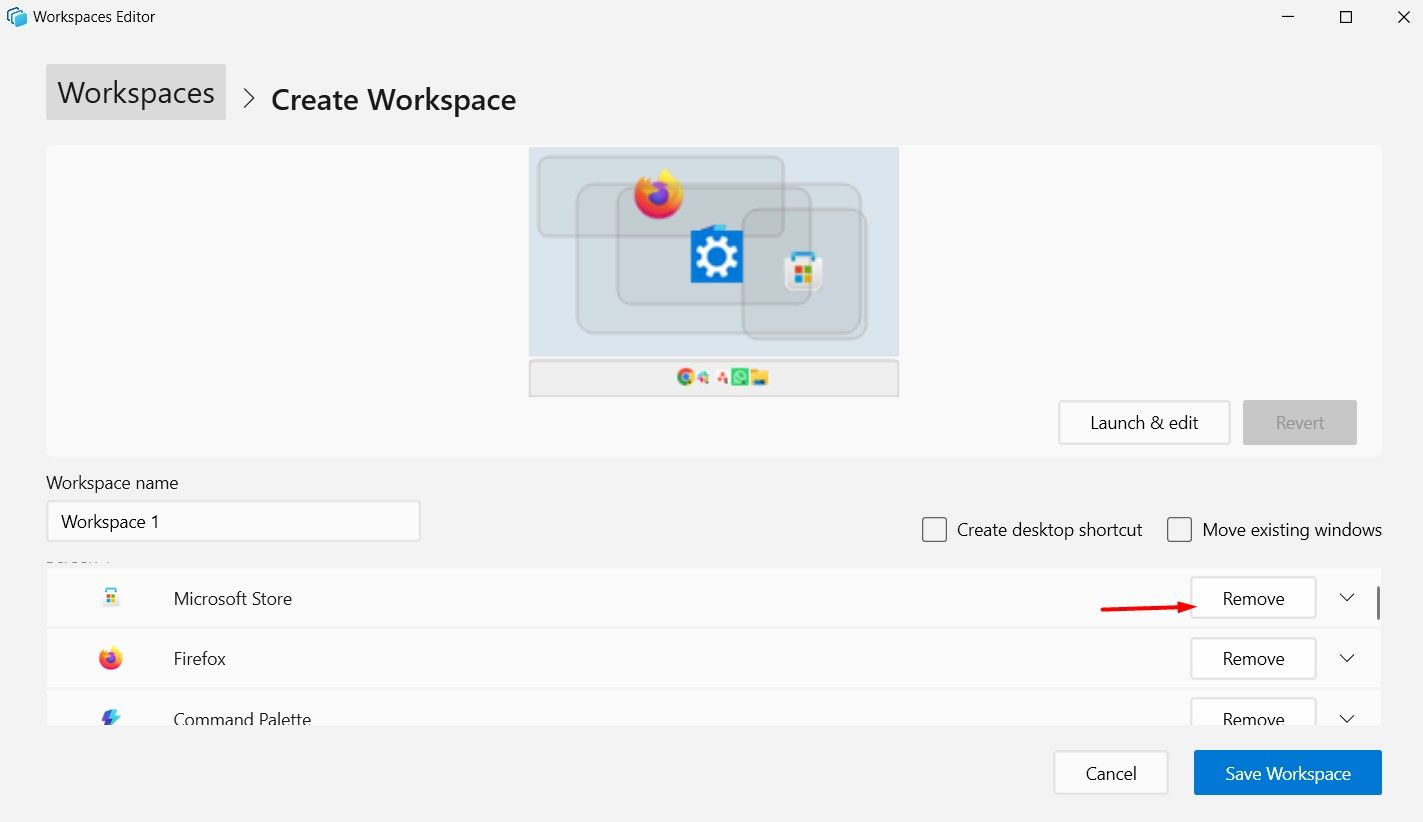
In the Workspace Editor window, you will see all the apps you selected to open with the workspace. To remove any app from the list, click the “Remove” button next to it.
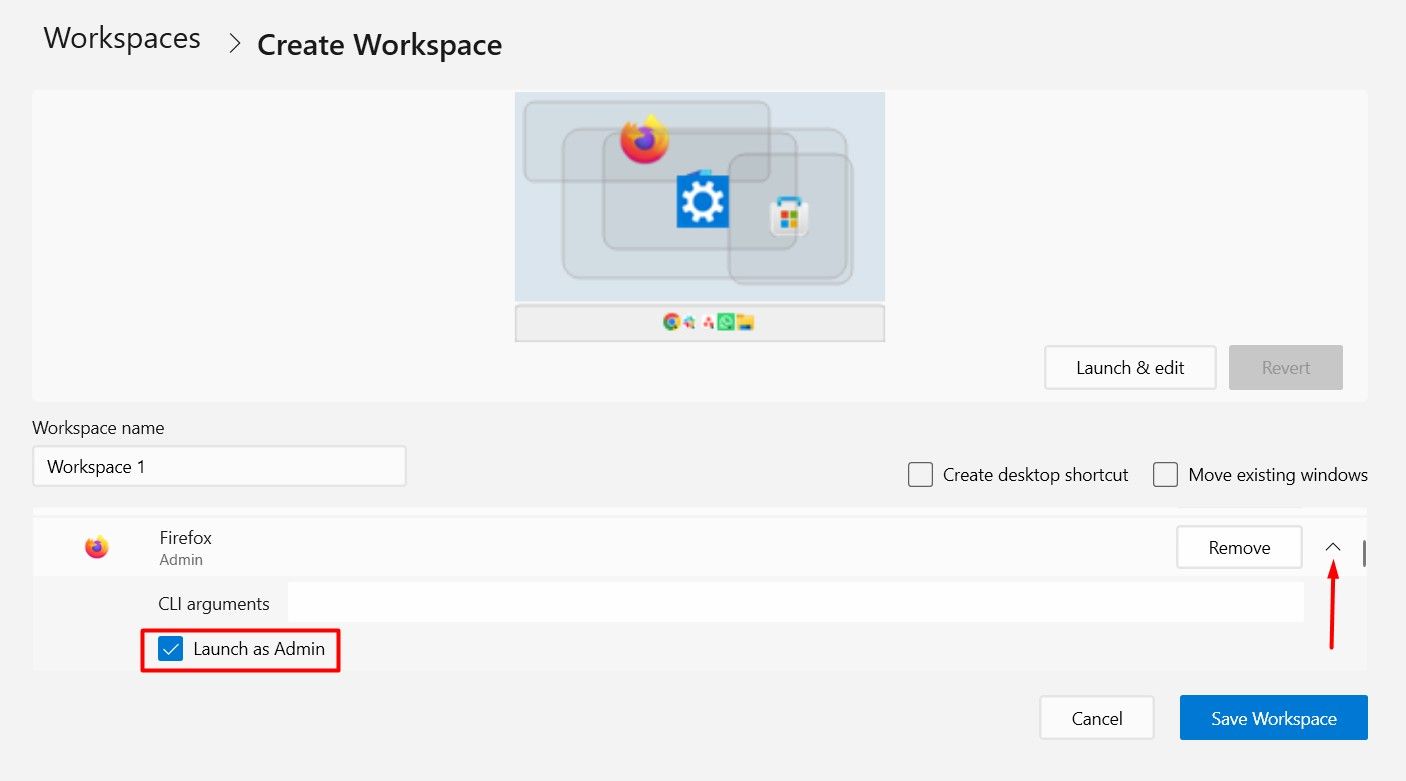
If you want to launch any of the listed programs as administrator, then click the arrow next to it and check the “Launch As Admin” option.
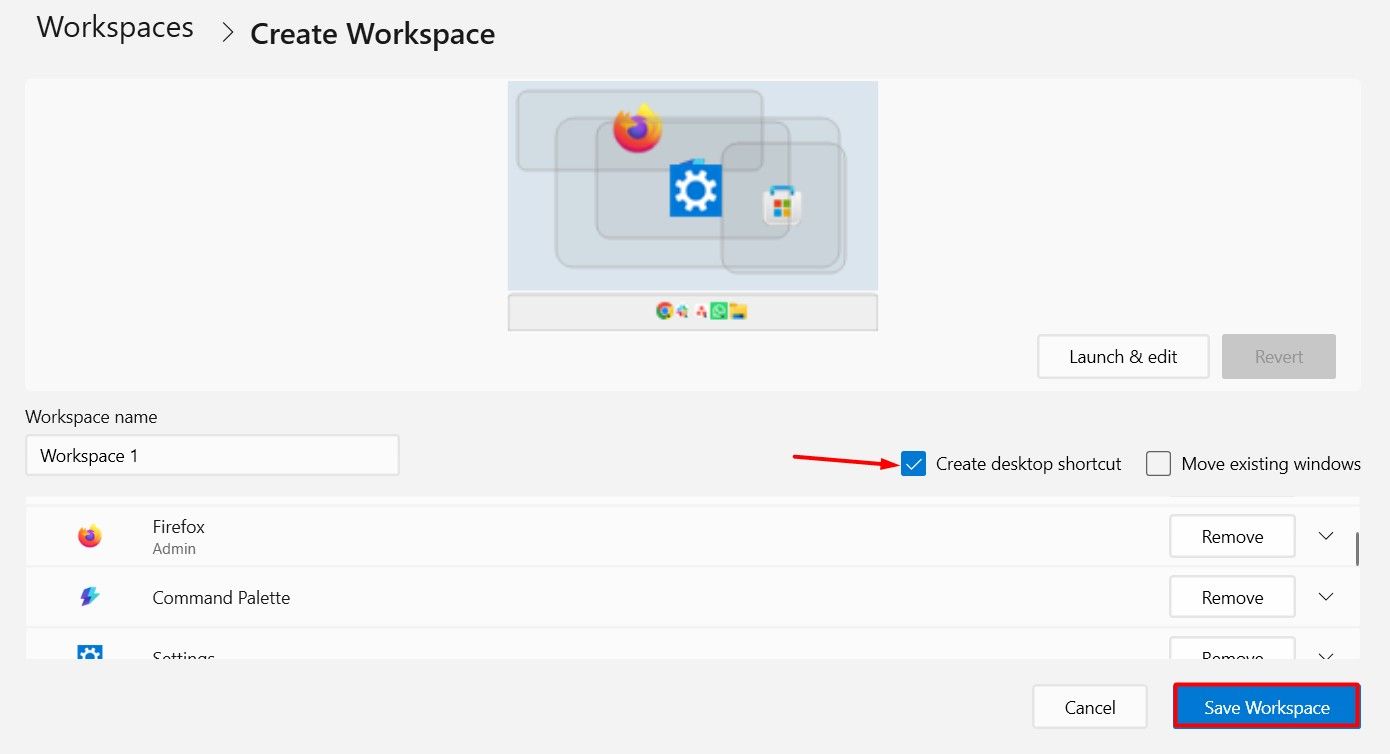
You must also check the “Create Desktop Shortcut” box. Once you have made all the edits, give a custom name to the workspace if you want, and then click the “Save Workspace” button.
Now, the next time you boot your computer, all you need to do is double-click your workspace shortcut on your desktop to launch all the applications that you have added to it. Alternatively, you can open Workspaces using the Win+Ctrl+’ key combination and click the Launch button next to the workspace you created.
Image Resizer
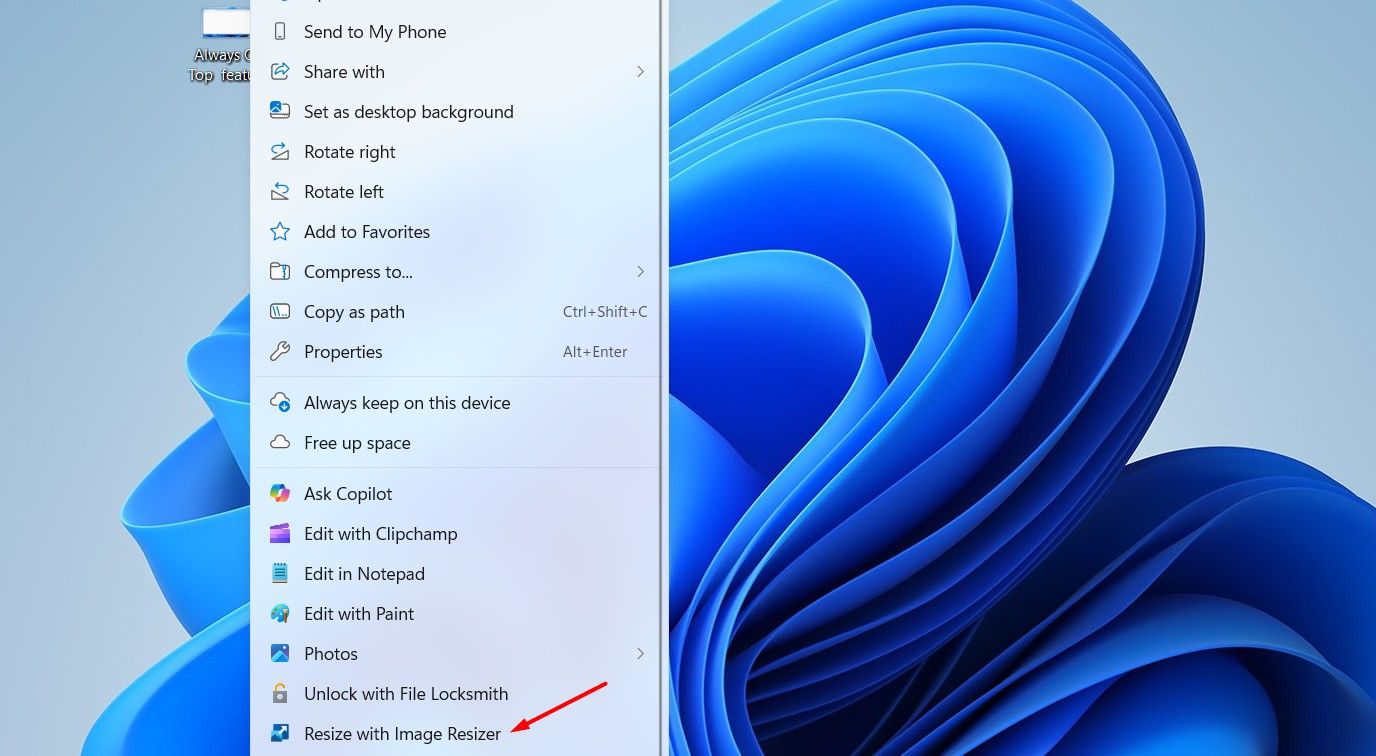
Image Resizer, as the name suggests, allows you to resize an image. To use this tool, right-click on an image and select the “Resize With Image Resizer” option.
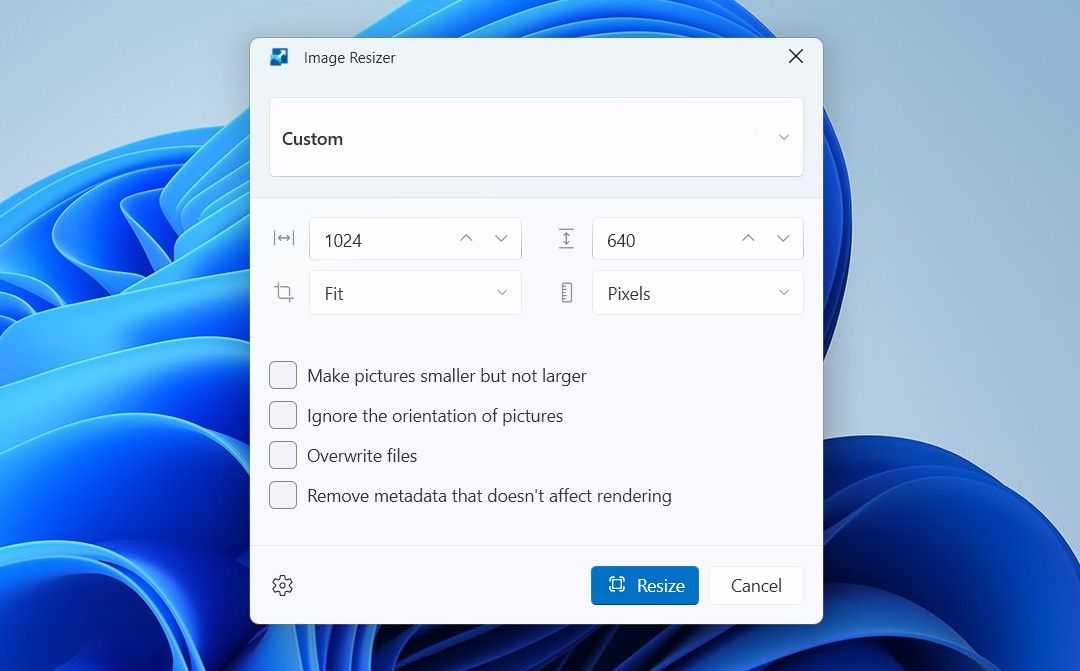
Next, click the drop-down icon and choose the size to which you want to resize your image. You can select from small, medium, large, and phone sizes. There is also a custom option that allows you to resize the image to specific dimensions.
I highly recommend unchecking the “Ignore the Orientation of Pictures” box, as resizing the image with this box checked can completely ruin the image’s orientation. Finally, click the resize button.
Related
PowerToys Is the Ultimate Work From Home Companion App
Working for home can be a trade-off in conveniences. Here’s how I use PowerToys toWFH smarter, not harder.
The Text Extractor feature in Microsoft PowerToys lets you extract text from literally anywhere on your screen. For example, you can use this tool to extract text even from the Windows Start menu.
To use the Text Extractor feature, press the Win+Shift+T key combination, then select the text you want to extract. Next, navigate to the location where you want to paste the text and press Ctrl+V to paste it.
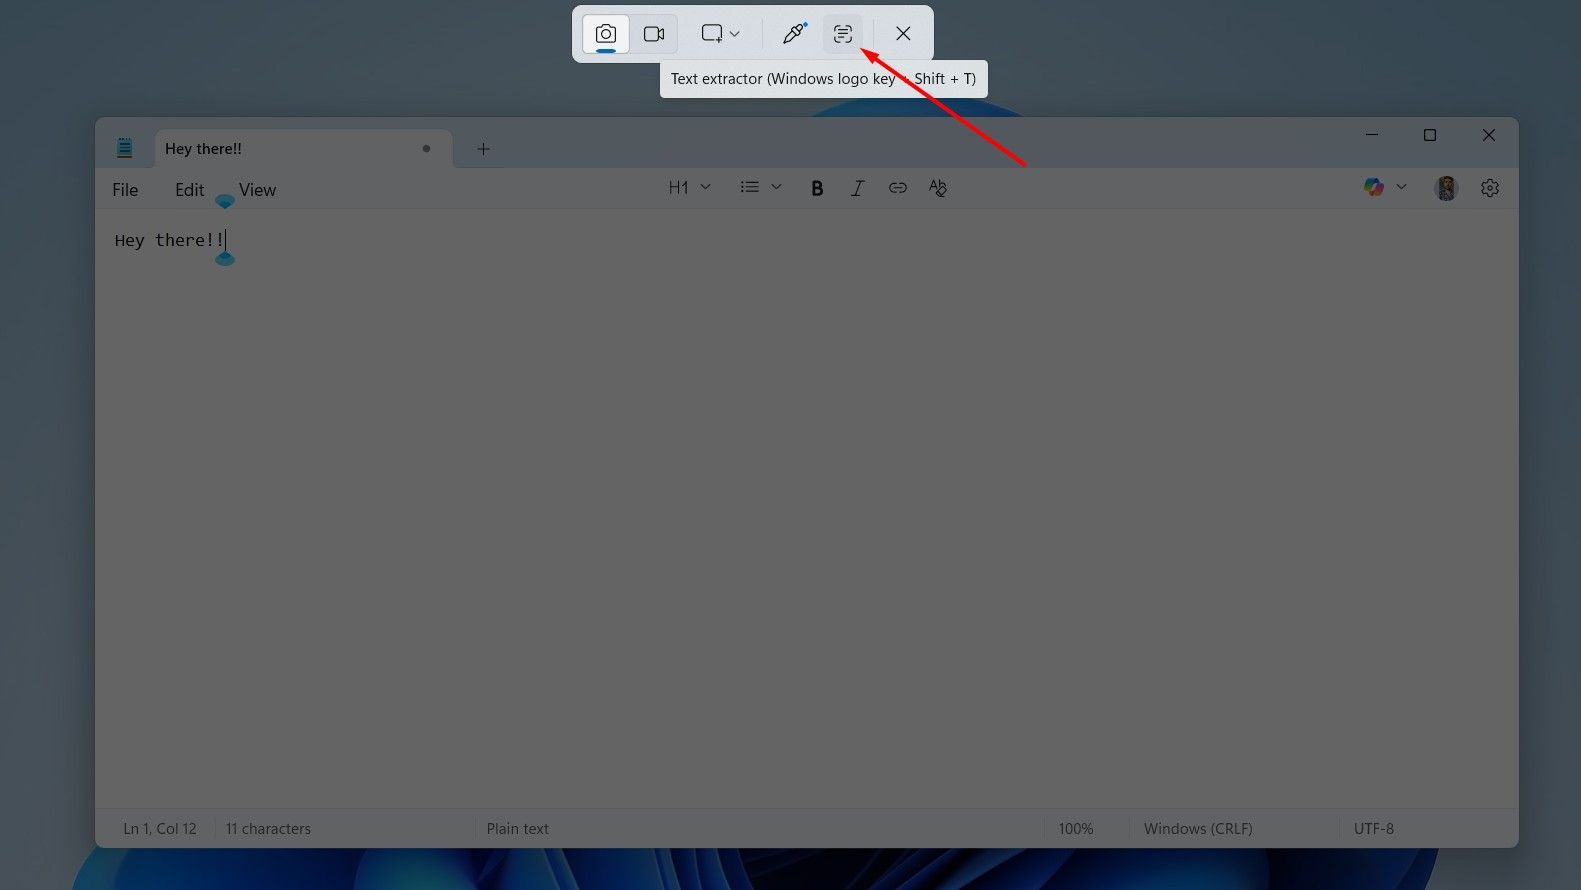
Although I use this feature regularly, there is a possibility that Microsoft may discontinue it soon, as they have already introduced a similar feature in the Snipping Tool. To use the Snipping Tool’s text extraction feature, press Win+Shift+S and choose the “Text Extractor” option.
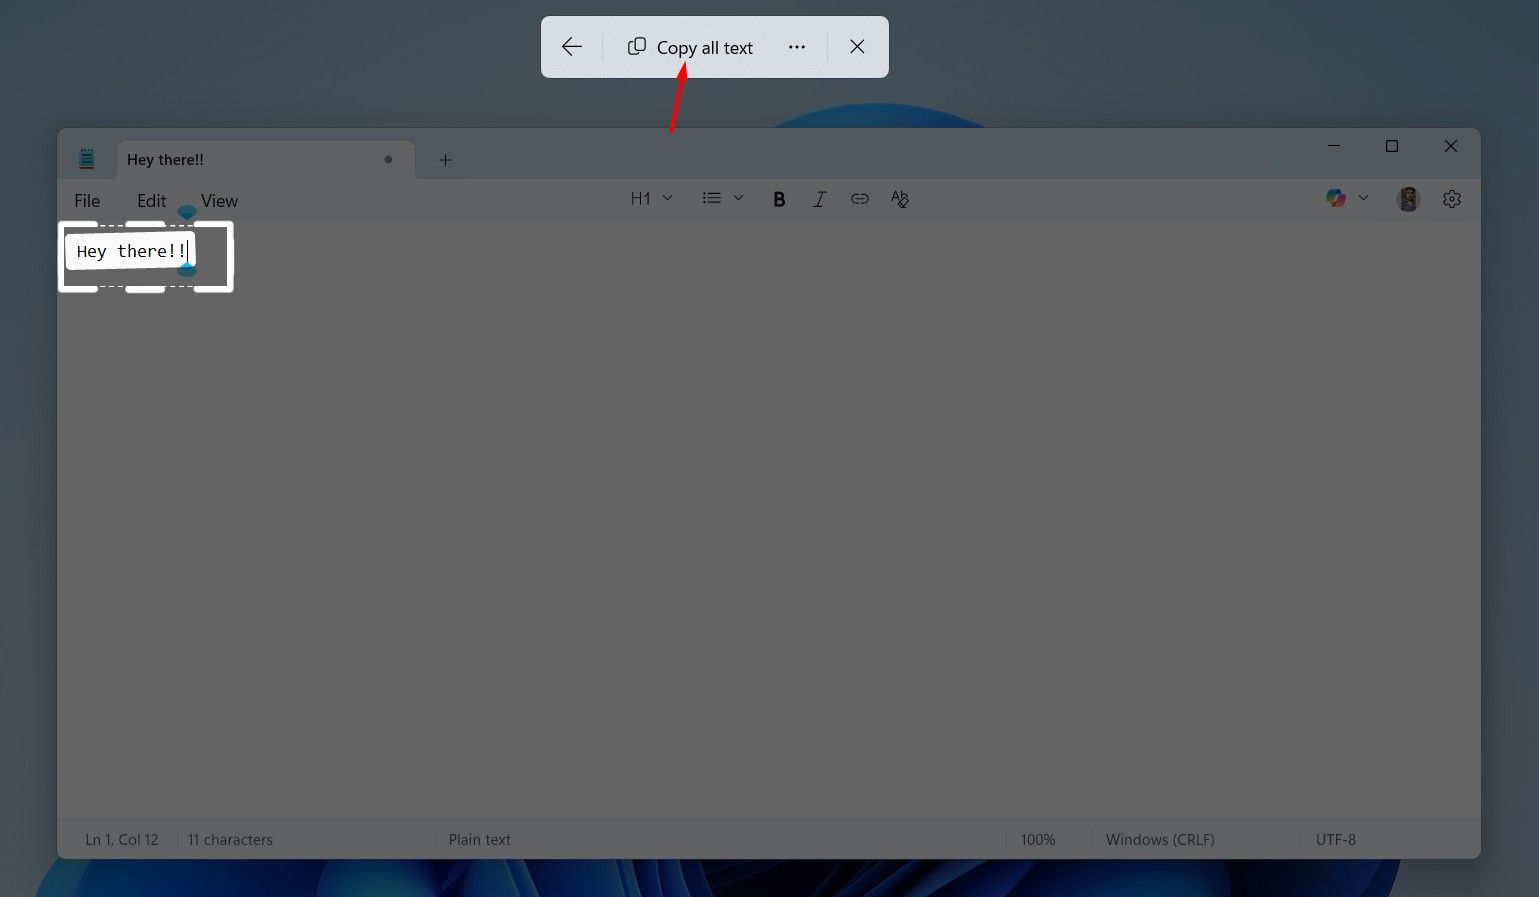
Then, select the text you want to extract and choose “Copy All text.” This will copy the selected text to the Windows clipboard, which you can then paste anywhere you like.
Find My Mouse
It often happens to me that the mouse cursor disappears somewhere on the screen, especially when I’m working on an application with a white background. In such situations, I use PowerToys’ Find My Mouse feature to locate my mouse cursor. To use this feature, press the left Control key twice, and you will see the cursor highlighted on your screen.
Shortcut Guide
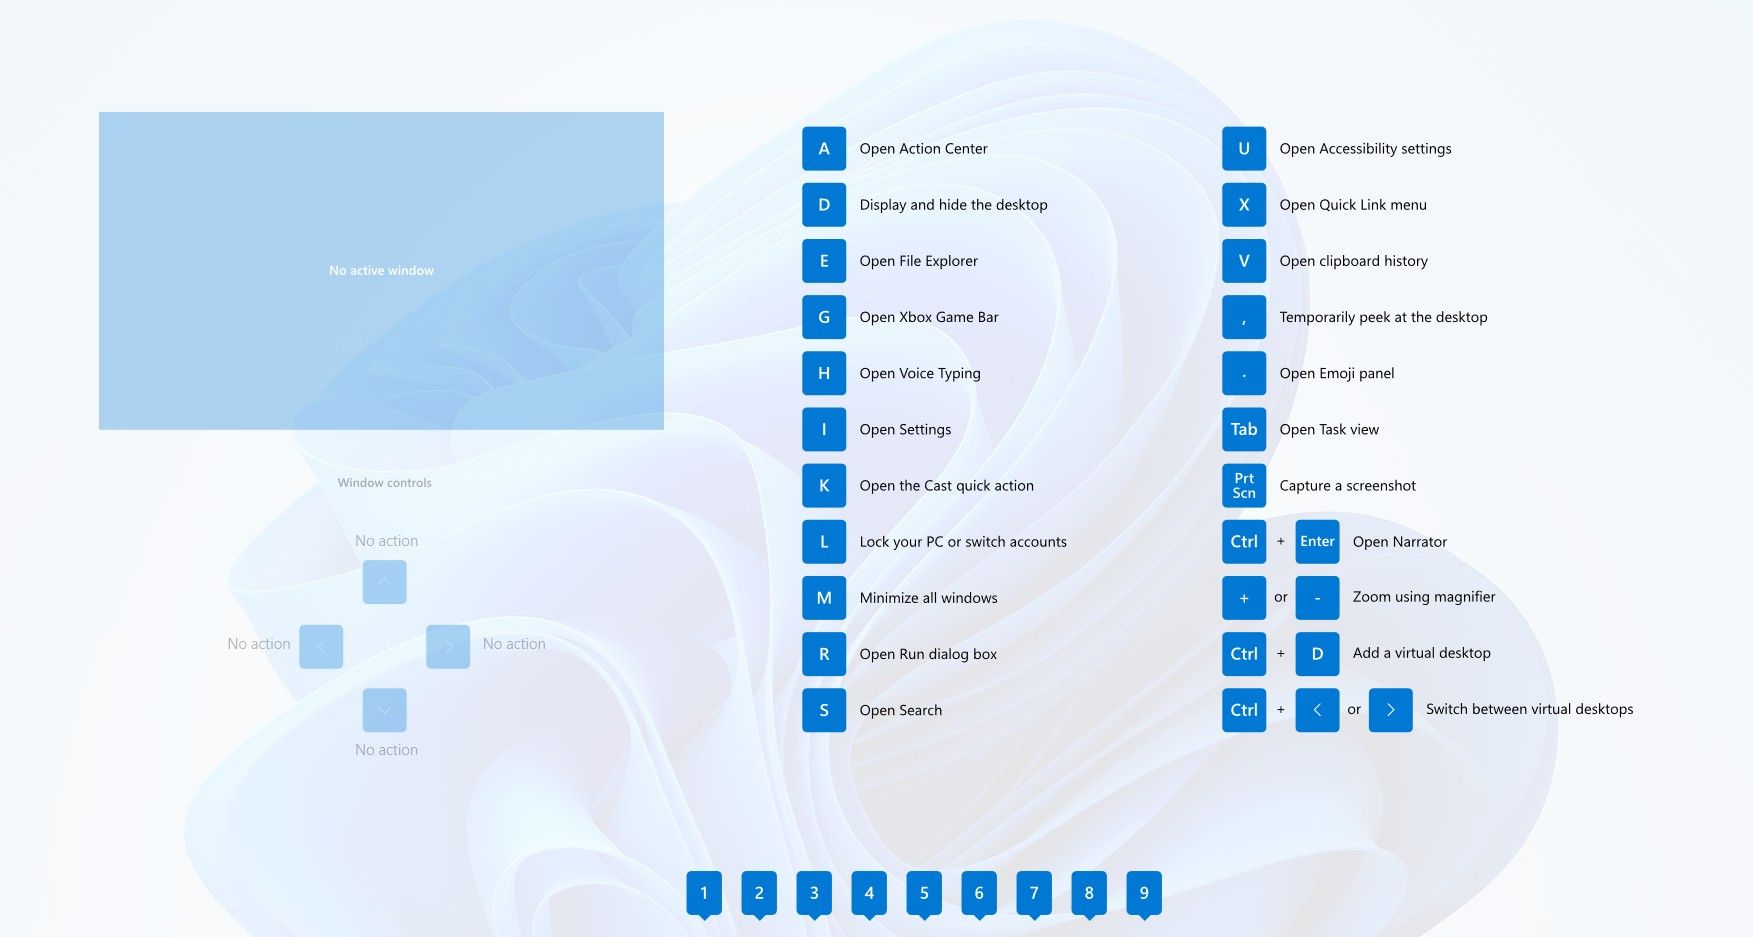
Windows 11 supports a long list of Windows key shortcuts; however, it can be quite difficult to remember all of them. If you want to view all the Windows key shortcuts available on your Windows 11 device, you should use the Shortcut Guide feature in PowerToys. To use this feature, press the Win+ Shift+/ keys together.
Color Picker
If you spend a lot of time editing images, you know how important it is to identify the exact color format used in an image you are drawing inspiration from or editing. However, if you have the Color Picker tool, you no longer need to worry about this.
You can activate the Color Picker feature by pressing the Win+Shift+C key combination. Then, you need to move the mouse cursor to the point whose color format you want to identify, and the feature will display the exact color format next to the cursor. To disable this feature, you need to press the Escape key.
Related
Windows 11 Locks Away These 4 Features, but They Should Be Standard
These should really be included in the base operating system.
These are some of the Microsoft PowerToys features that you will often find me using in my day-to-day life. As mentioned earlier, new features are regularly added to the suite, which means you will always have something new to try. You should access Microsoft PowerToys and select the Dashboard option on the left. In the Dashboard window, you will find all the PowerToys features that are currently available, both enabled and disabled. You can toggle on any of the disabled modules if you want to start using them.





Leave a Comment
Your email address will not be published. Required fields are marked *