If your Word documents constantly need last-minute fixes or don’t look quite right, you’re not alone. After years of brute-forcing my way through Word docs, I found that a few small style tweaks actually made editing feel smooth.
Here are some of the go-to Styles options I always pay attention to on long documents.
1
Keep With Next
If you use Microsoft Word Styles to format documents, then this setting will be familiar to you. The Keep with Next option is a paragraph setting that prevents awkward page breaks by ensuring a paragraph or a heading always stays with the paragraph that follows it.
This feature works particularly well for headings at the end of a page that shouldn’t get separated from their content.
When you apply Keep with Next to a heading style, Word automatically moves the heading to the next page if there isn’t enough room for both the heading and at least one line of the following paragraph. Your documents look neater as a result.
How to Use Keep With Next
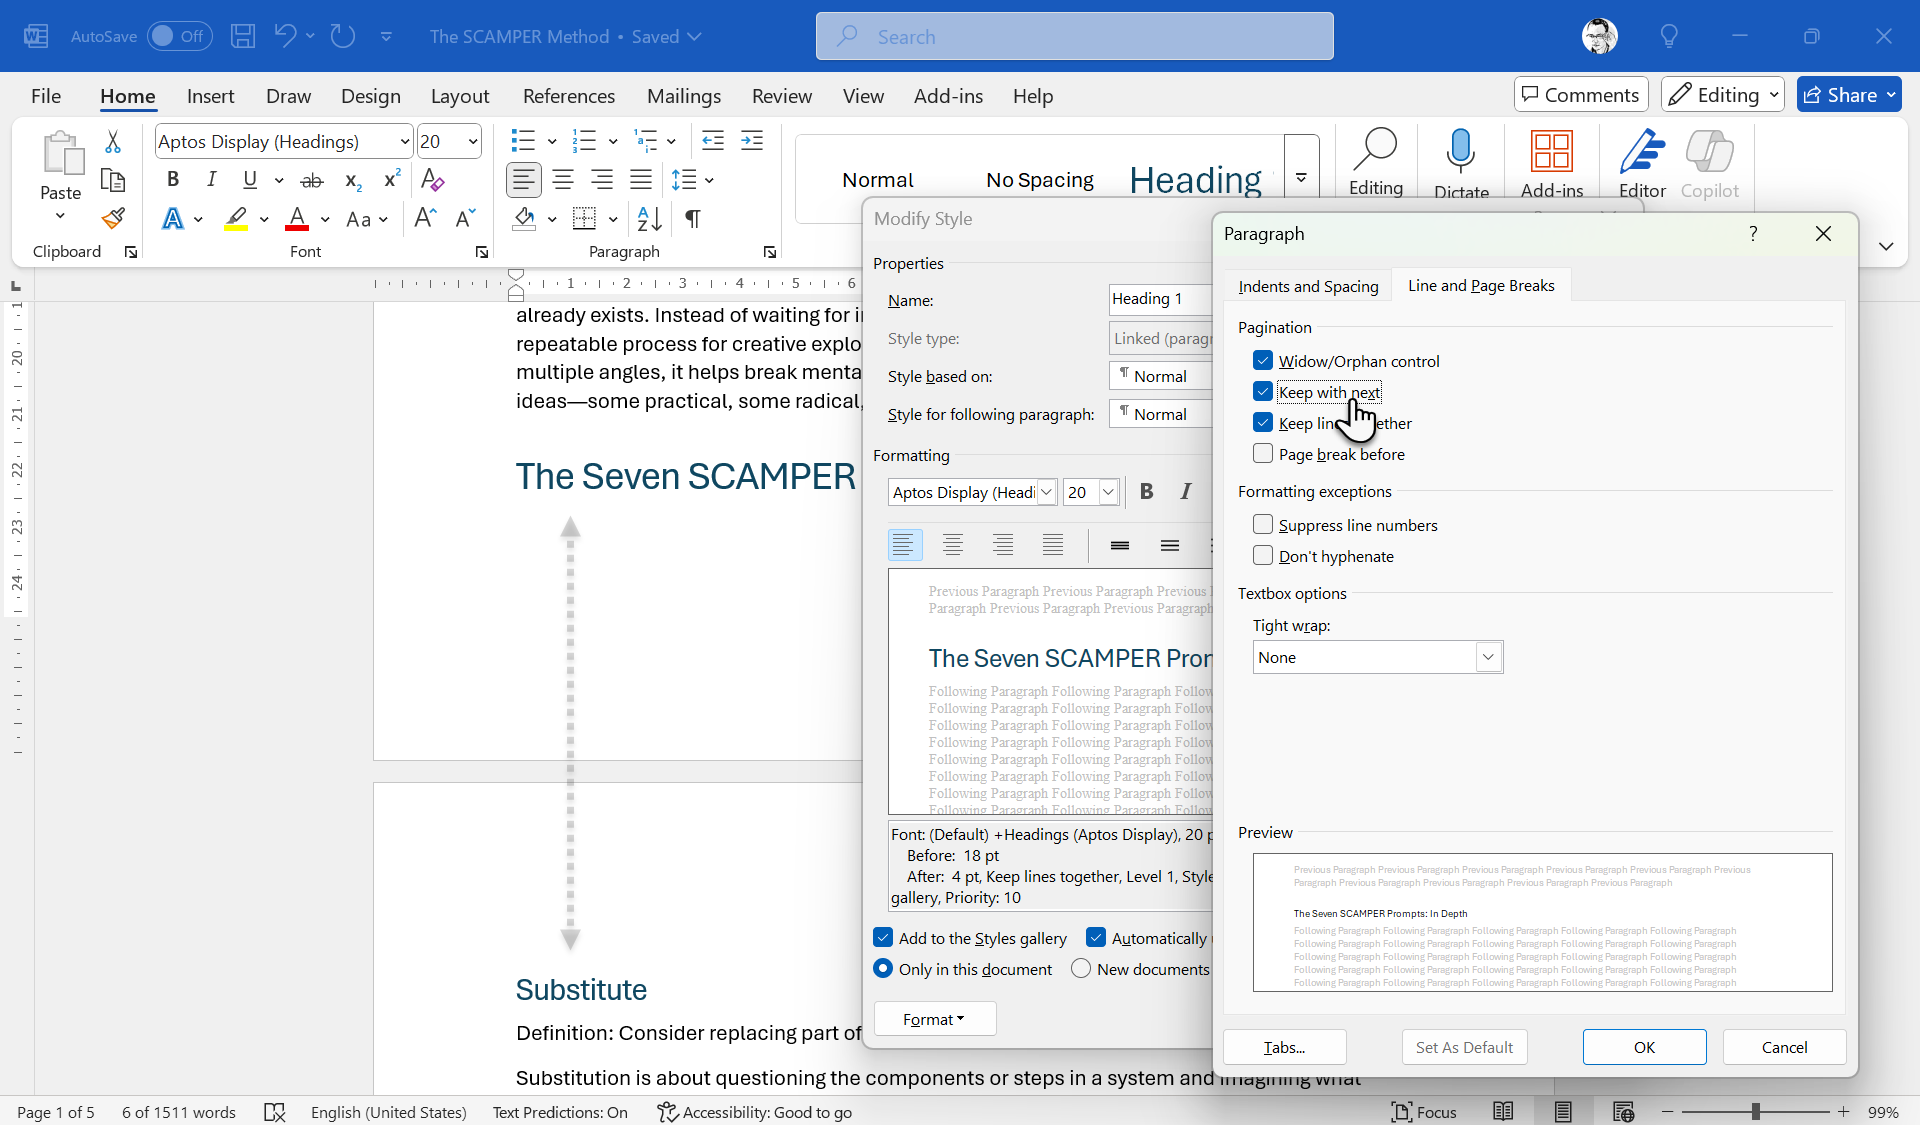
You can apply Keep with next as a paragraph setting or set it for a specific style.
Right-click any style in the Styles gallery on the Home tab. Select Modify from the context menu. Then, click on Format > Dropdown menu > Paragraph > Line and Page Breaks tab > Check the Keep with next option. Click OK to apply the changes.
Use Keep with Next with heading styles like Heading 1 and Heading 2 for the best results, as it makes sense to start an entire section together.
2
Understanding Linked Styles
Linked Styles solve a common formatting problem elegantly. These styles act as both paragraph and character styles, depending on what you select when applying them.
Select an entire paragraph and apply a linked style. Then, it functions as a paragraph style, formatting the entire paragraph. Select just a word or phrase and apply the same linked style. Now, it acts as a character style, formatting only the selected text.
There are several benefits to using Linked Styles.
For one, it eliminates the need for separate paragraph and character versions of the same style. It gives you more flexible formatting options. Lastly, it reduces style clutter in your Styles gallery.
You don’t have to do anything as all built-in Heading styles in modern Word versions are linked styles. But don’t forget to check this when you create your custom styles.
How to Identify Linked Styles
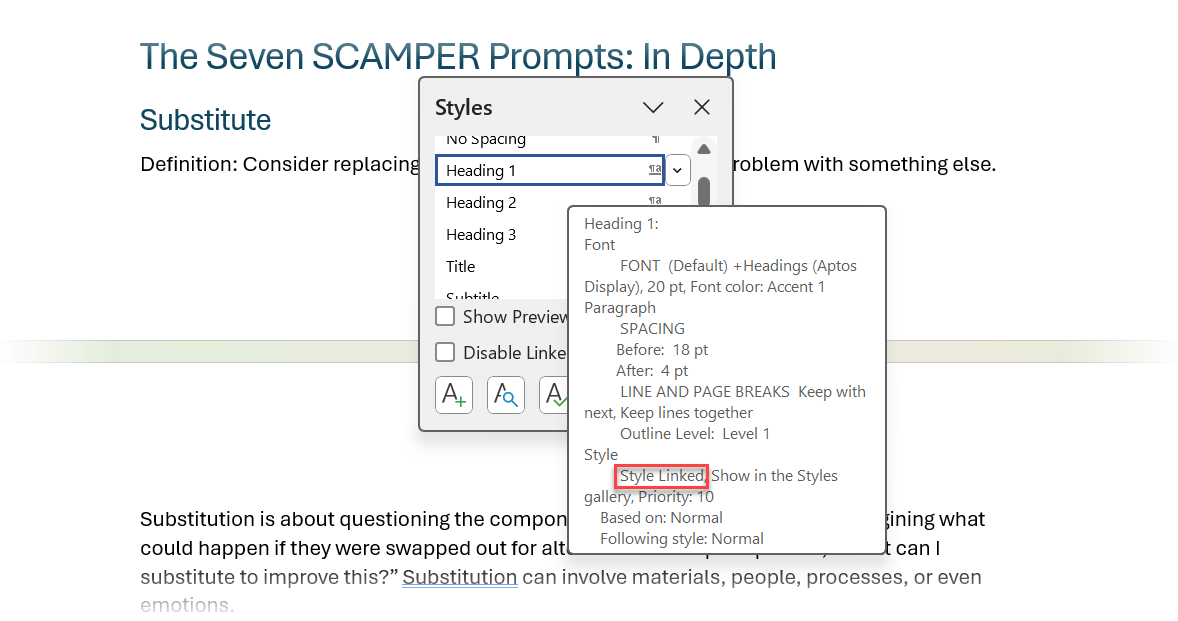
Open the Styles pane by clicking the small arrow in the Styles group on the Home tab. Hover over a style in the list and look for styles that show Linked as the Style type. They’re marked with both a paragraph symbol (¶) and an “a” in the Styles pane.
In the Modify Style dialog, linked styles display “Linked (Paragraph and Character)” under the style name.
The idea of Linked Styles is sometimes tough to understand. Think of them as one special rule that can apply to a whole paragraph, or just to a little piece of text inside that paragraph. It’s super handy because you don’t need two separate rules for the same look. But they sometimes create issues with some critical functions of styles, like designing tables of contents in Microsoft Word.
3
Avoid Automatically Update
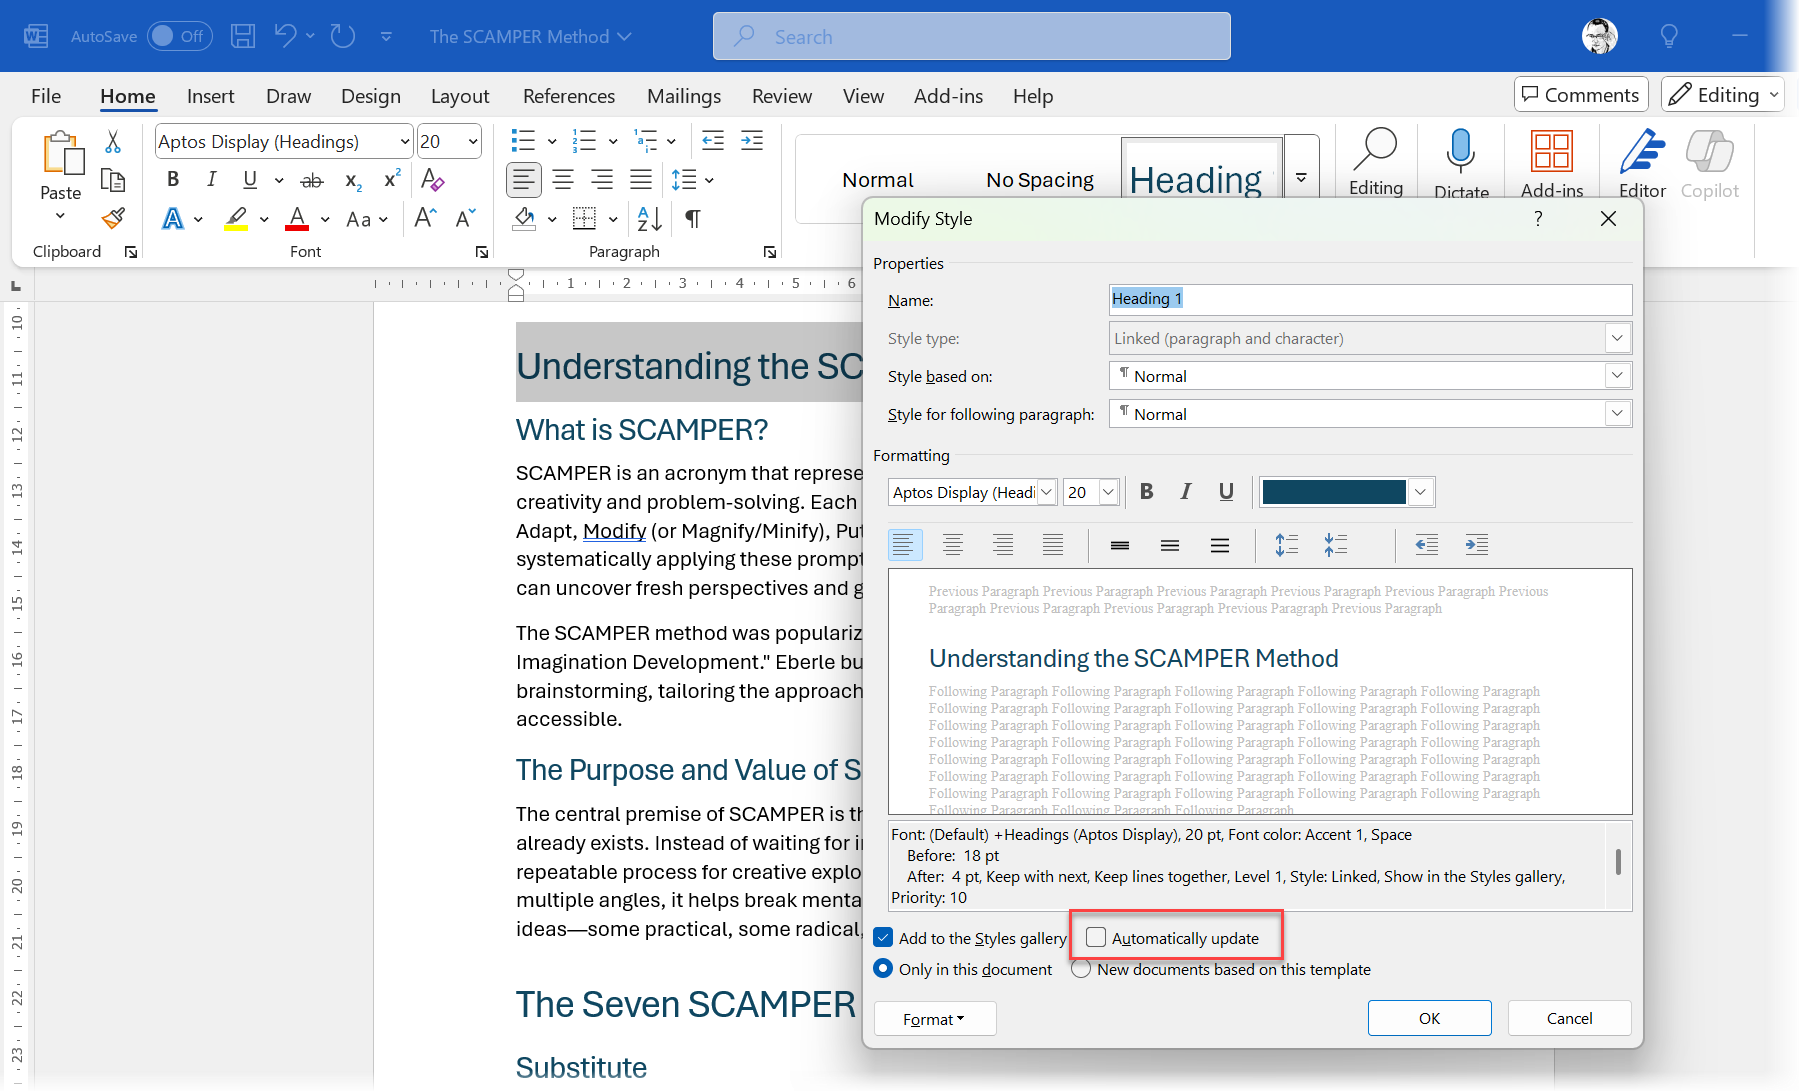
The Automatically update option can be both helpful and annoying. When you enable it, the setting automatically updates a style whenever you manually format text that uses that style. While this might seem convenient, it leads to unintended formatting changes throughout your document where the style may be in use.
The accidental formatting changes can instantly change your entire document. If you are collaborating on a Word document with a team, it makes consistent formatting difficult and can cause confusion.
Good luck troubleshooting formatting issues if your collaborative document is large and complex!
How to Disable Automatically Update
Right-click a style in the Styles gallery. Select Modify. Then, uncheck the Automatically update option at the bottom of the dialog box.
Click OK to save the changes
Instead of relying on Automatically update, make deliberate style tweaks through the Modify Style dialog box to maintain better control over your document’s formatting.
4
Style for Following Paragraph
The Style for following paragraph feature is handy for long documents that need to follow a specific chain of style formats from the title downwards. This Style option creates this logical appearance for the different sections in your document. It automatically applies a specific style (as an alternative to the default “Normal” style) when you press Enter after typing.
Thus, a “chain” of styles follows a natural progression. Enabling this feature is an alternative to manually selecting a style from the Style Gallery.
For example, you might set up a sequence where a specific style is automatically applied instead of the default Normal style for a new paragraph.
- Title style is followed by a specific Subtitle style
- Subtitle style is followed by Quote style
- List Item style is followed by another List Item style
How to set up Style for Following Paragraph
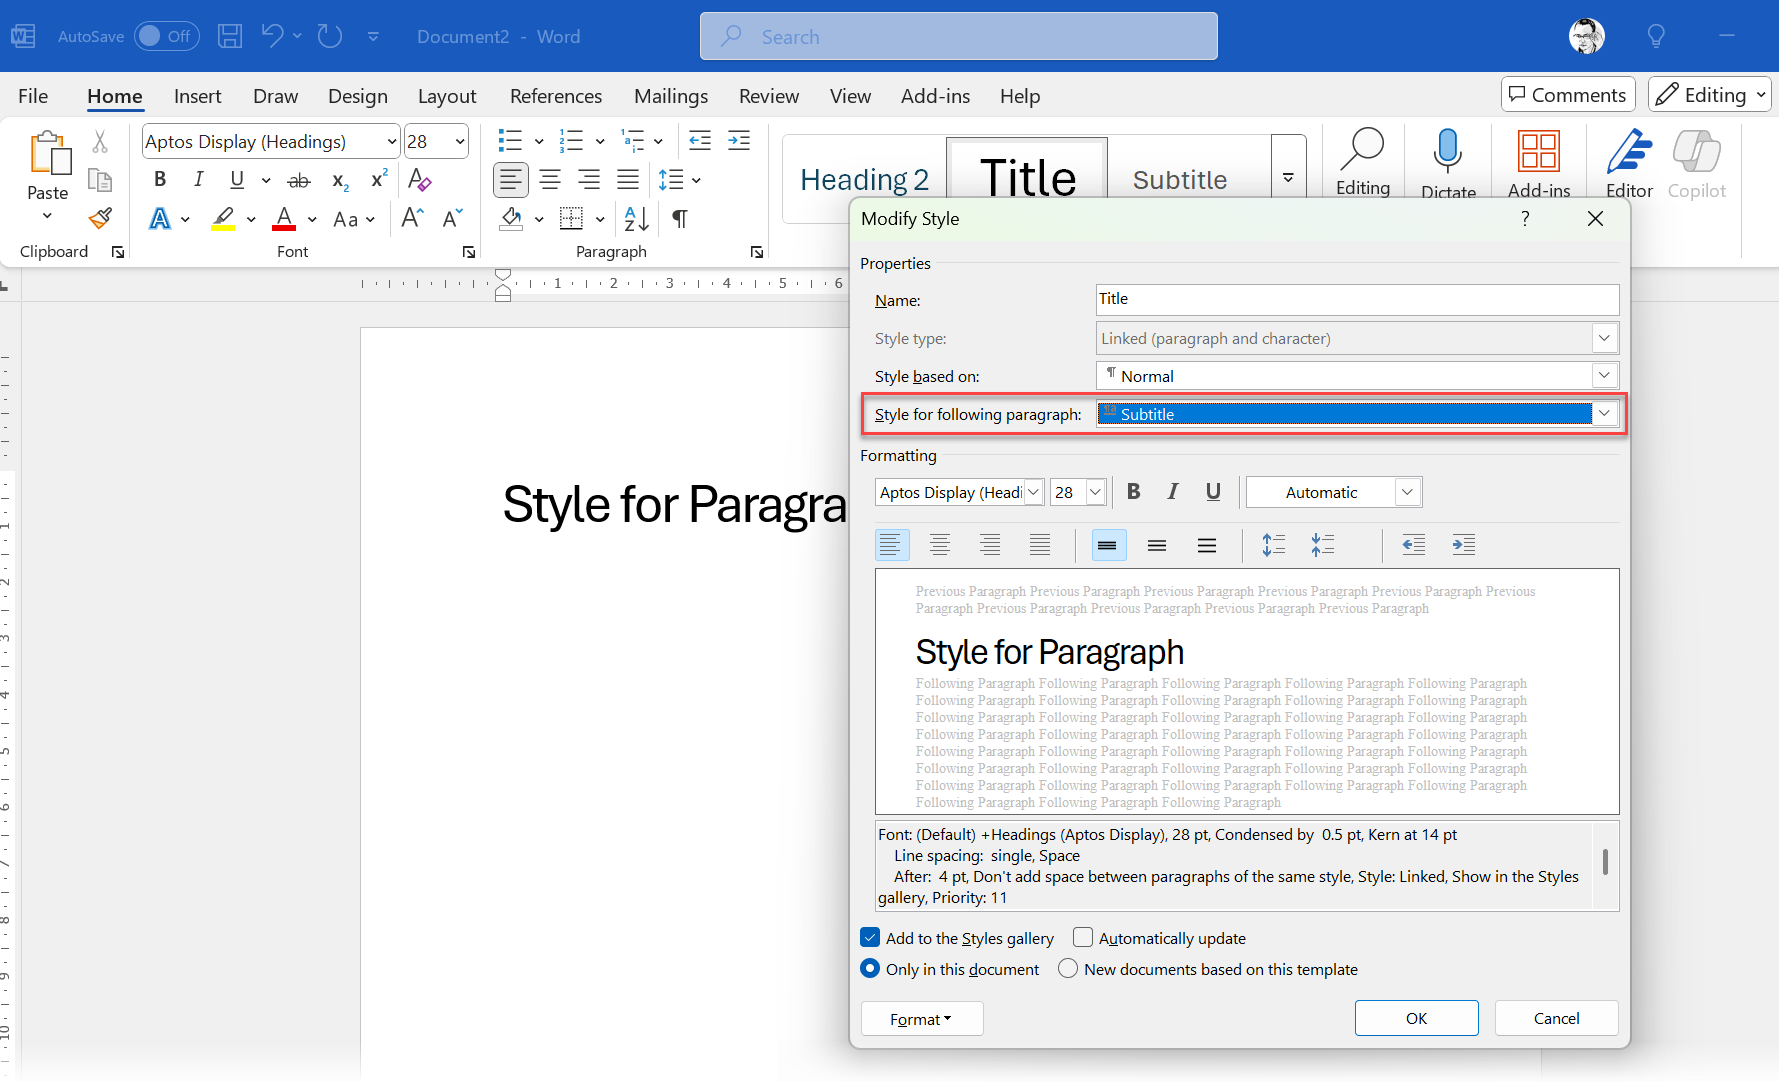
On the Home tab, right-click the first style in your desired sequence (e.g., Title). Then, select Modify.
In the Modify Style dialog box, find the Style for following paragraph dropdown. Select the style you want to appear next (e.g., Subtitle). Click OK to save.
Repeat this process for each style in your chain of formatting options. Word remembers the sequence and applies them in sequence with a press of Enter.
One of the downsides is that there doesn’t seem to be a way to apply this to existing text. But for new documents, automatically applying a series of styles in sequence is a big time saver. And especially, if you need to follow style guides while looking to save time formatting documents.
5
Keep Managing the Styles Gallery
The Styles Gallery on the Home tab shows your most frequently used styles. To save rummaging around, you can customize it to display exactly the styles you need. Proper gallery management makes your workflow more efficient by putting your liked styles at your fingertips.
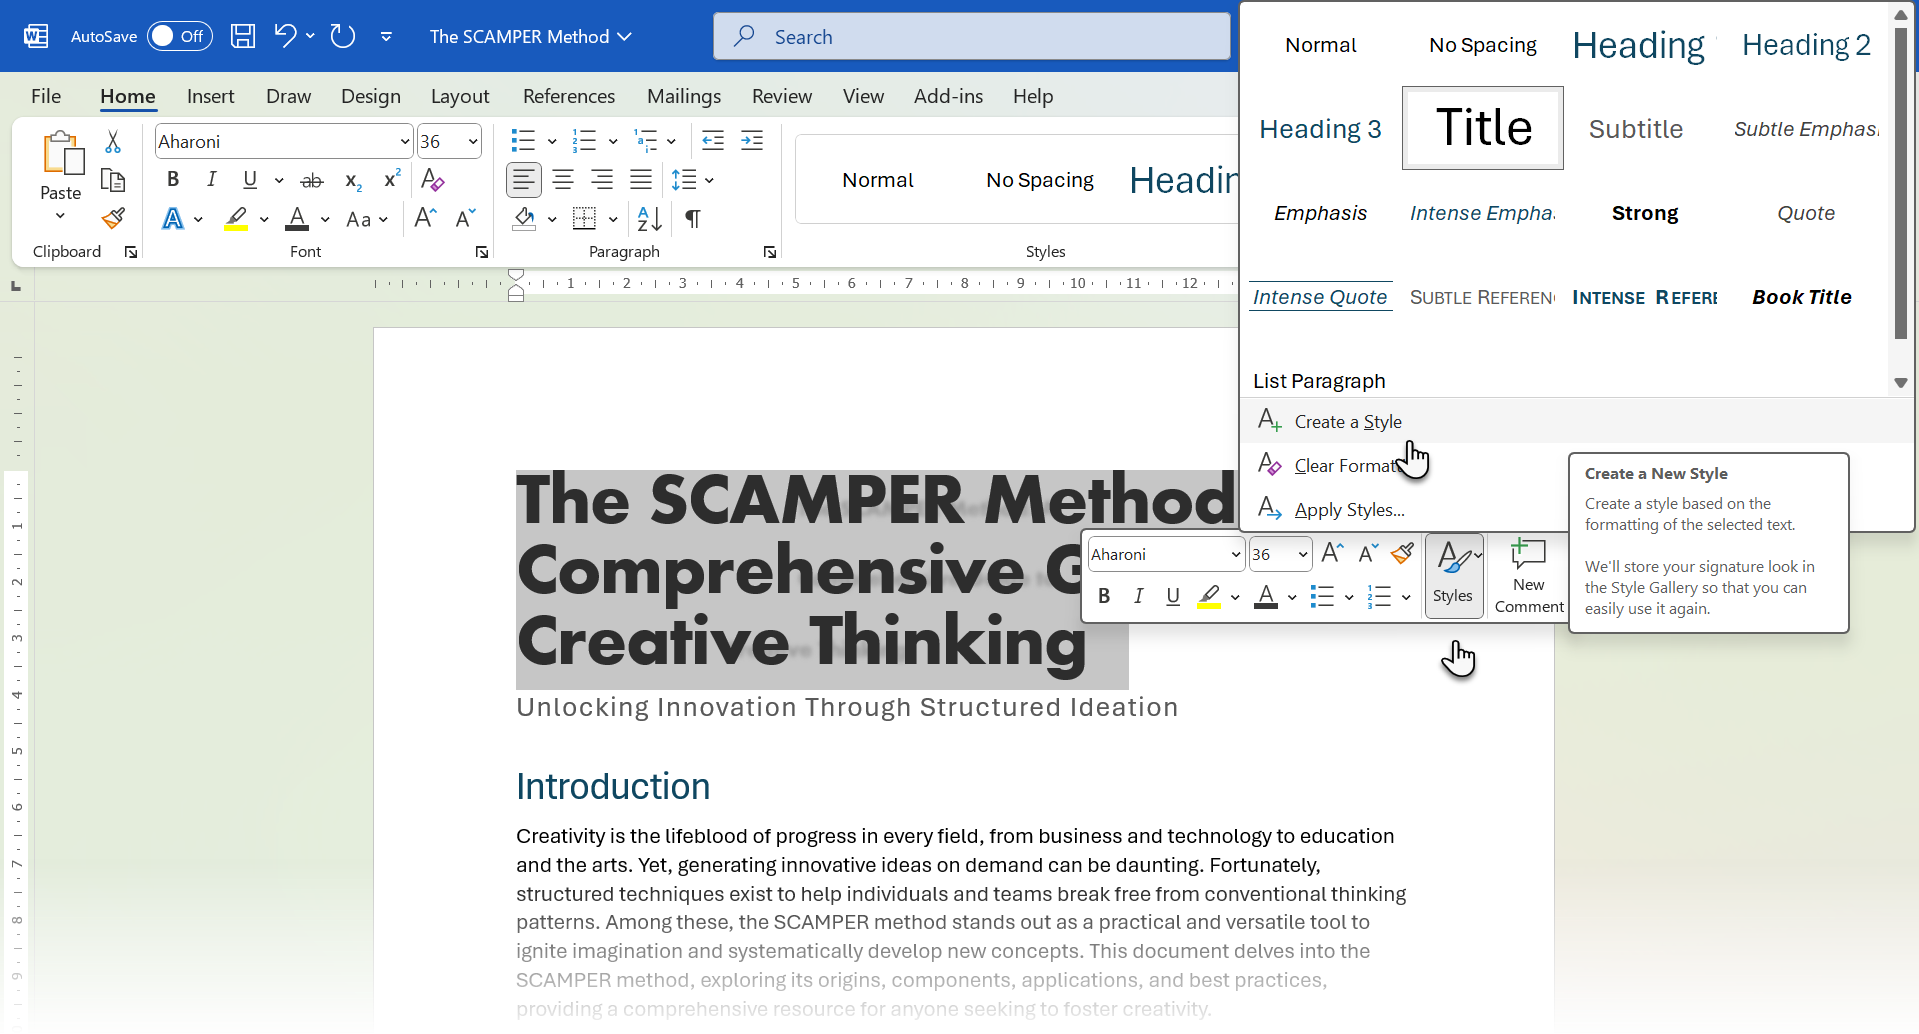
Create New Styles From Formatted Text
To create a new style based on existing text, right-click on the text you wish to use. In the mini toolbar that pops up, select Styles > Create a Style.
In the Create New Style from Formatting dialog box, assign a name to your style and click OK.
Your newly created style will now be visible in the Styles gallery.
If you want this style to be available in all future Word documents, right-click it in the Styles gallery, choose Modify, and then select New documents based on this template at the bottom of the dialog box.
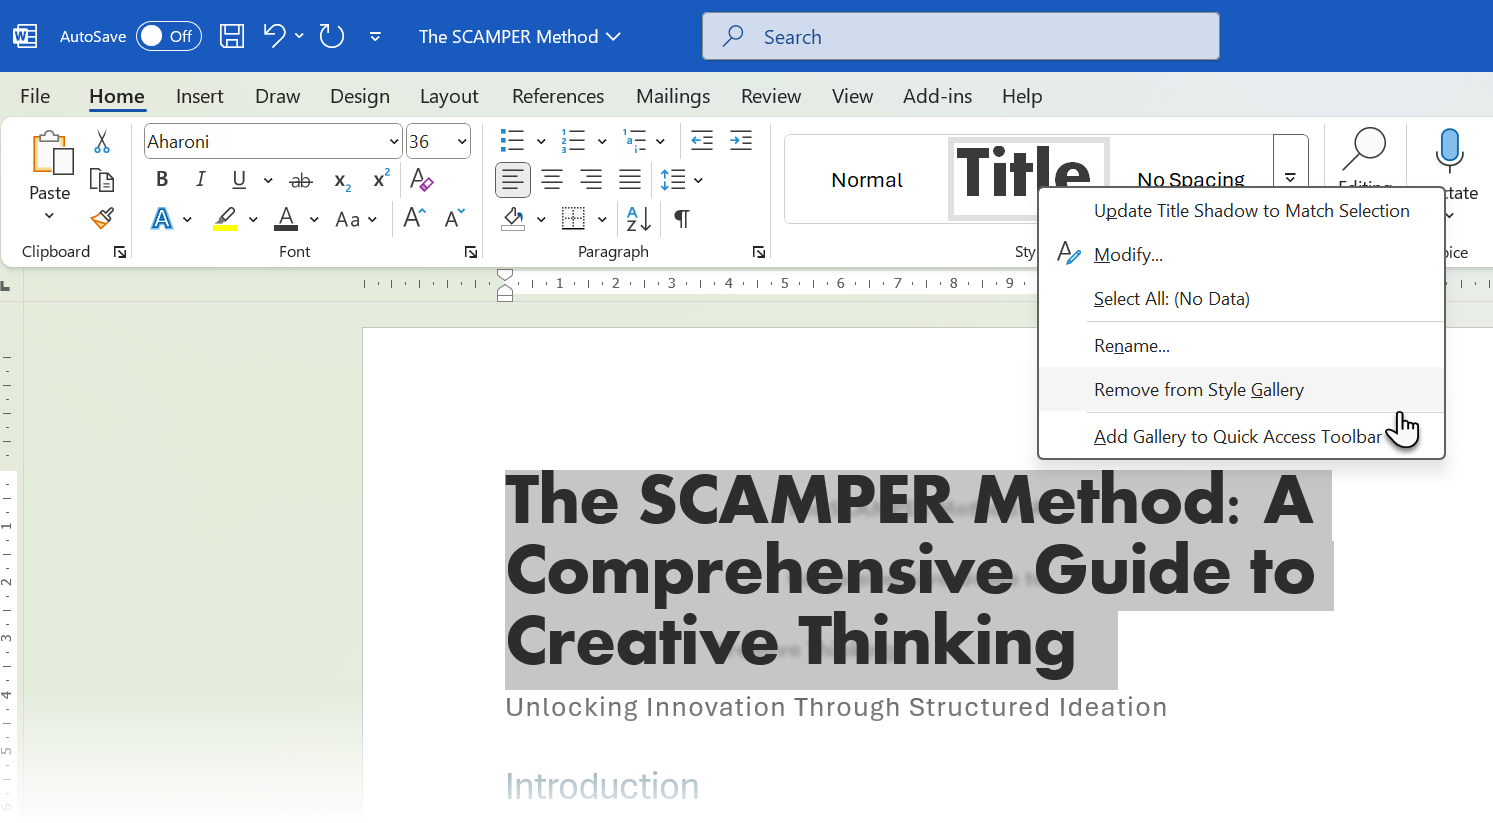
Remove Styles From the Gallery
Right-click any style in the Styles gallery on the ribbon. Simply select Remove from Style Gallery.
The style disappears from the gallery but remains available in the Styles pane
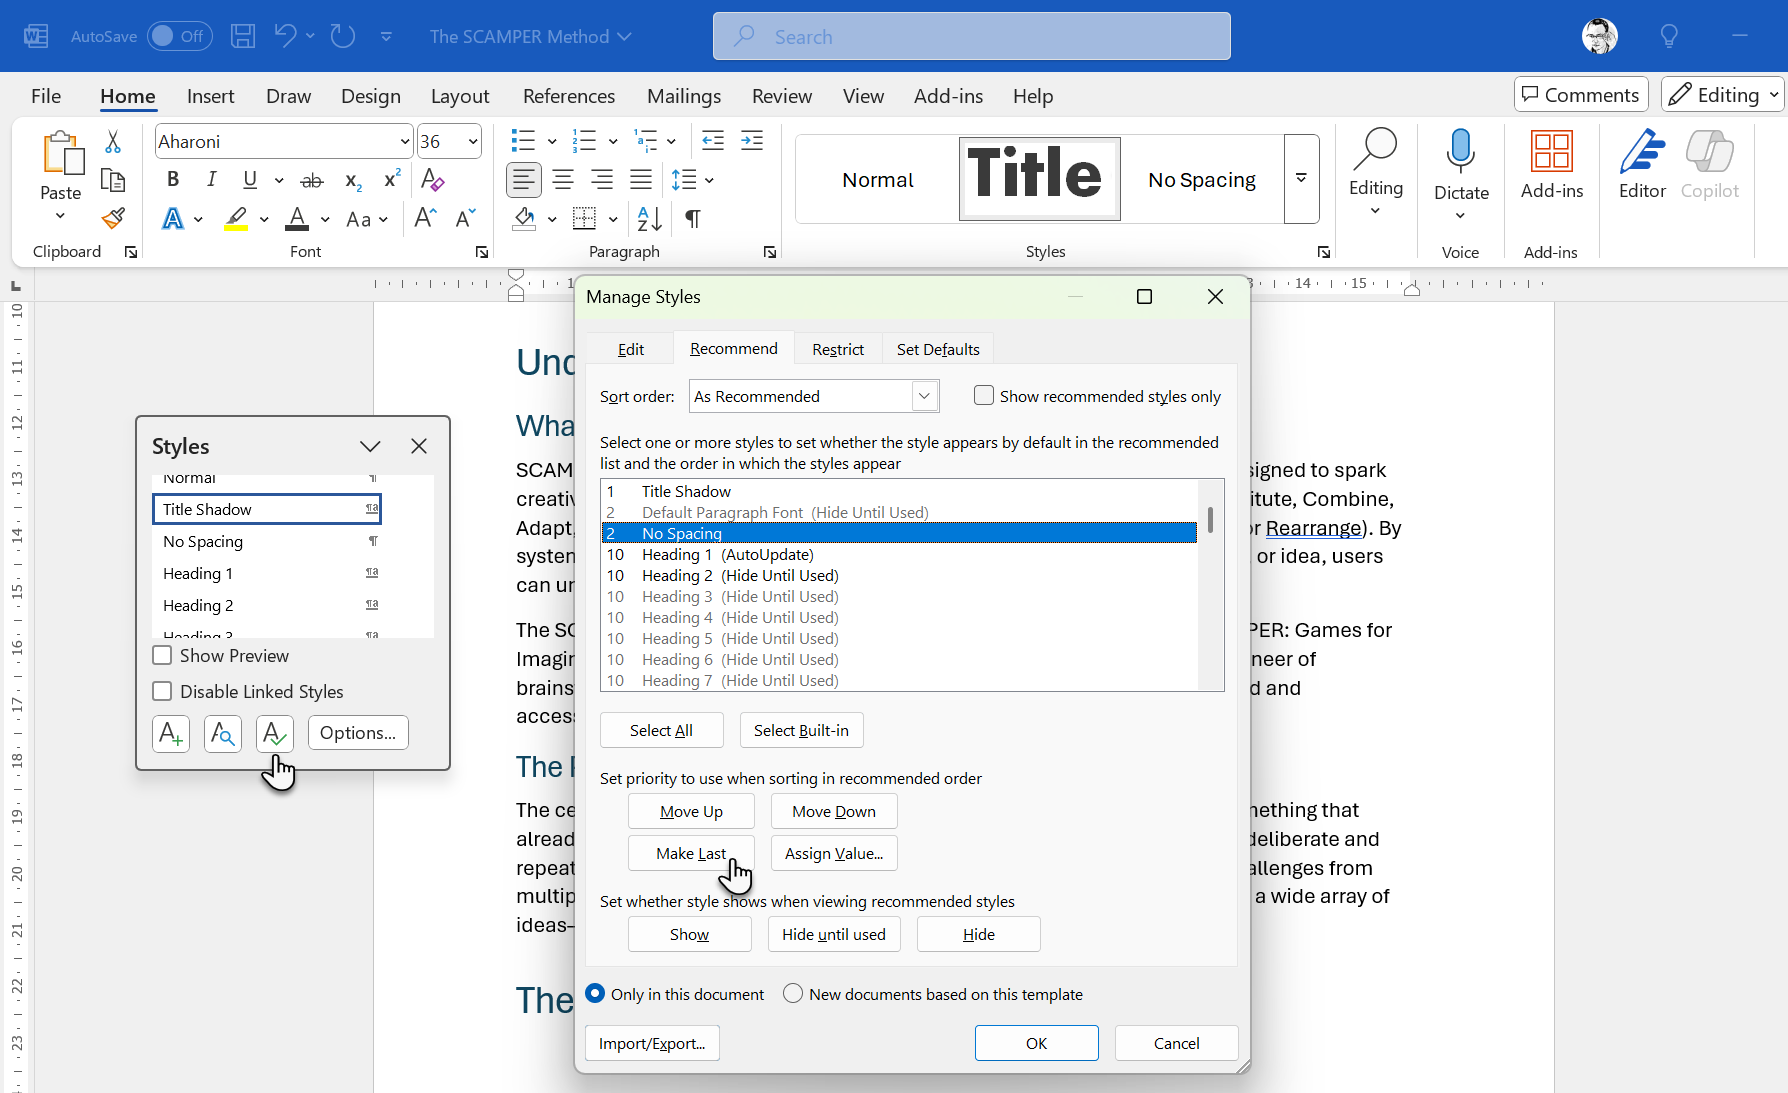
Reordering Styles in the Gallery
To adjust styles, click the tiny dialog box arrow in the bottom right of the Styles group on the Home tab to open the Styles pane.
Then, click the Manage Styles button to display the Manage Styles dialog box and select the Recommend tab.
Highlight the style you wish to move and click Move Up or Move Down. Repeat this for any other styles you want to adjust. Once done, click OK to update the Style Gallery to your preferences.
If you want the styles to remain in the same order for all new documents based on this template, choose New Documents based on this template.
Keep your Styles gallery lean by only including styles you use regularly. This reduces visual clutter and makes finding the styles you need much easier.
These five Style features can add to a formatting system that saves time and makes you a better editor in Word. It can help you eliminate little annoyances, as sometimes we don’t pay attention to how styles actually work. With styles, there’s a lot more than what meets the eye.




Leave a Comment
Your email address will not be published. Required fields are marked *