Between work, social life, and many other things, I can’t spend all day fiddling with my phone. Thankfully, these Samsung routines take care of the small stuff for me.
1
Fingerprint Unlock With Edge Lighting
Feel like unlocking your phone is boring? I did until I added Edge Lighting to my fingerprint unlock. Now, every time I touch the sensor, a soft glow wraps around the screen’s edges.
It’s a small change, but it makes unlocking feel more intentional, especially in the dark.
There are four effects to choose from: Basic, Glitter, Echo, and Spotlight. My favorite is Glitter because it adds rich sparkle to my screen.
To set this up, go to your Phone Settings and select Modes and Routines. On the Routines tab, tap the Plus (+) icon to create a new routine. In the If section, select Unlock with Fingerprint and pick the fingerprint you want to use. This triggers the routine every time you unlock your phone with that fingerprint.
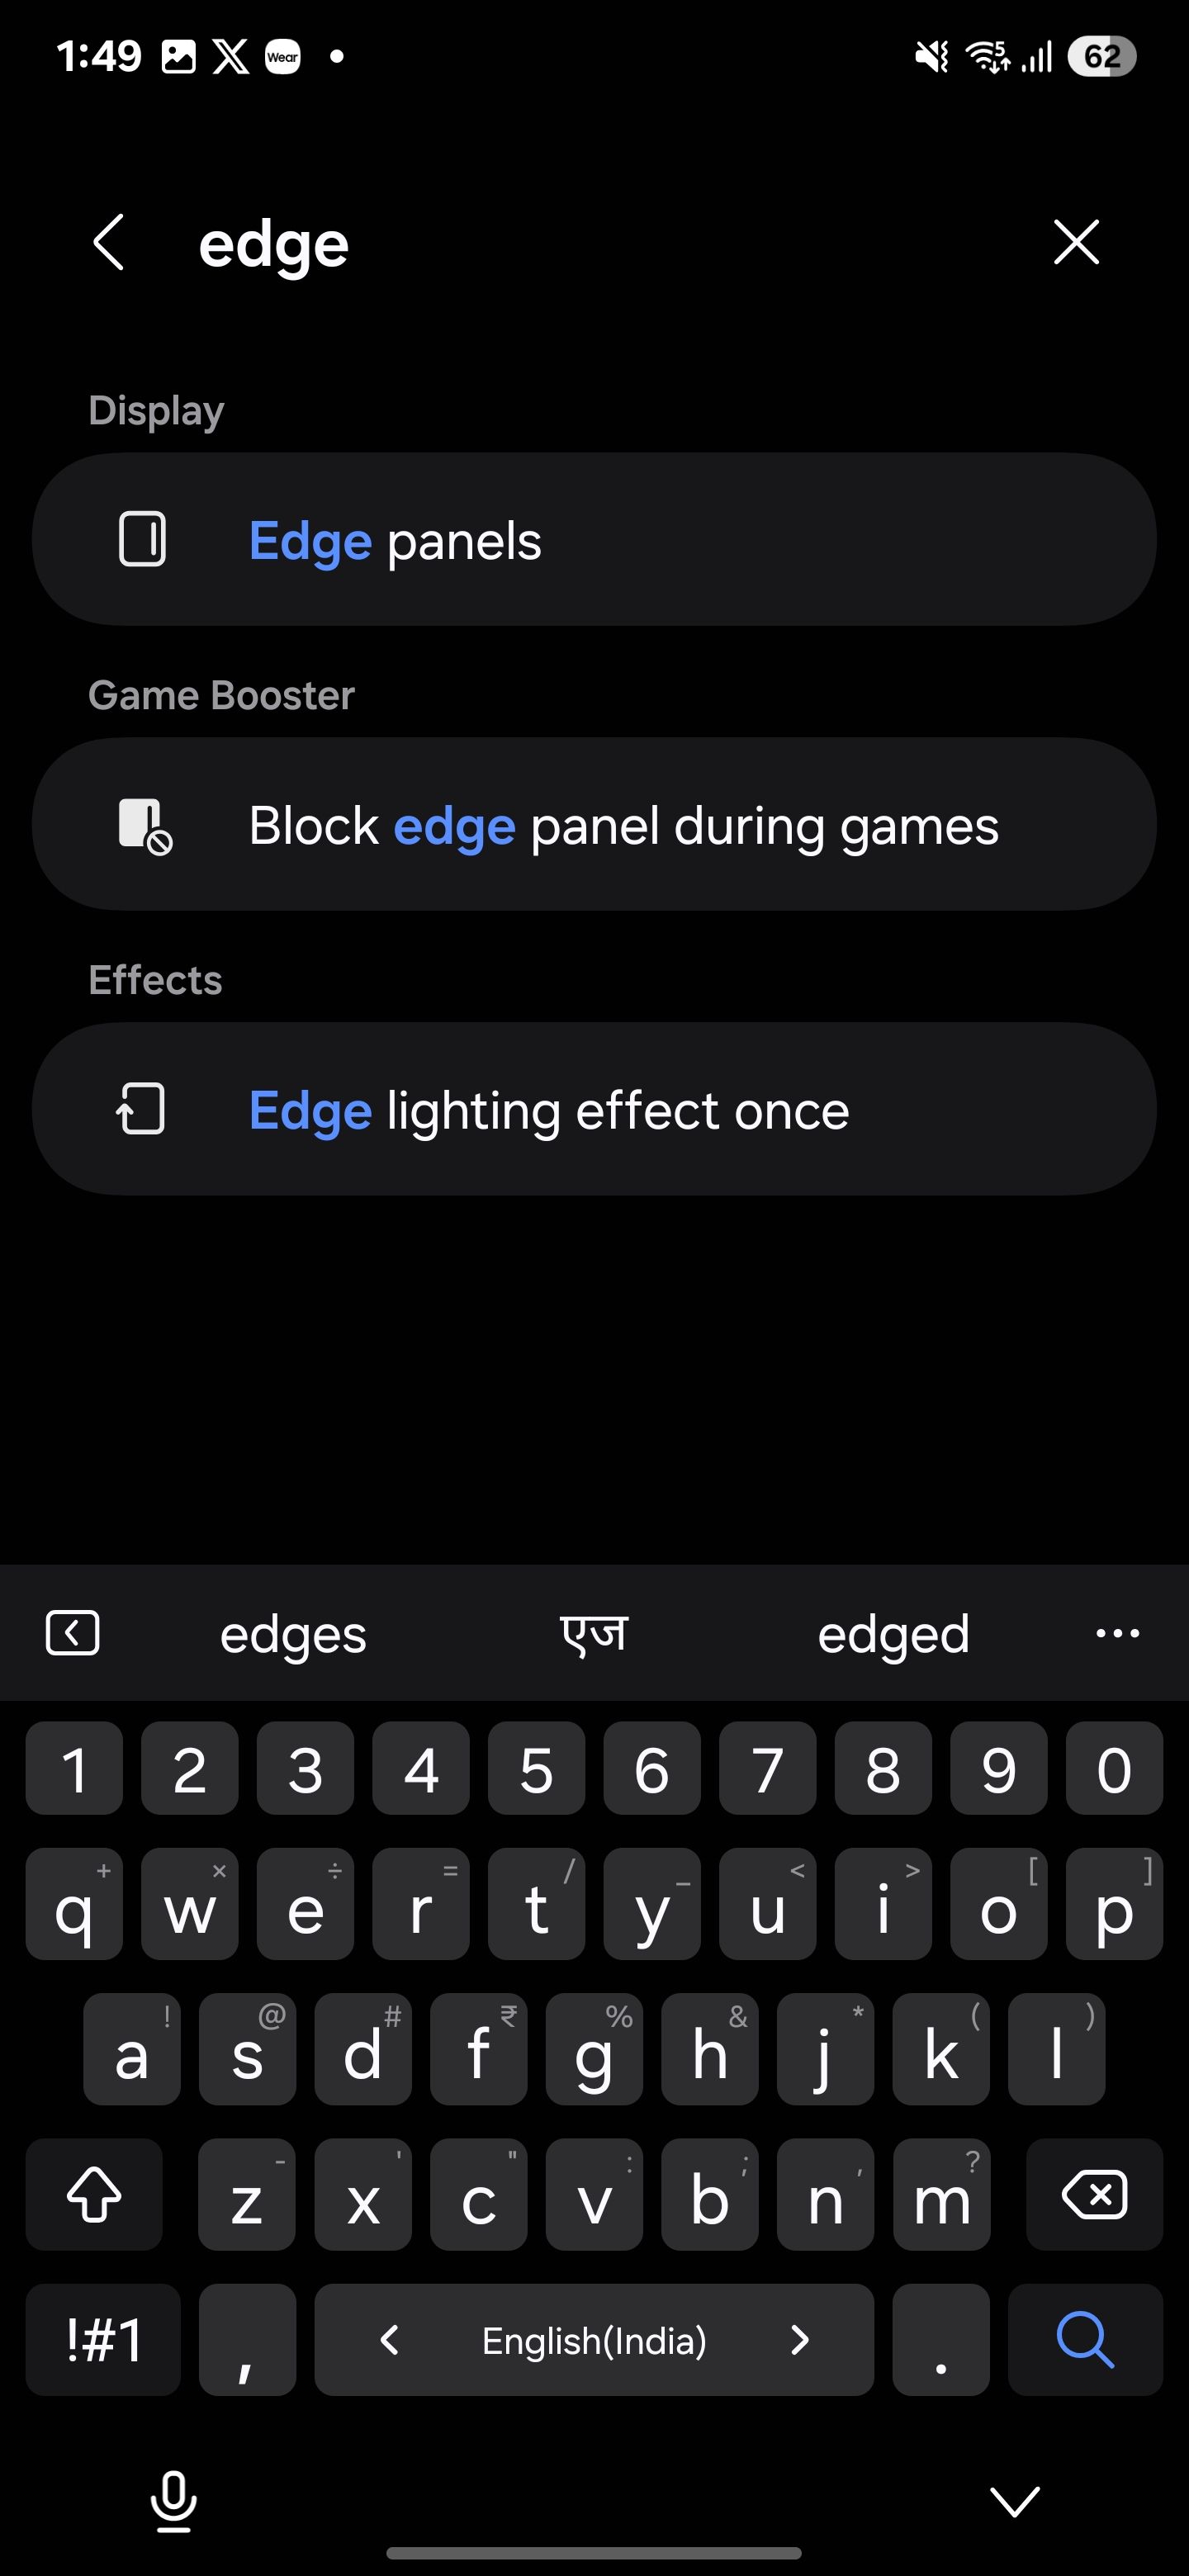
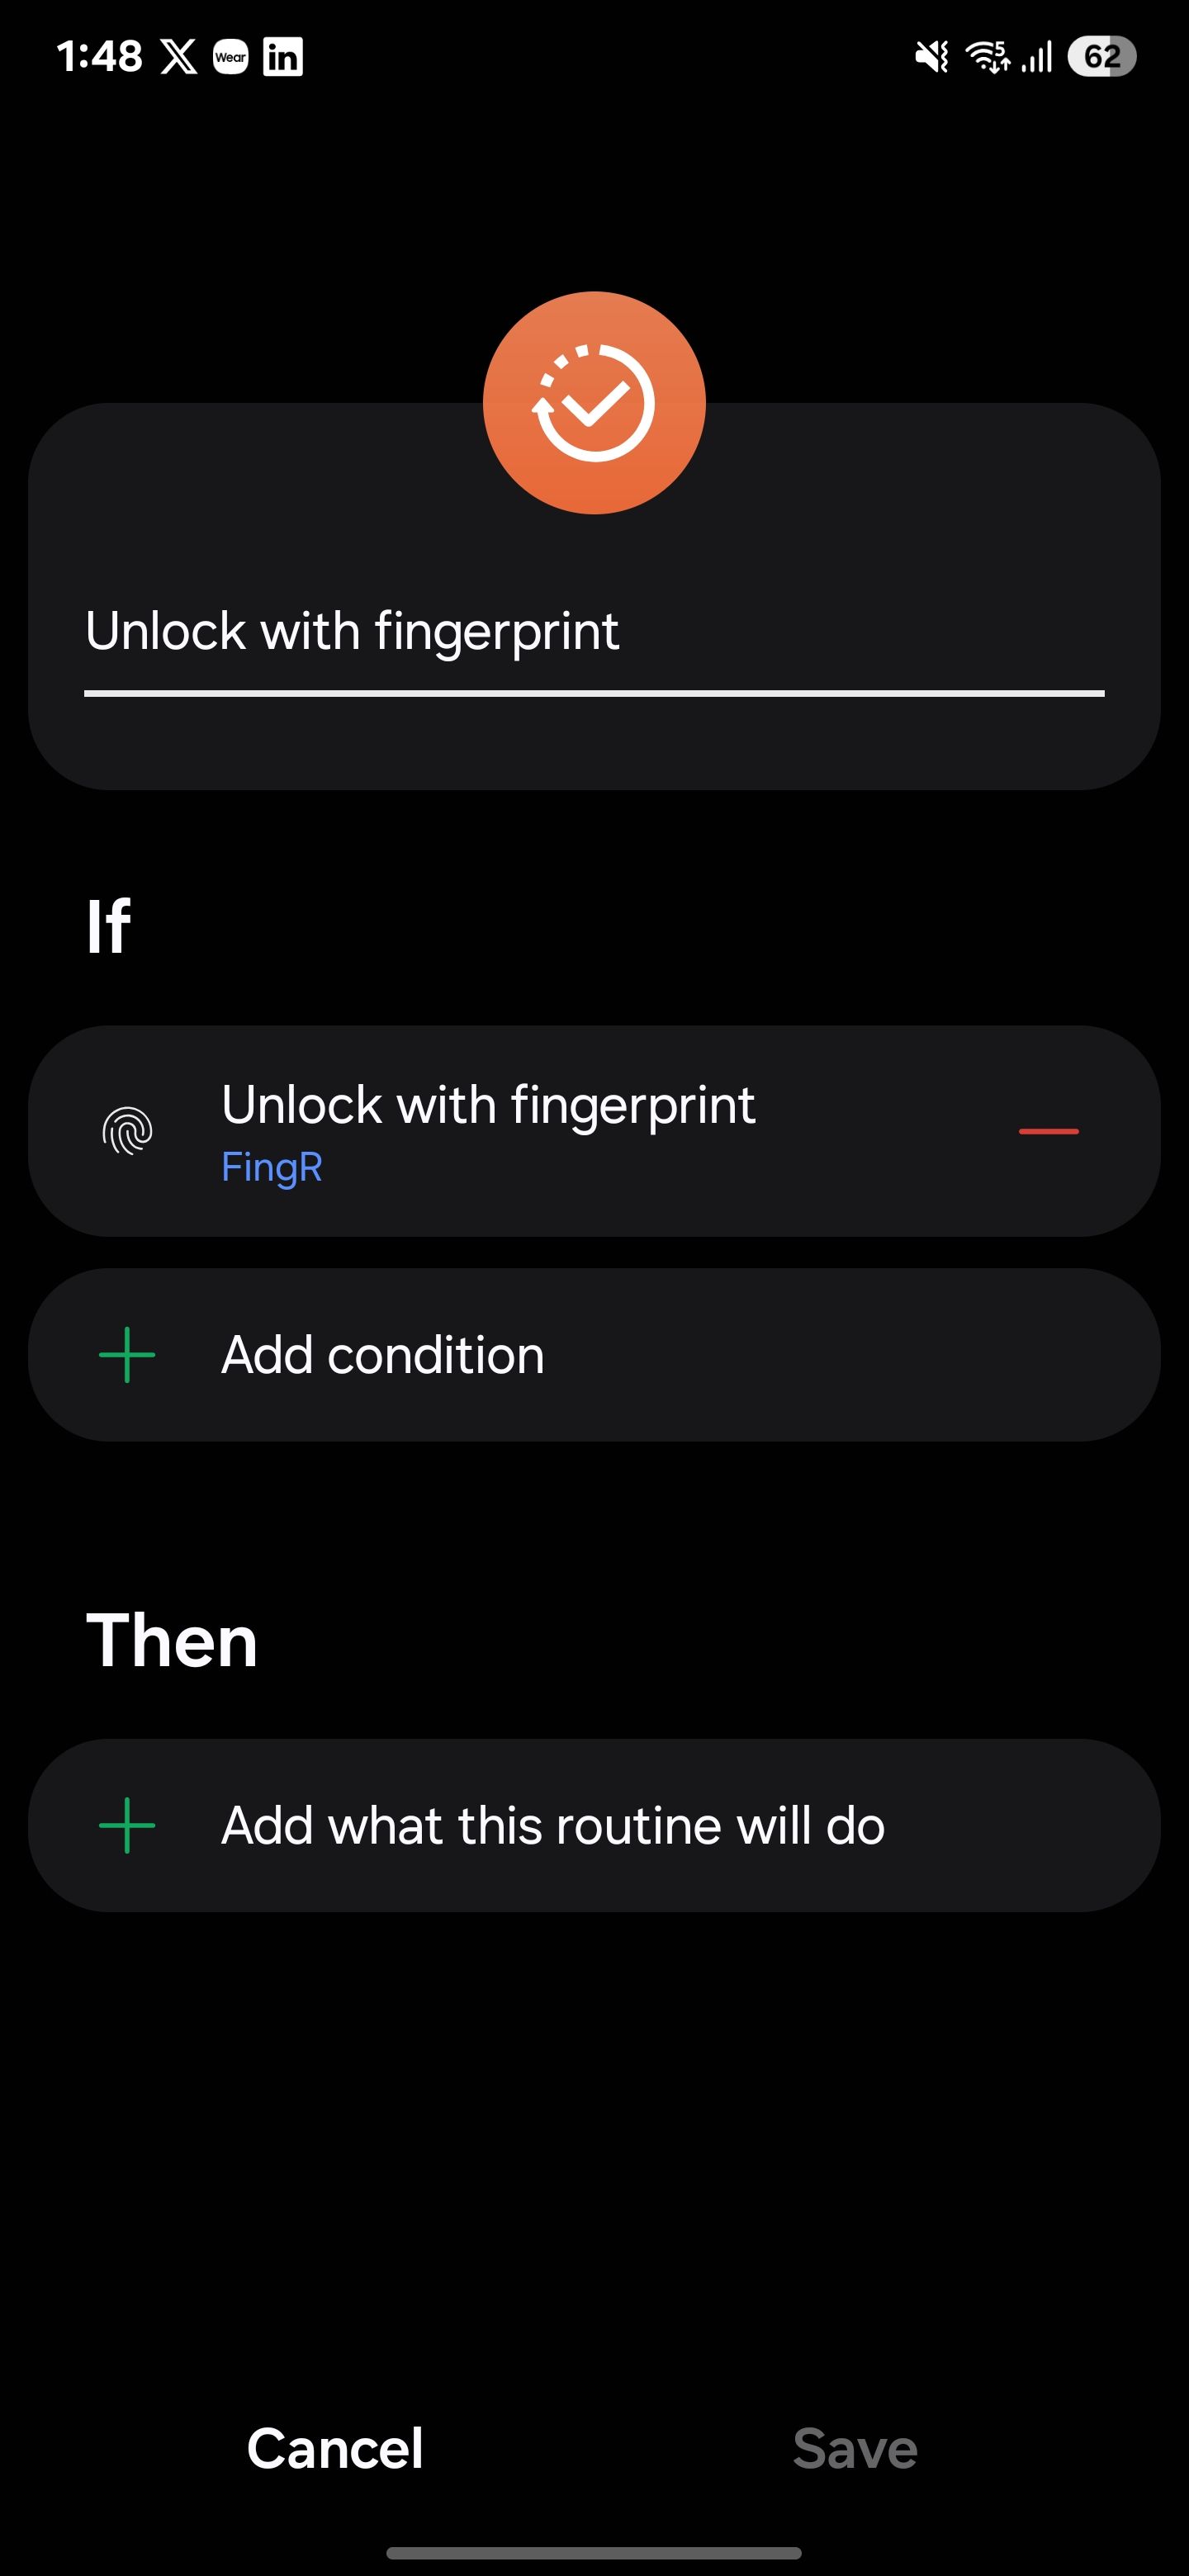
Next, in the Then section, choose Edge Lighting Effect Once and choose the effect you prefer. On the Advanced tab, set the transparency and duration (Short, Medium, or Long). Tap Done, then Save to finish. Now, every time you unlock your phone with that fingerprint, your screen edge will glow coolly.
2
Disabling Fingerprint Unlock at Night
It sounds paranoid, but your fingerprint can unlock your phone while you’re asleep. To avoid that, I turn off fingerprint unlocking at night and switch to a PIN or pattern instead. It’s kind of like enabling Lockdown Mode on Android, but it’s automatic and tied to a set time. This way, I can keep my phone secure and make sure no one secretly uses my fingerprint to unlock it while I’m sleeping.
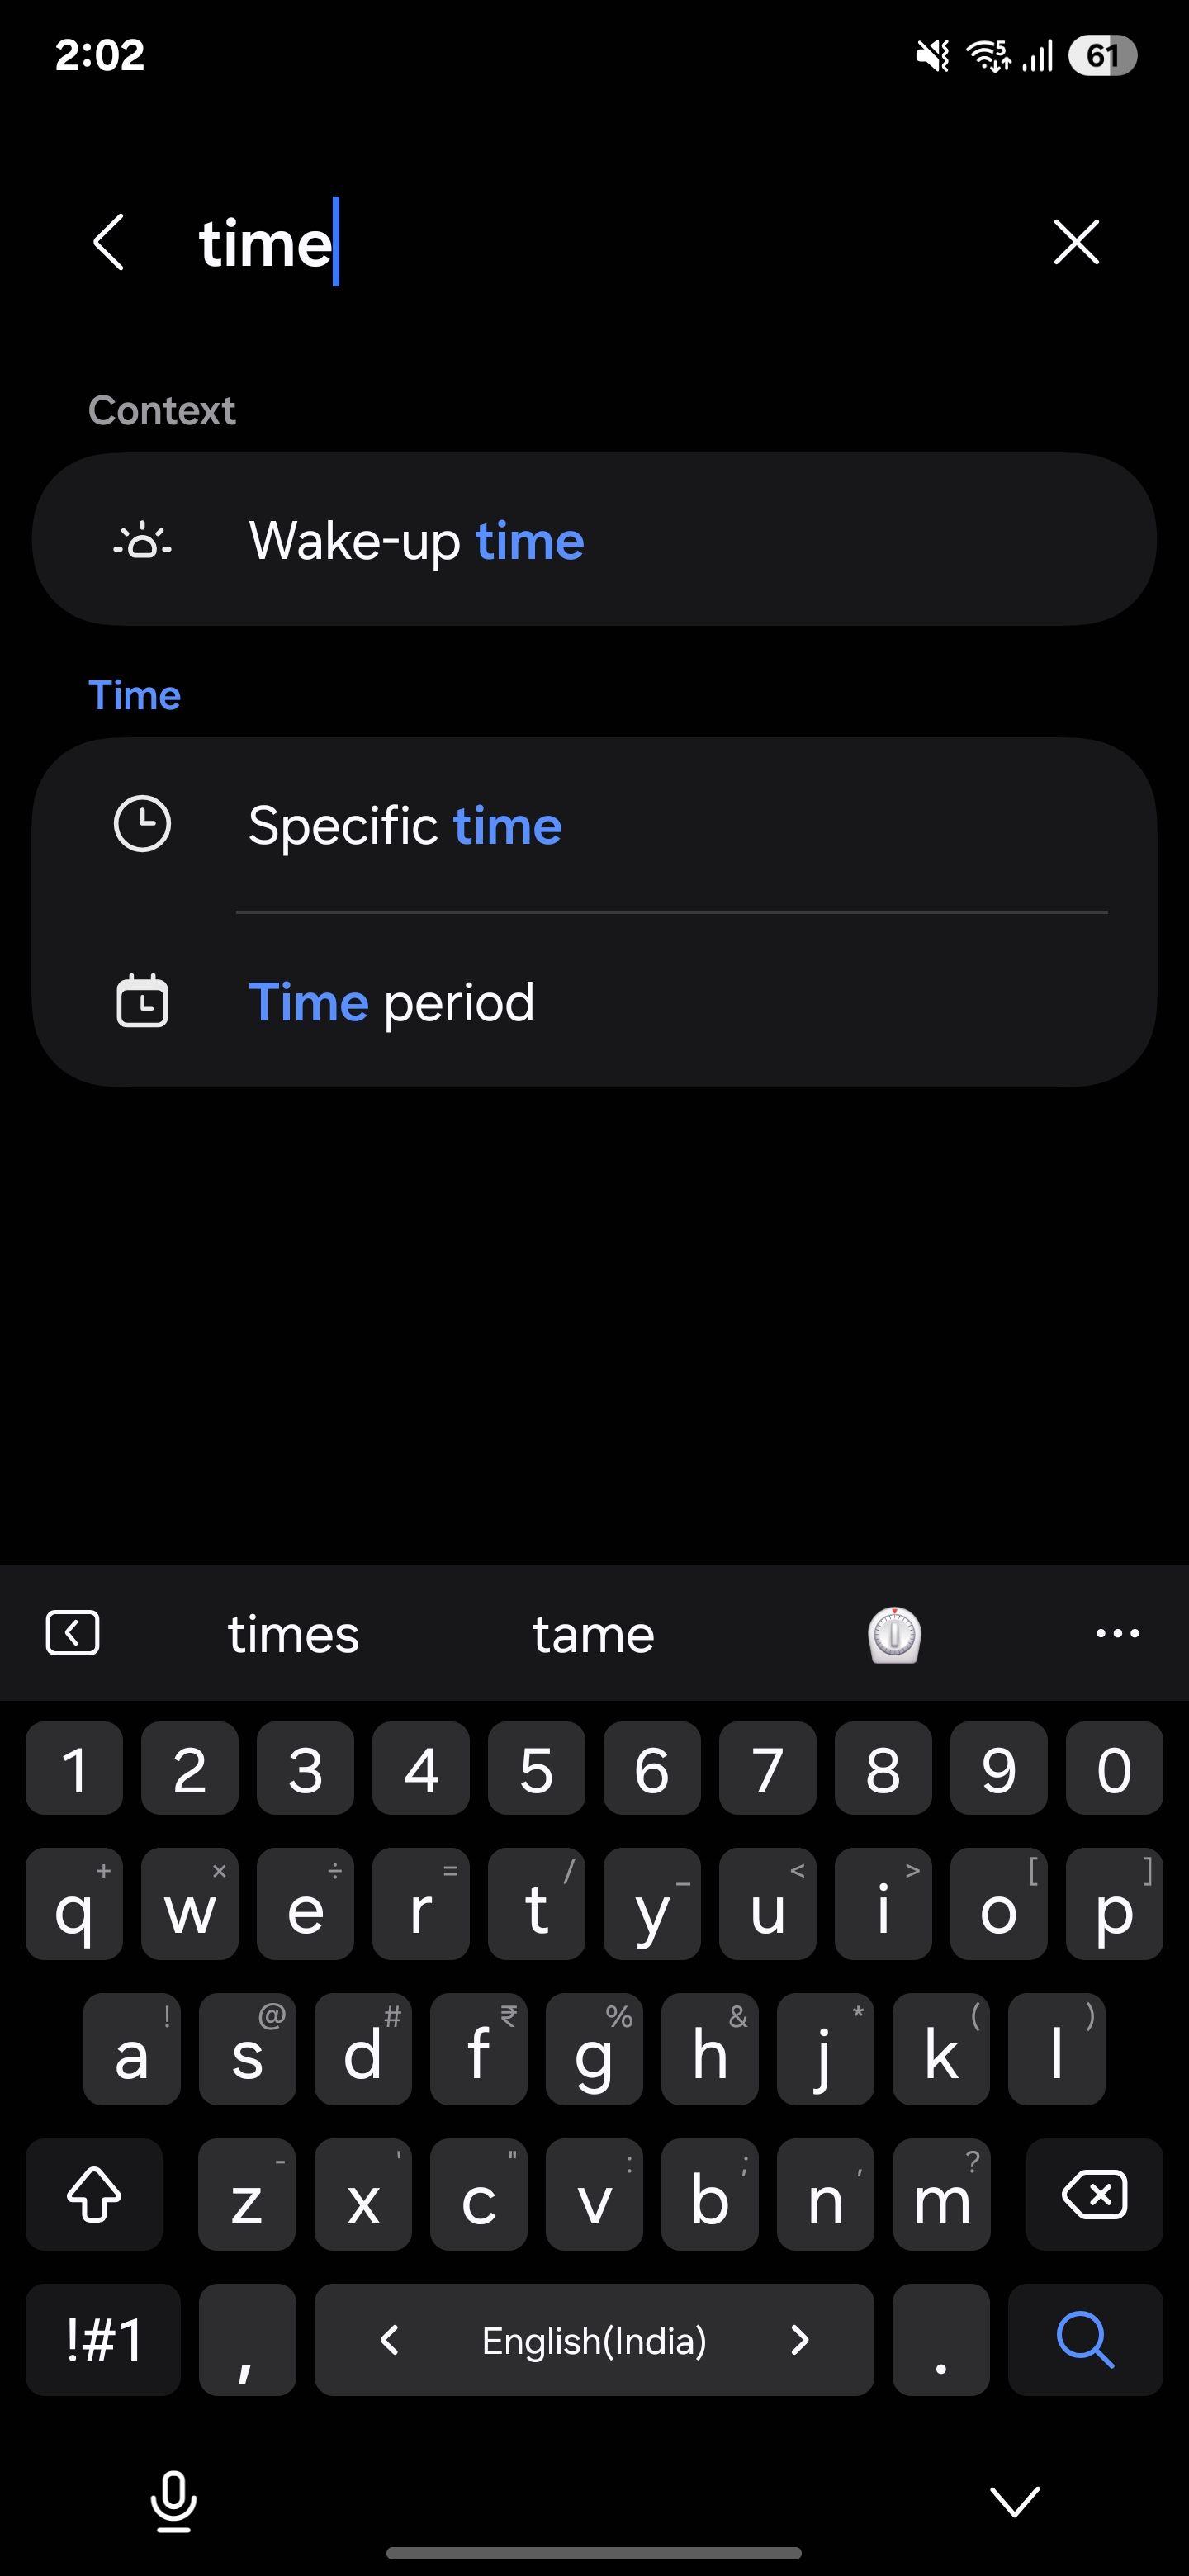
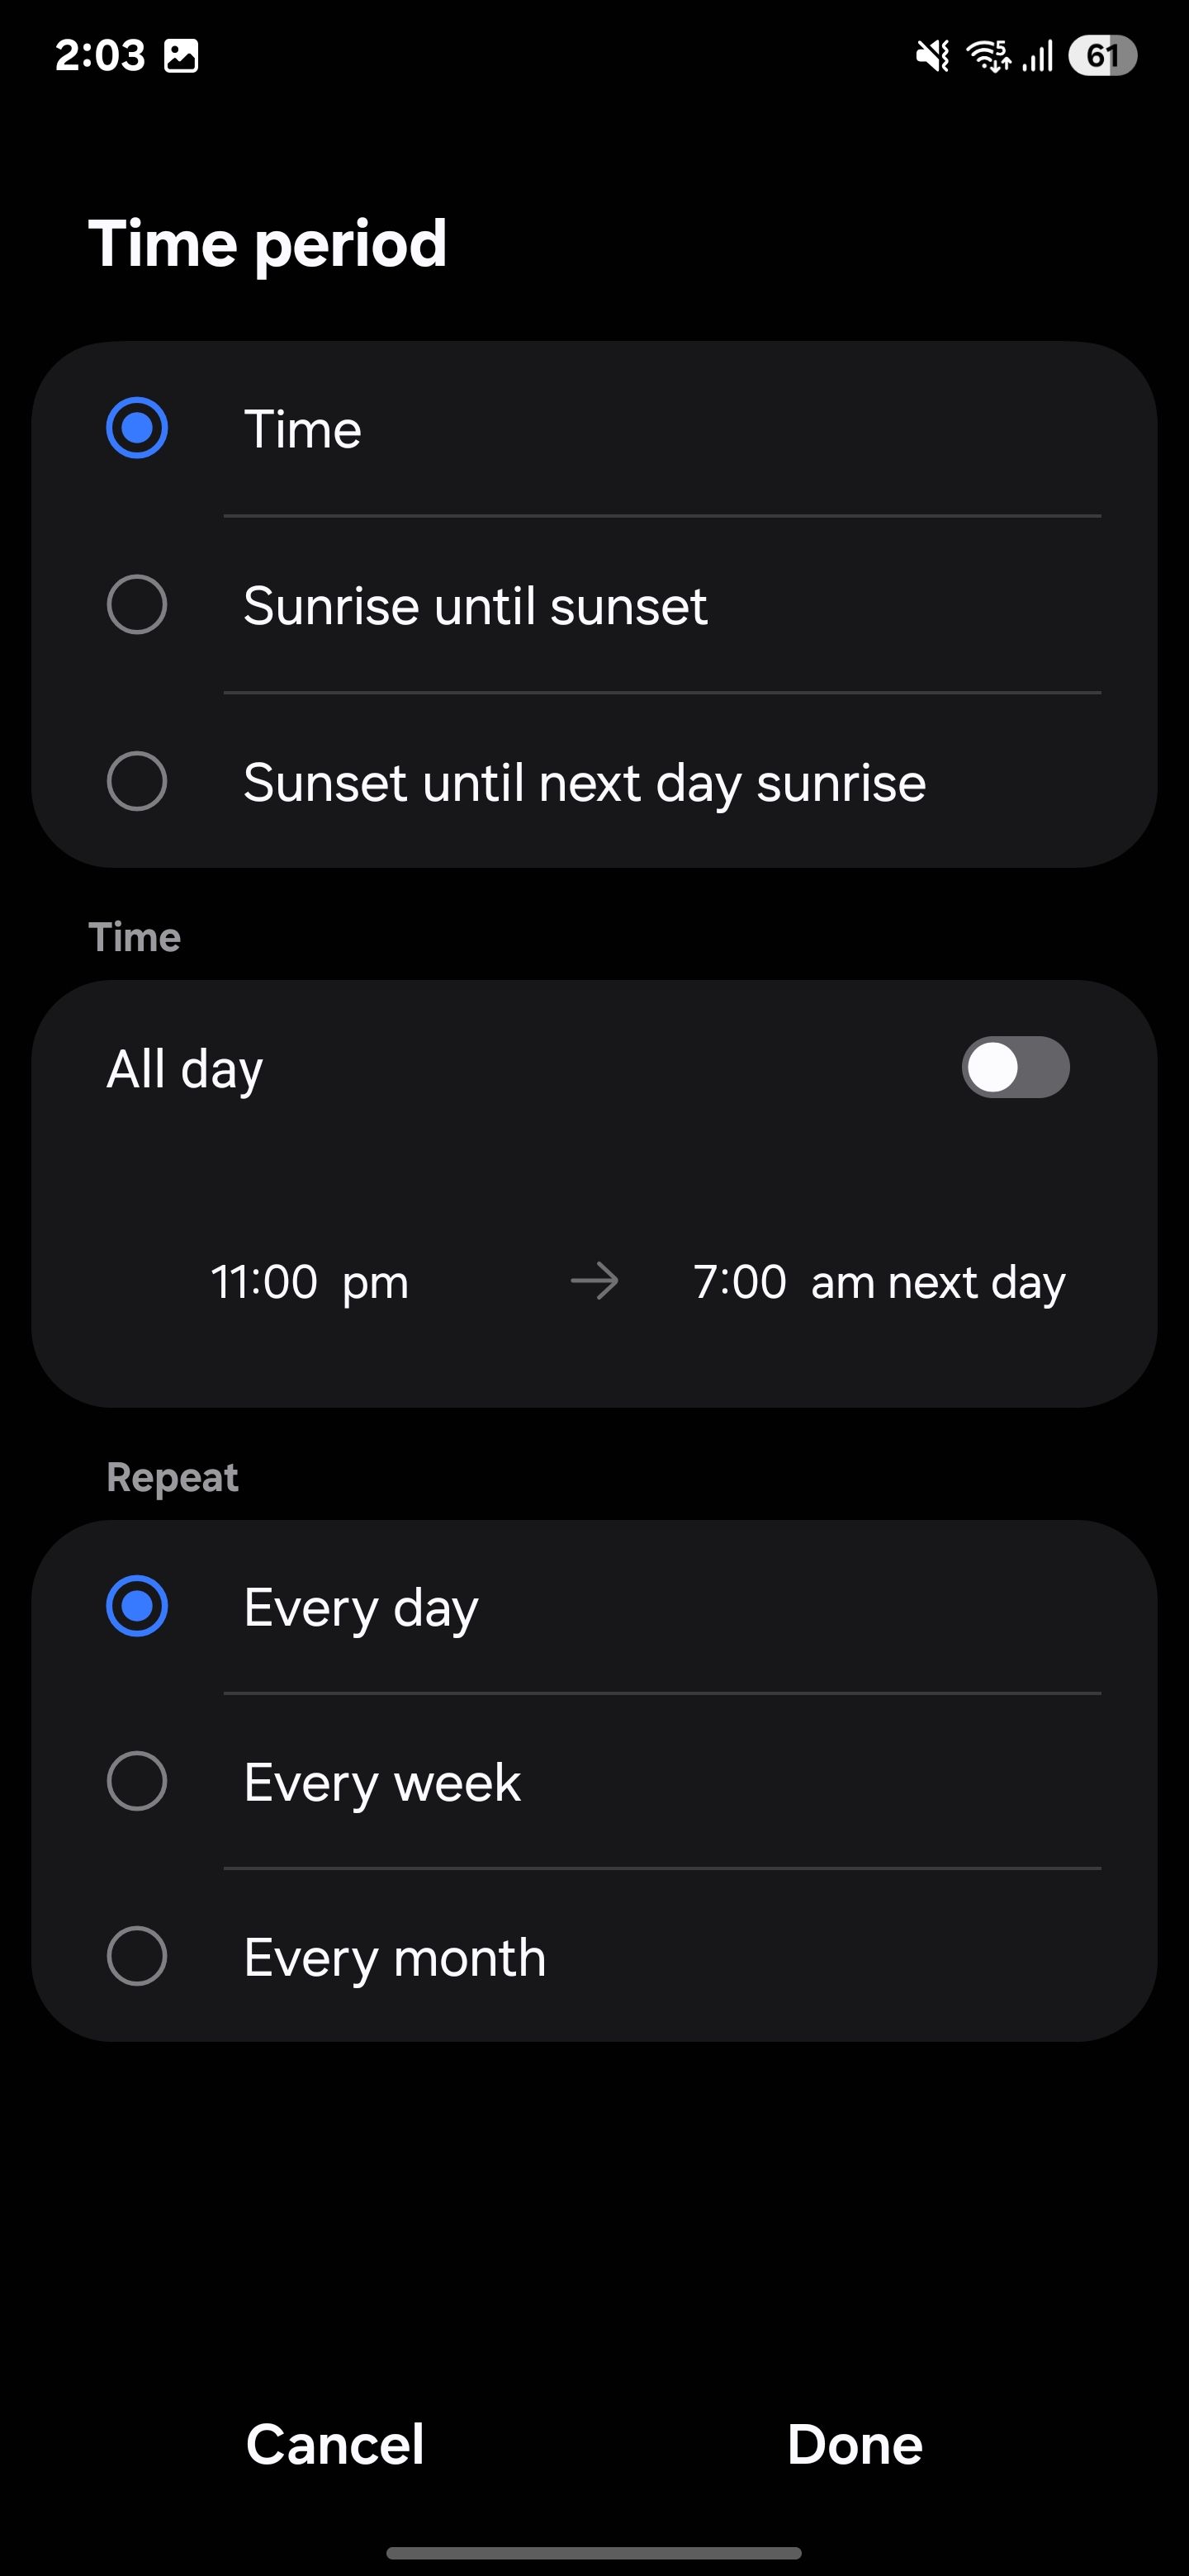
To turn off fingerprint unlocking at night, open Modes and Routines and tap the plus (+) icon. In the If section, select Time period and choose Time. Set the hours you want, like 11 PM to 7 AM, when you’d prefer fingerprint unlocking to be off.
Under Repeat, you can go with Every day, or select specific days if you want it to apply weekly or monthly. Once that’s done, hit Done at the bottom right.
Now, in the Then section, choose Unlock with biometrics and toggle off both Fingerprints and Face. Tap Done, then Save to lock in your routine. Finally, scan your fingerprint to confirm the changes. Your phone will now only unlock with a pattern or PIN at night. Adding this layer of security gives you peace of mind that your personal information stays safe while you sleep.
3
Announcing Battery Status and Charging Events
Ever wished your phone would notify you if it’s charging or running low so you wouldn’t have to keep checking? Well, mine does, and it’s amazing. Whenever it’s plugged in, it says, “Charging started.”
When the battery is low, it chimes, “Battery is below 20%.” Whether I’m working or just watching something, I don’t have to keep checking my phone—I just know. It announces when charging starts, stops, or when the battery reaches certain levels, such as 15%, 80%, or full.
To automate battery-low announcements:
Open the Modes and Routines app on your Samsung device and tap the “+” icon to start a new routine. Under the If section, hit the plus (+) icon to add a trigger. Choose Charging status as the trigger and set it to Not charging.
Then, tap “Add condition (+)” and pick Battery level as the condition. Set it to Below and choose 20% (or whatever percentage works for you).
In the Then section, tap the plus (+) icon and select Show custom notification. In the title field, type something like “Your battery is low, please charge your device,” or whatever suits you.
You can also tweak the notification text to your liking. Turn on Read this notification aloud if you’d like, then tap Done. Finally, hit Save in the bottom right corner to lock in your automation.
Whenever your battery drops below 20%, this automation will activate and send you a customized notification with your chosen title and text. If you’ve turned on the “Read this notification aloud” option, your device will even read it out loud for you!
Similarly, you can set up automation for other situations, like when you plug your device into a charger or when your battery is fully charged.
4
Decline Calls and Send Quick Message
When I’m already on a call, and someone else tries to reach me, it can be tricky to manage both conversations or respond quickly. Thanks to the automatic messaging feature, I can let the second caller know I’m busy and will get back to them ASAP.
It helps me stay professional and prevents me from being rude or unresponsive. If you often encounter situations like this, try this automation.
To set up this automation, head to Settings on your phone and tap on Modes and Routines. Hit the plus (+) icon to start a new routine. Under If, tap the “+” icon, select During calls, and choose From anyone for all callers or From specific callers for certain people. Tap Done to confirm the trigger.
For the action, tap plus (+) under Then and select Decline call and send a quick message. Customize the message that will be sent to the caller, such as “Sorry, I’m busy right now. Will get back to you shortly.” When you’re all set, hit Save and give your routine a name.
From now on, whenever you get a call while you’re already on one, your phone will automatically decline it and send a pre-set or customized message to the caller.
5
Switch to Dark Mode at Night
Dark Mode is a cool, eye-friendly feature that saves battery, especially on devices with OLED or AMOLED screens. But I don’t always want it on during the day, so I set it up for automatic switching at night.
I no longer have to remember to toggle the Dark Mode feature every night for a more comfortable browsing experience. If you’re a night owl like me, this automation is worth setting up.
To set up automatic Dark Mode switching, open the Routines and Modes app on your Samsung device and tap the “+” icon. In the If section, tap “+” to add a trigger. Select Time period and choose Sunset until next day sunrise as your timeframe.
This way, Dark Mode will turn on at sunset and switch back to Light Mode at sunrise. You can also set a custom schedule if needed. Under Repeat, select Every day or specific days for your routine.
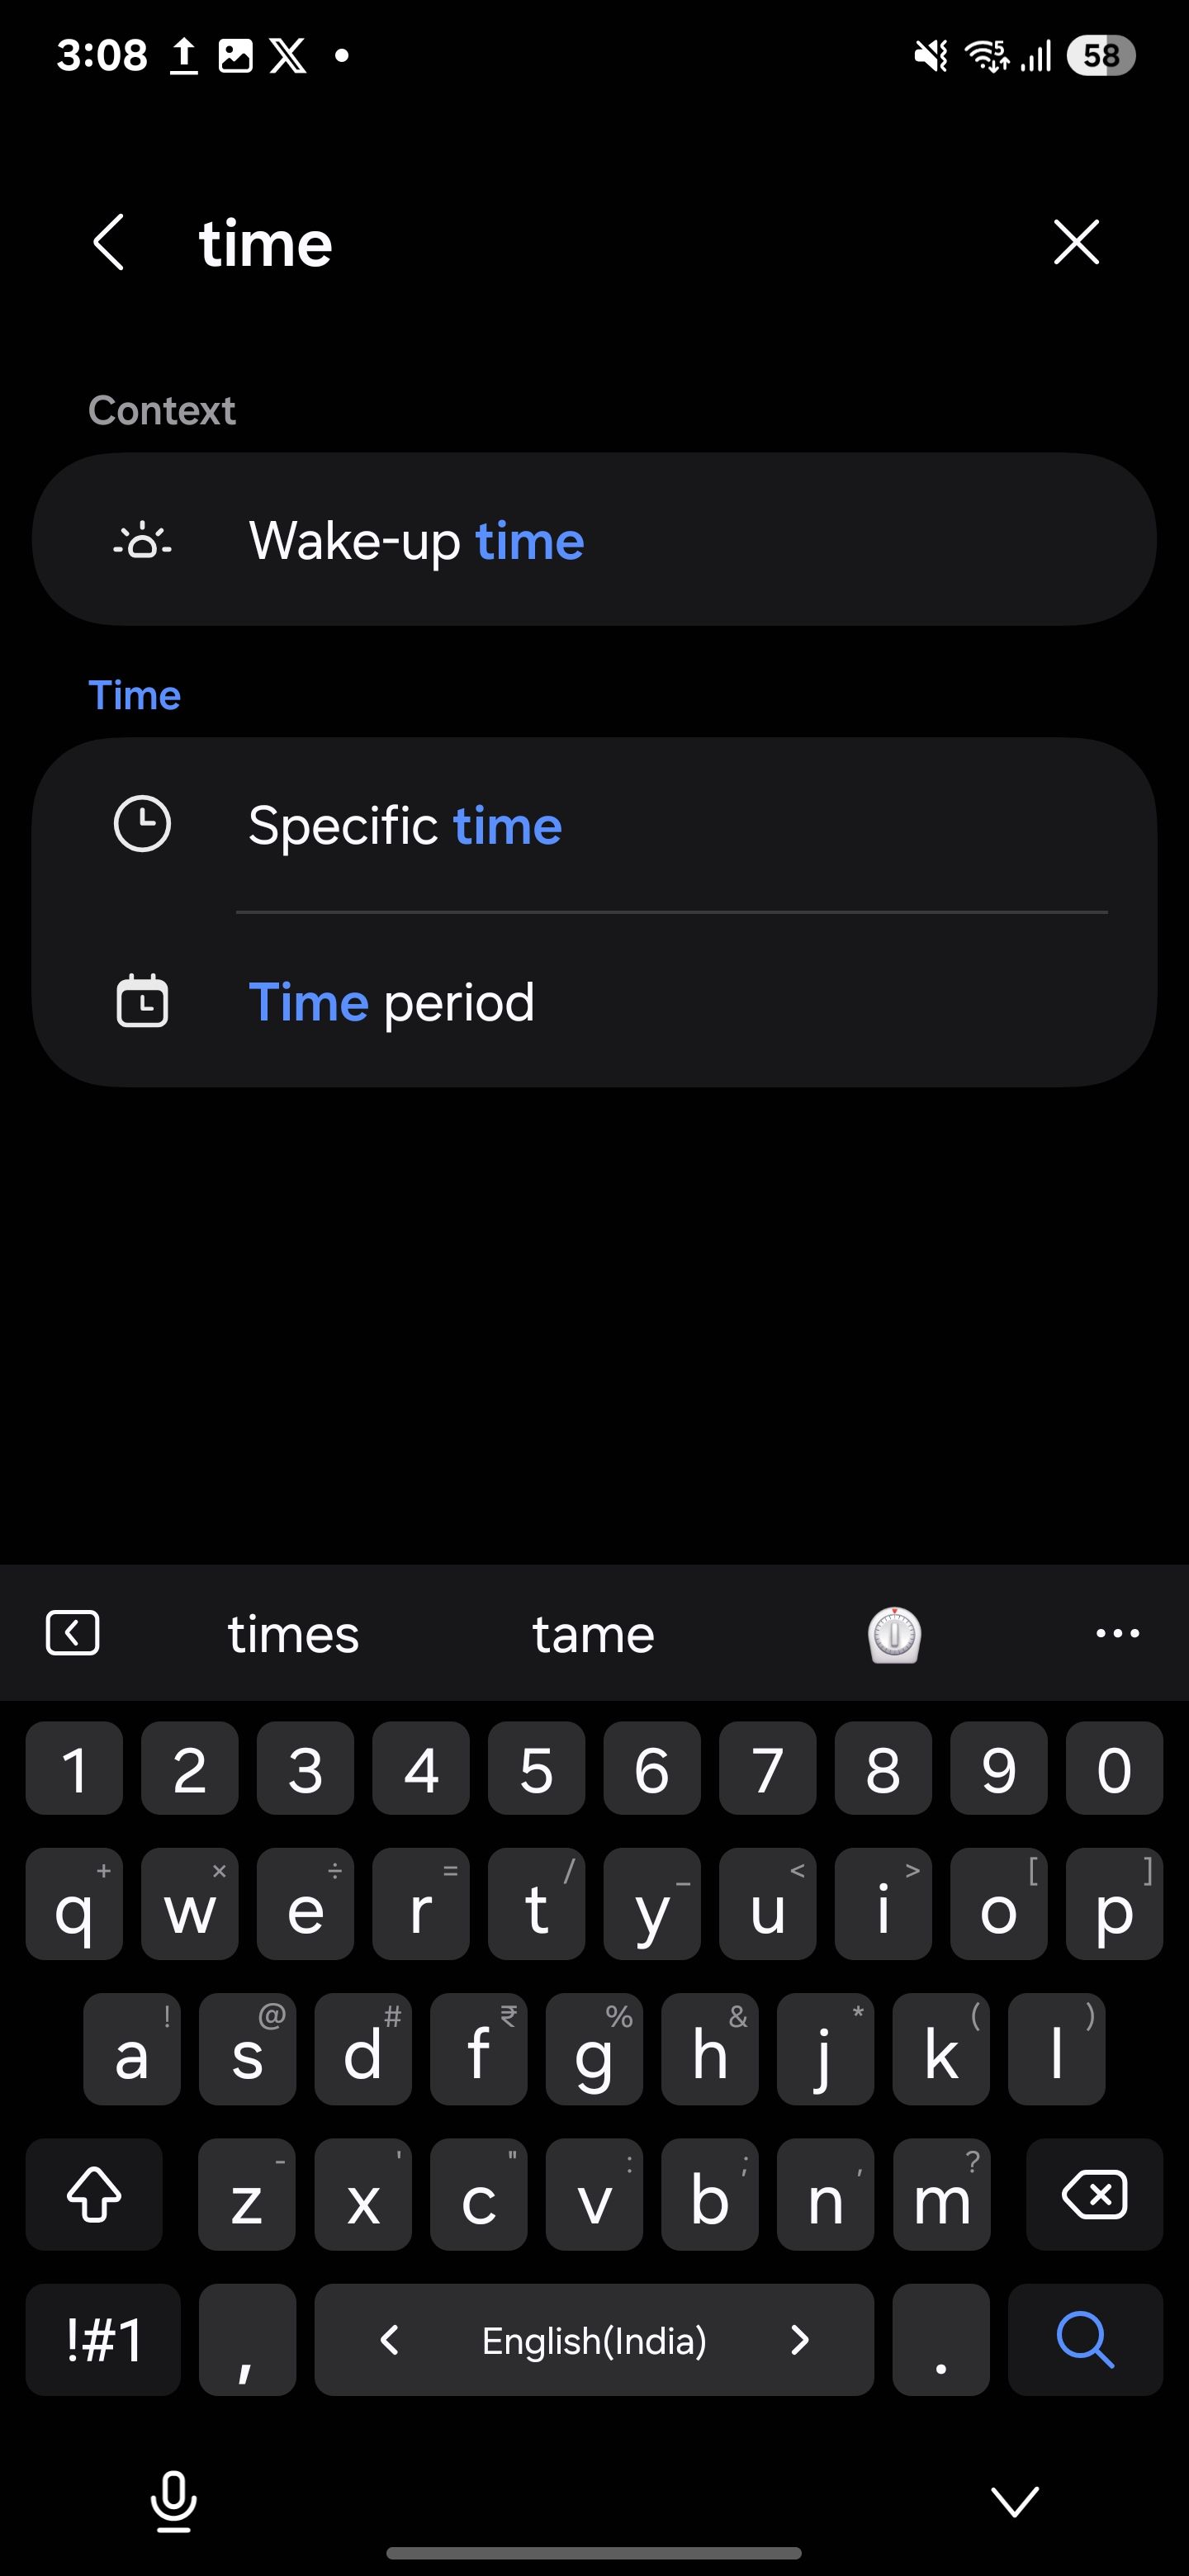
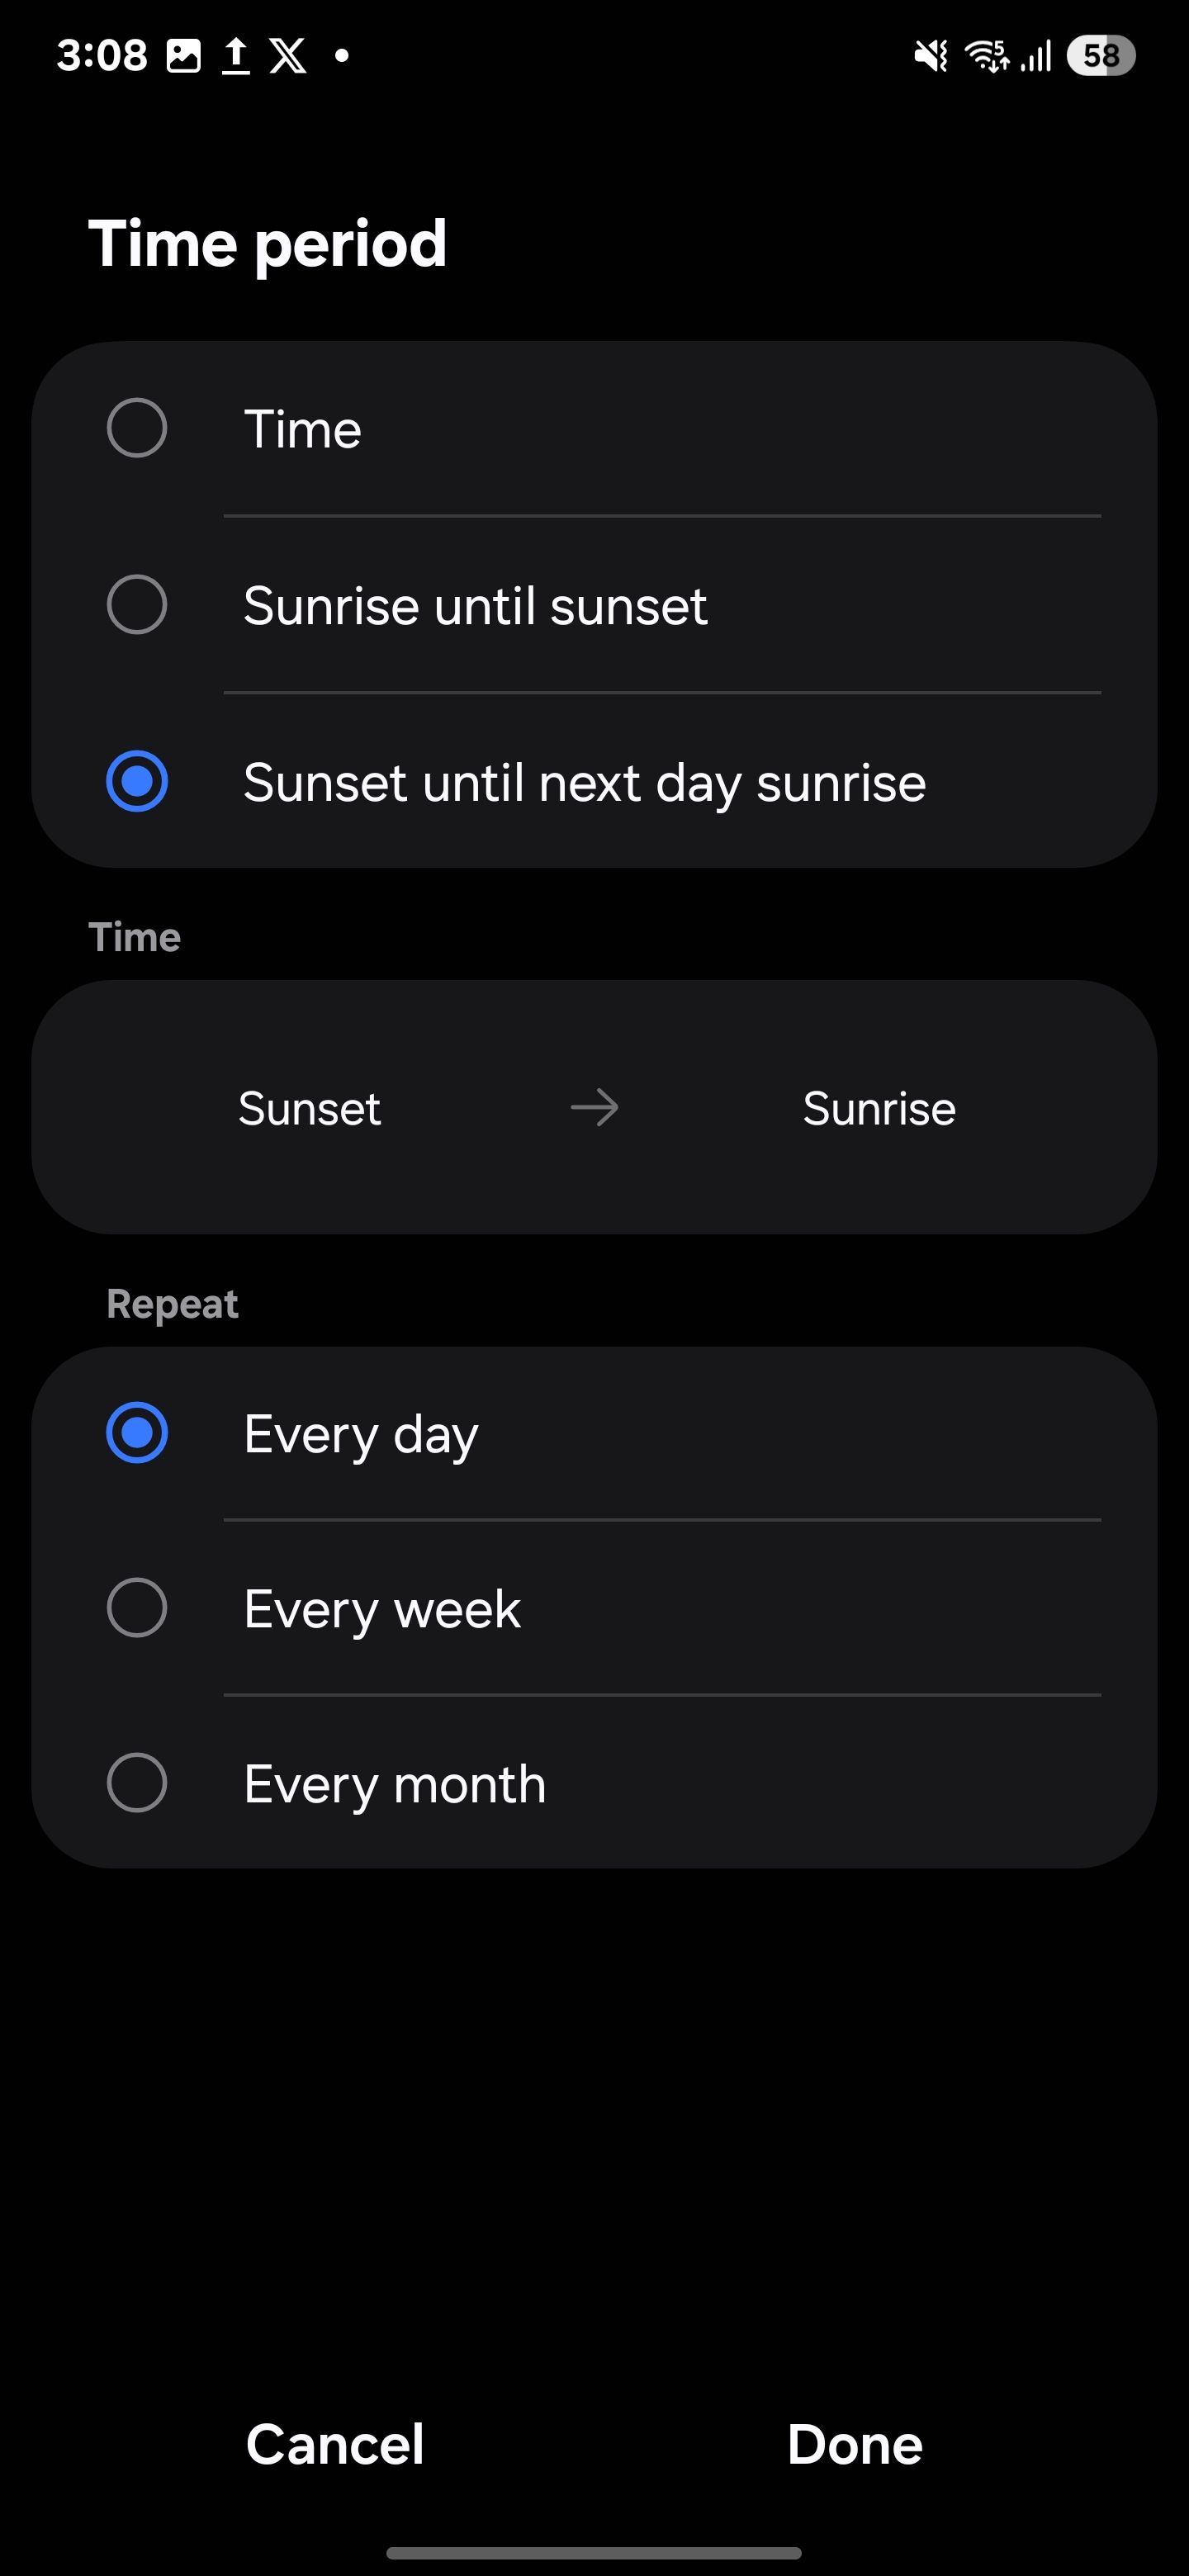
In the Then section, select Dark Mode, set it to On, and tap Done. You can also add Eye Comfort Shield with Adaptive (auto-adjusts screen color) or Custom (manual temperature adjustments). Finally, tap Save, name your routine, and you’re done.
6
Power Saving Mode When Battery Is Low
When my battery drops below a certain threshold (like 20%), this routine activates Power Saving Mode. It reduces performance, limits background activity, and restricts certain features, giving me just enough juice to make it home without hunting for a charger.
To set up this routine, head to Settings > Modes and Routines, and tap the plus (+) icon. Under the If section, choose Battery level, set it to less than 20%, and tap Done. Next, in the Then section, search for Power saving and turn it On. Tap Done > Save, give your routine a name, and hit Done again.
When your battery drops to 20% or less, your phone will automatically switch to power-saving mode—giving you the extra boost to get through the day.
7
Turn Wi-Fi On at Home, and Use Mobile Data When Away
This automation eliminates the daily hassle of switching Wi-Fi on and off. At home, my phone automatically connects to Wi-Fi, saving mobile data. The moment I step out, it switches to mobile data, so I don’t have to deal with connection drops when I’m out of range. It’s smooth, saves battery, and ensures I’m always connected to the best network available.
To set up this automation, head over to Settings > Modes and Routines. Switch to the Routines tab and hit the plus (+) icon to trigger a new automation. Under If, tap the “+” icon, search for Place, and pick either My current location or Home (if you’ve already set it up).
Adjust the slider to set the radius for triggering the automation—I’d recommend a larger radius if you frequently commute between home and work. Then, choose When I arrive and hit Done.
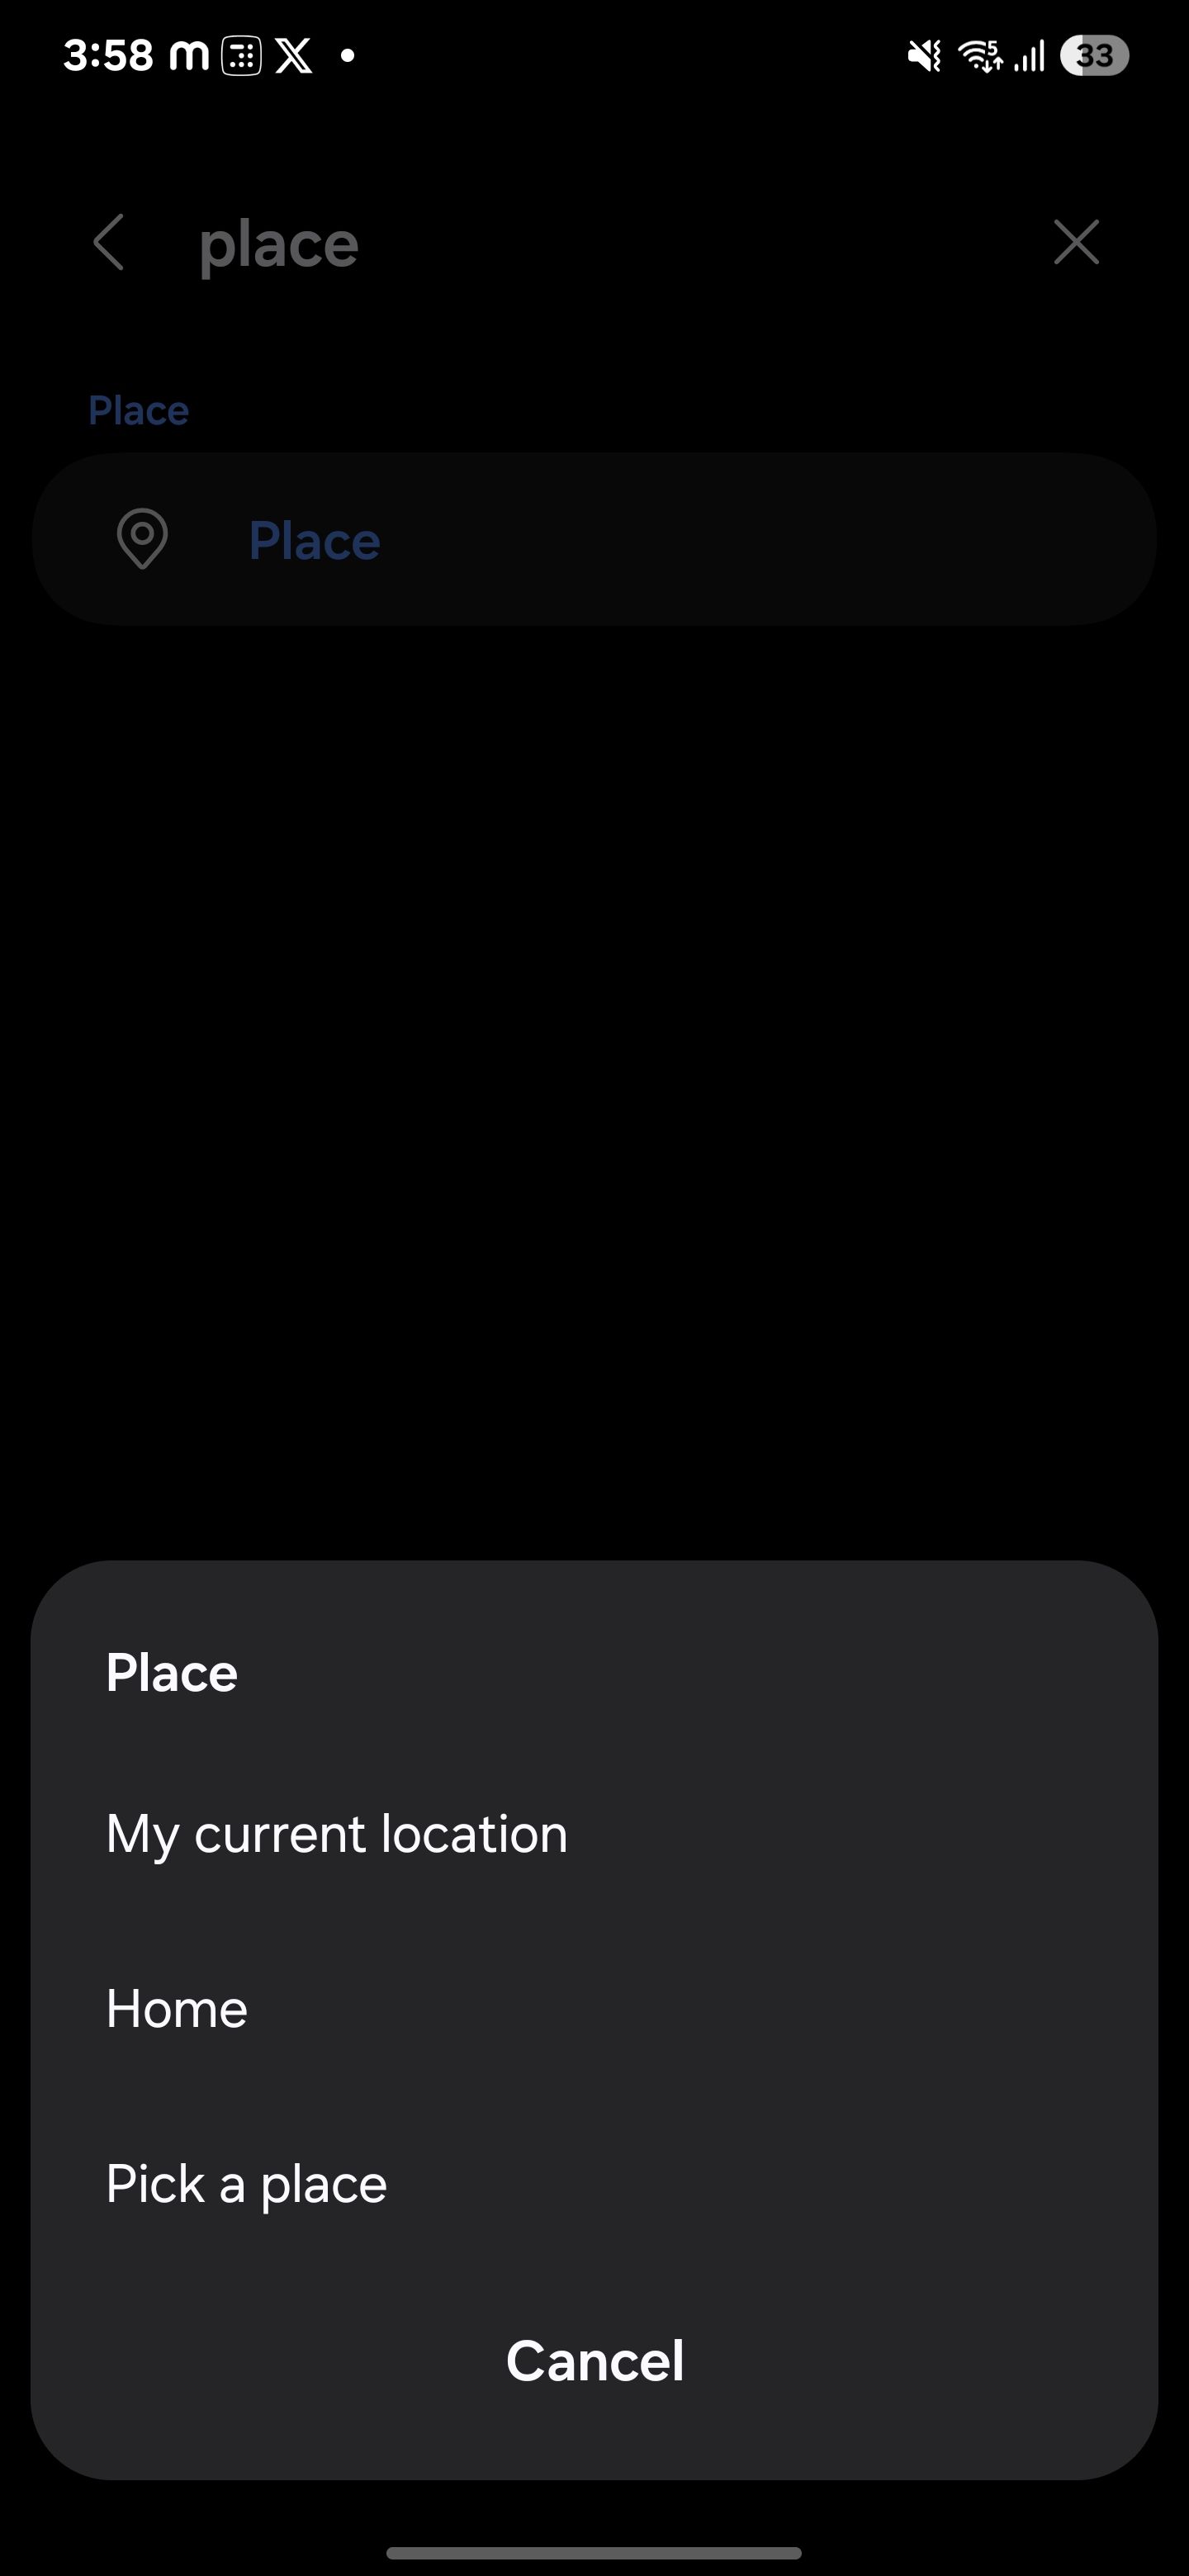
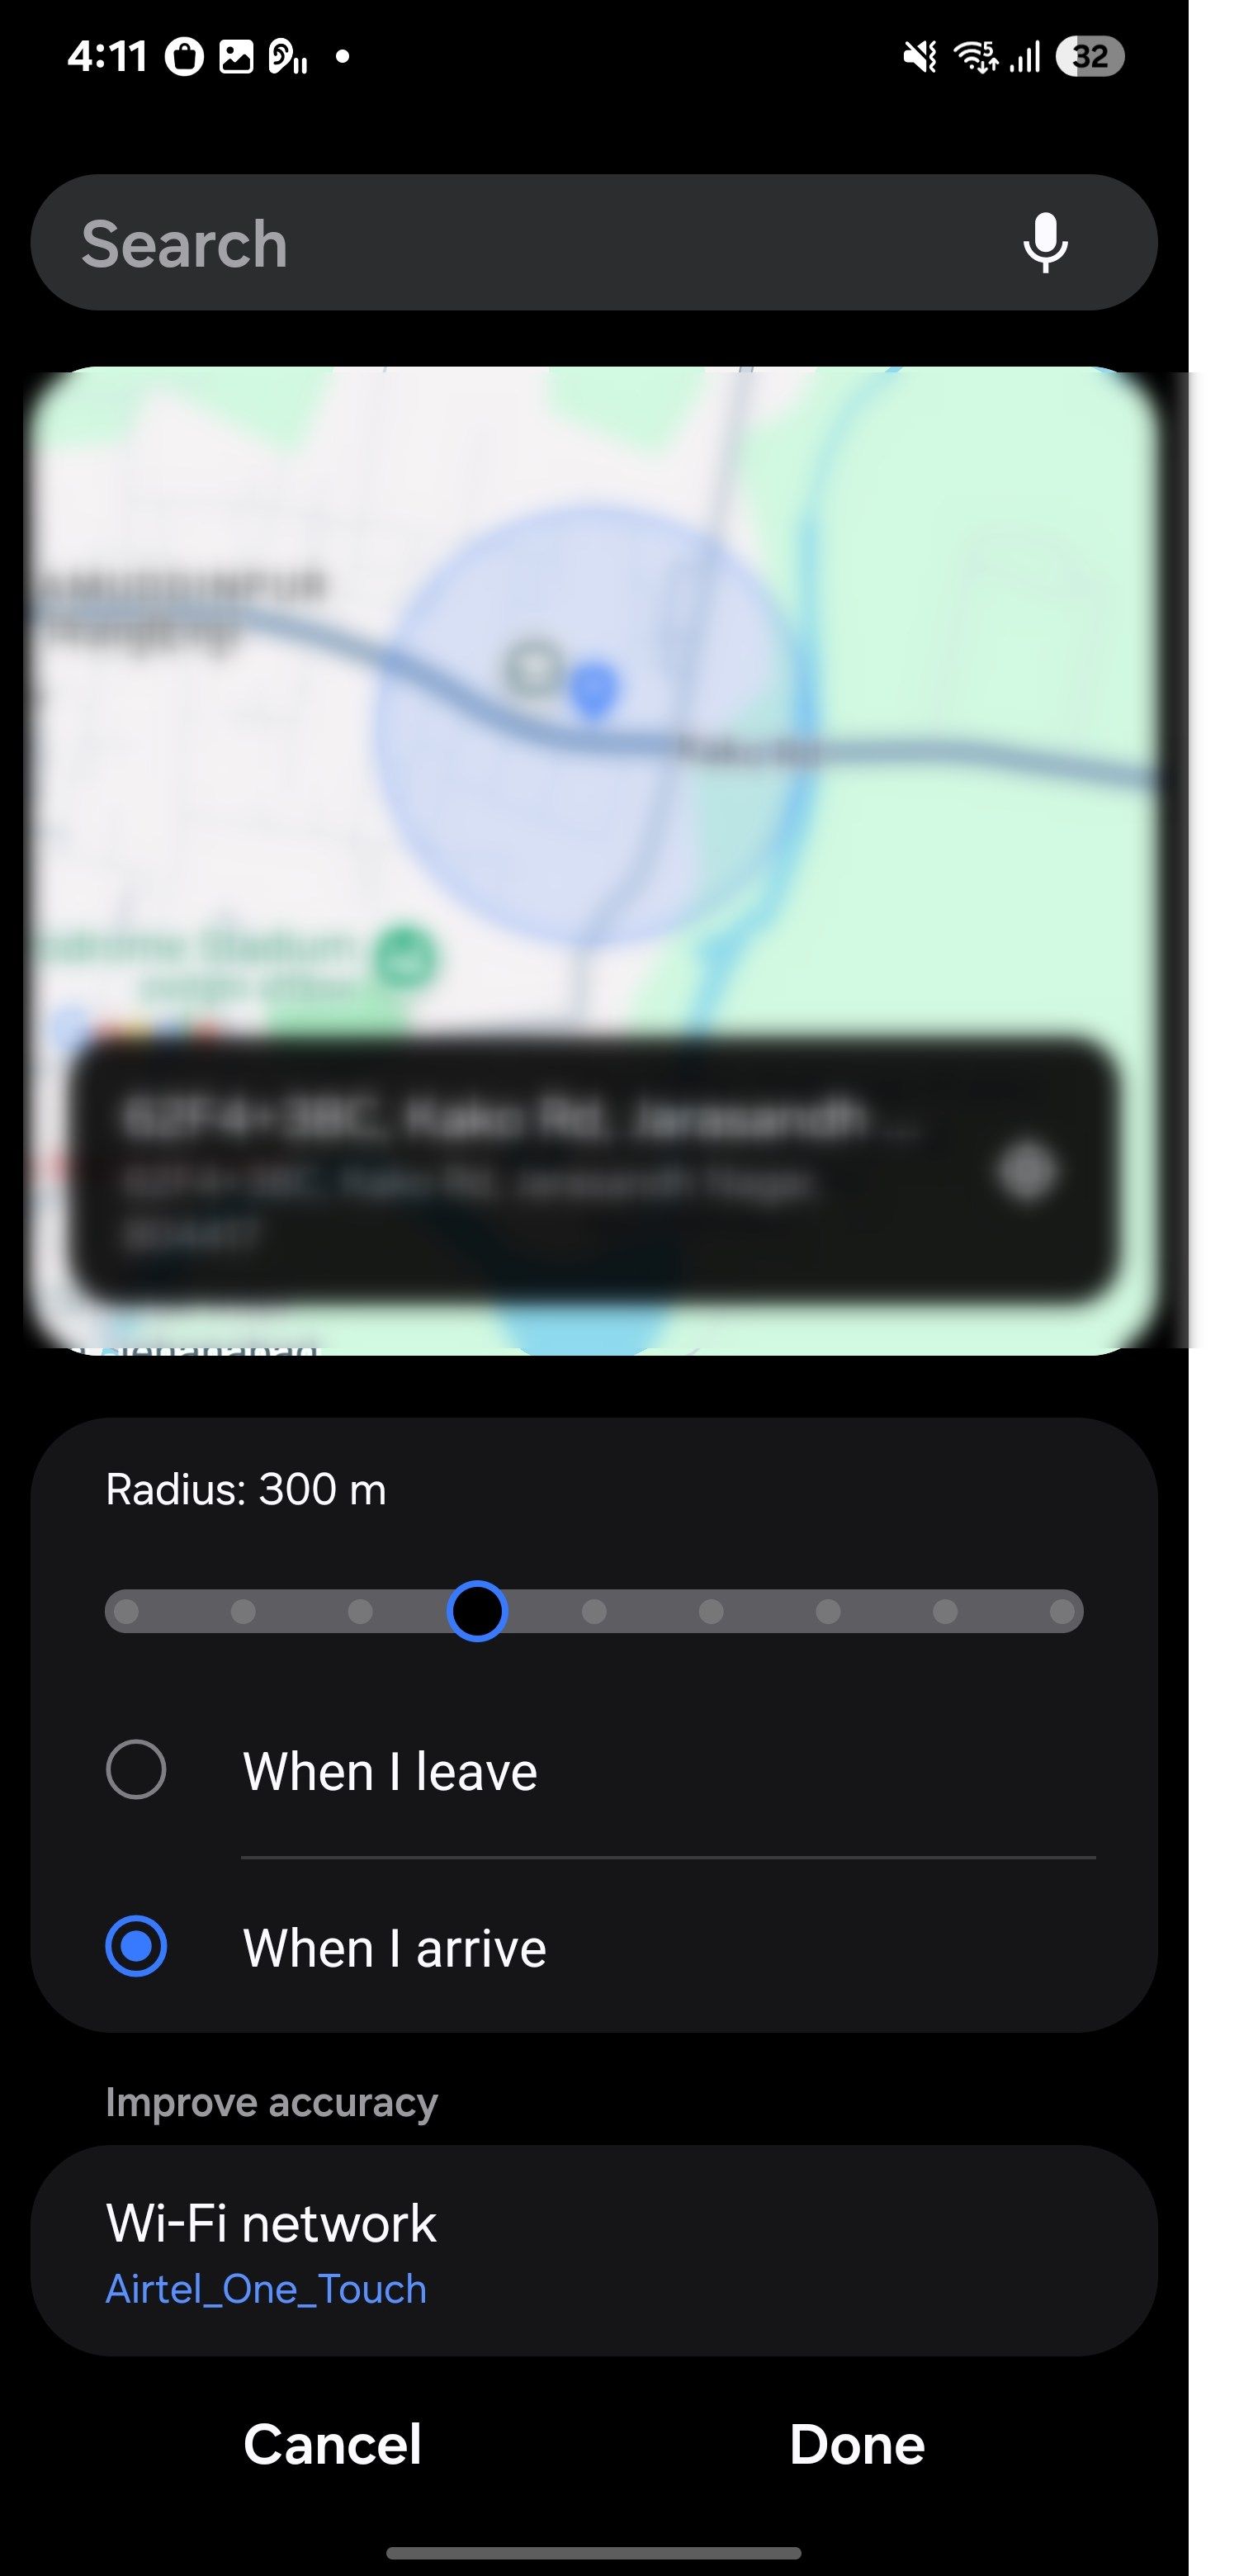
In the Then section, search for and select Wi-Fi, set it to On, and tap Done. After that, tap the “+” icon to add another action, choose Mobile Data, and set it to Off. Once completed, tap Done > Save to activate the automation. To finish, give your automation a name and pick an icon to make it easy to spot.
When you arrive home, your phone will automatically turn on Wi-Fi and turn off mobile data. It’s a quick and easy way to save both data and battery life.
You can also create an automation for when you leave home to turn off Wi-Fi and switch on mobile data. Just follow the same steps as before, but this time, pick When I leave as the trigger. Then, set Wi-Fi to Off and Mobile data to On.
Whenever you head out, your phone will automatically switch to mobile data, so you stay connected and never miss important notifications or emails while you’re away.
8
Optimizing Entertainment Settings
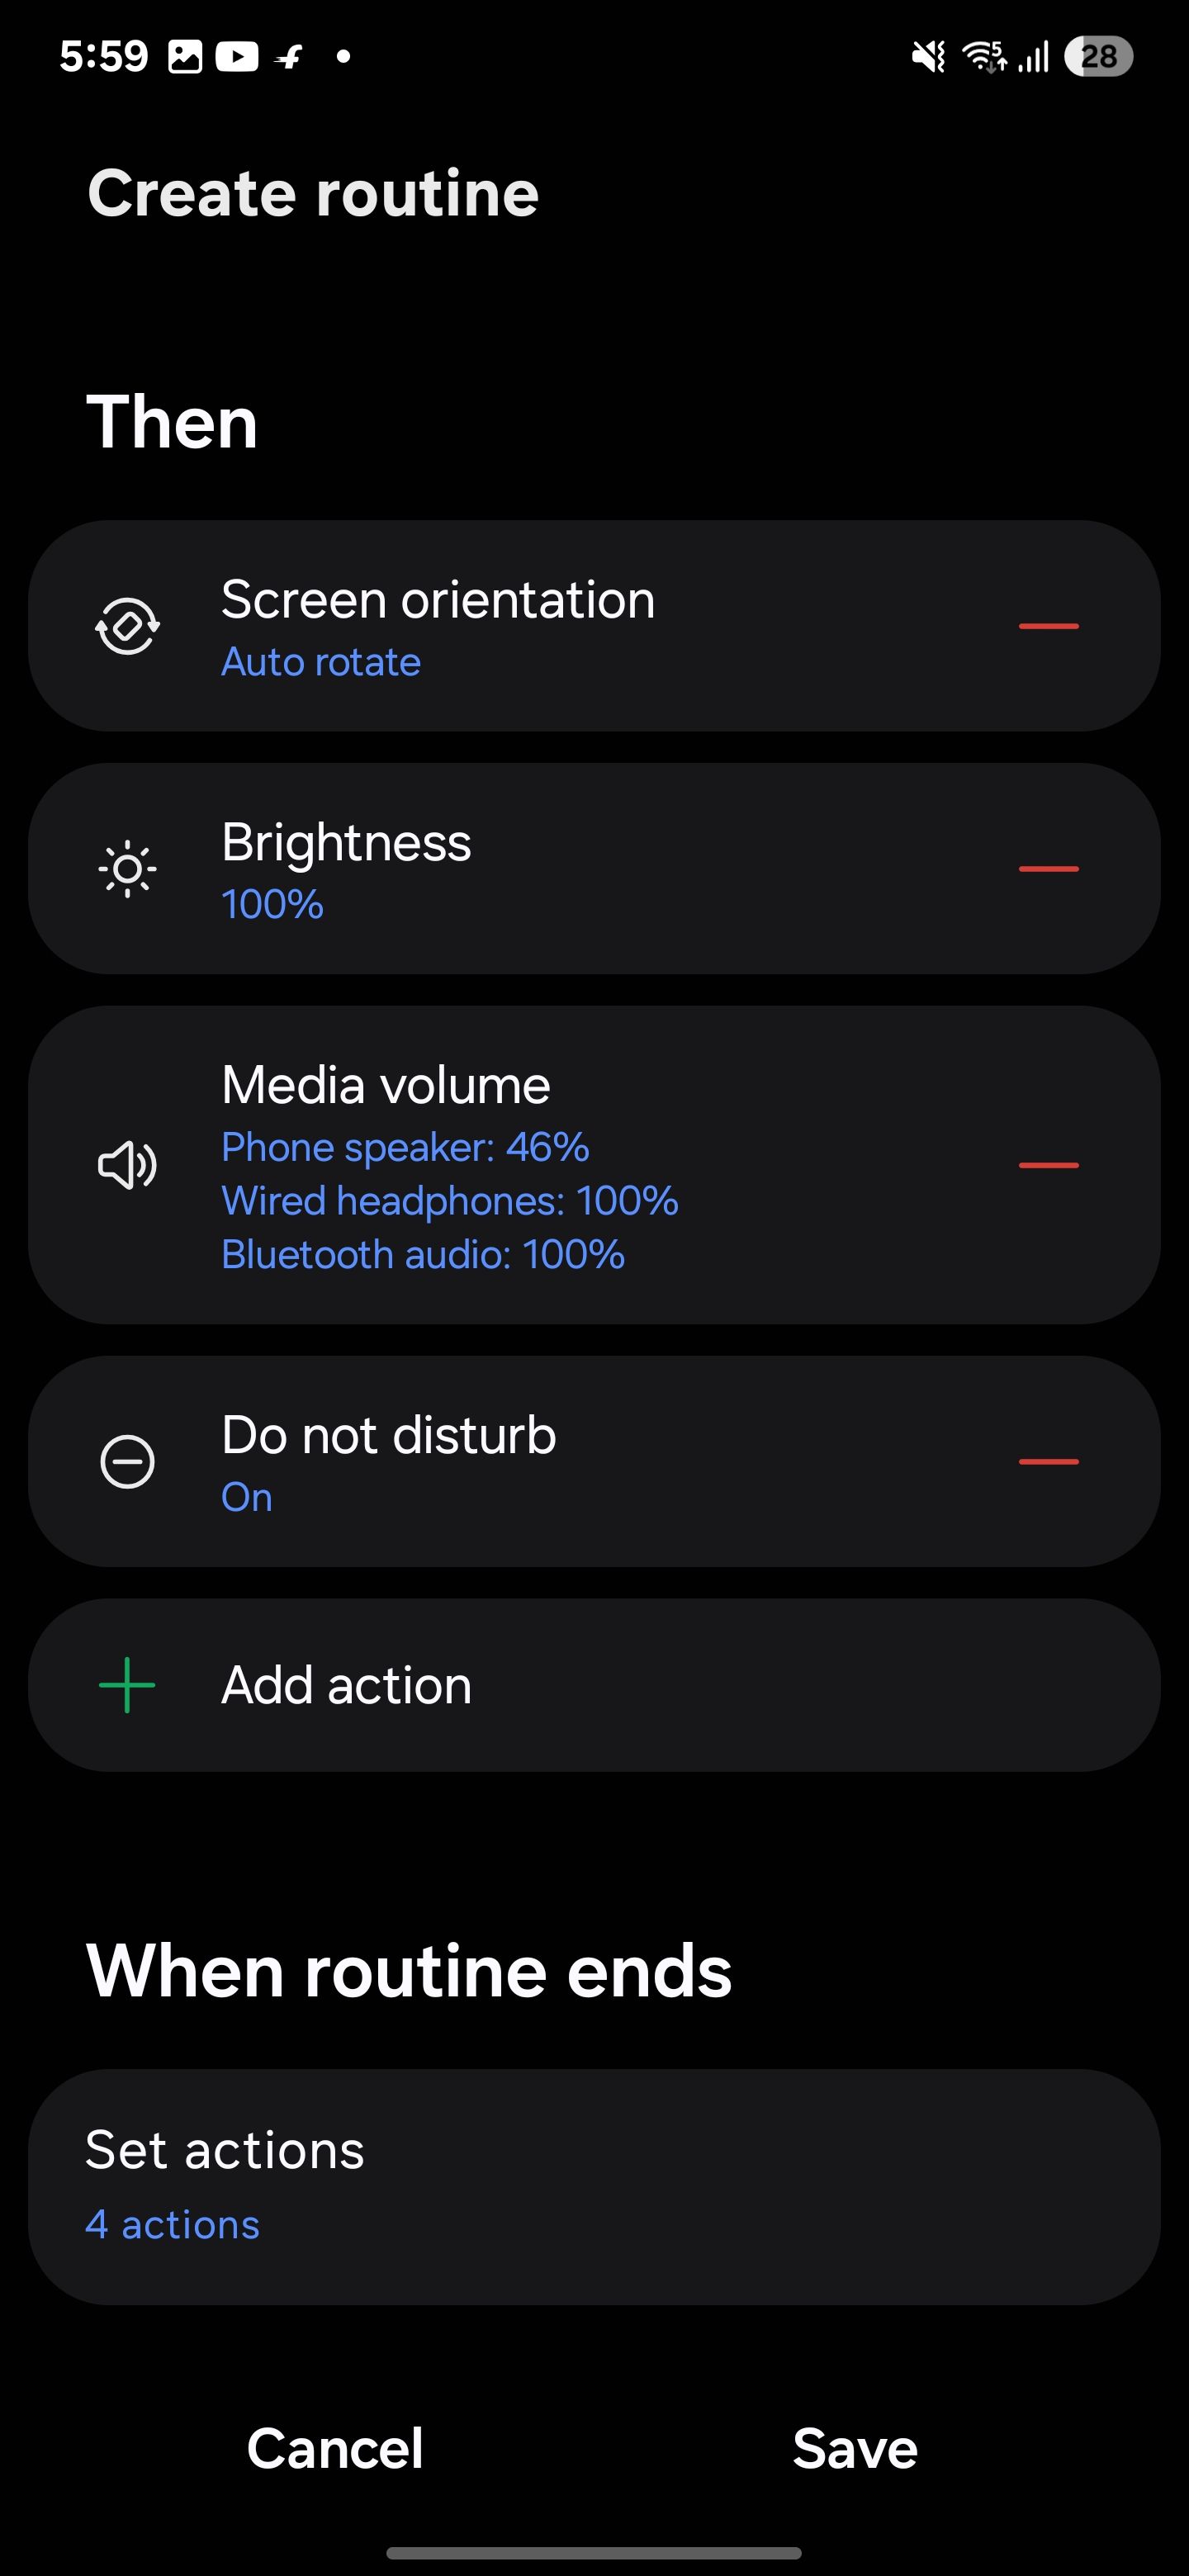
When I binge-watch or listen to music, I want no interruptions. So, I built a one-tap routine I call Entertainment Mode. It turns on Do Not Disturb, enables Dolby Atmos, raises the brightness, and sets the volume slightly above my normal level. This lets me fully immerse myself in my favorite shows and tunes without any distractions.
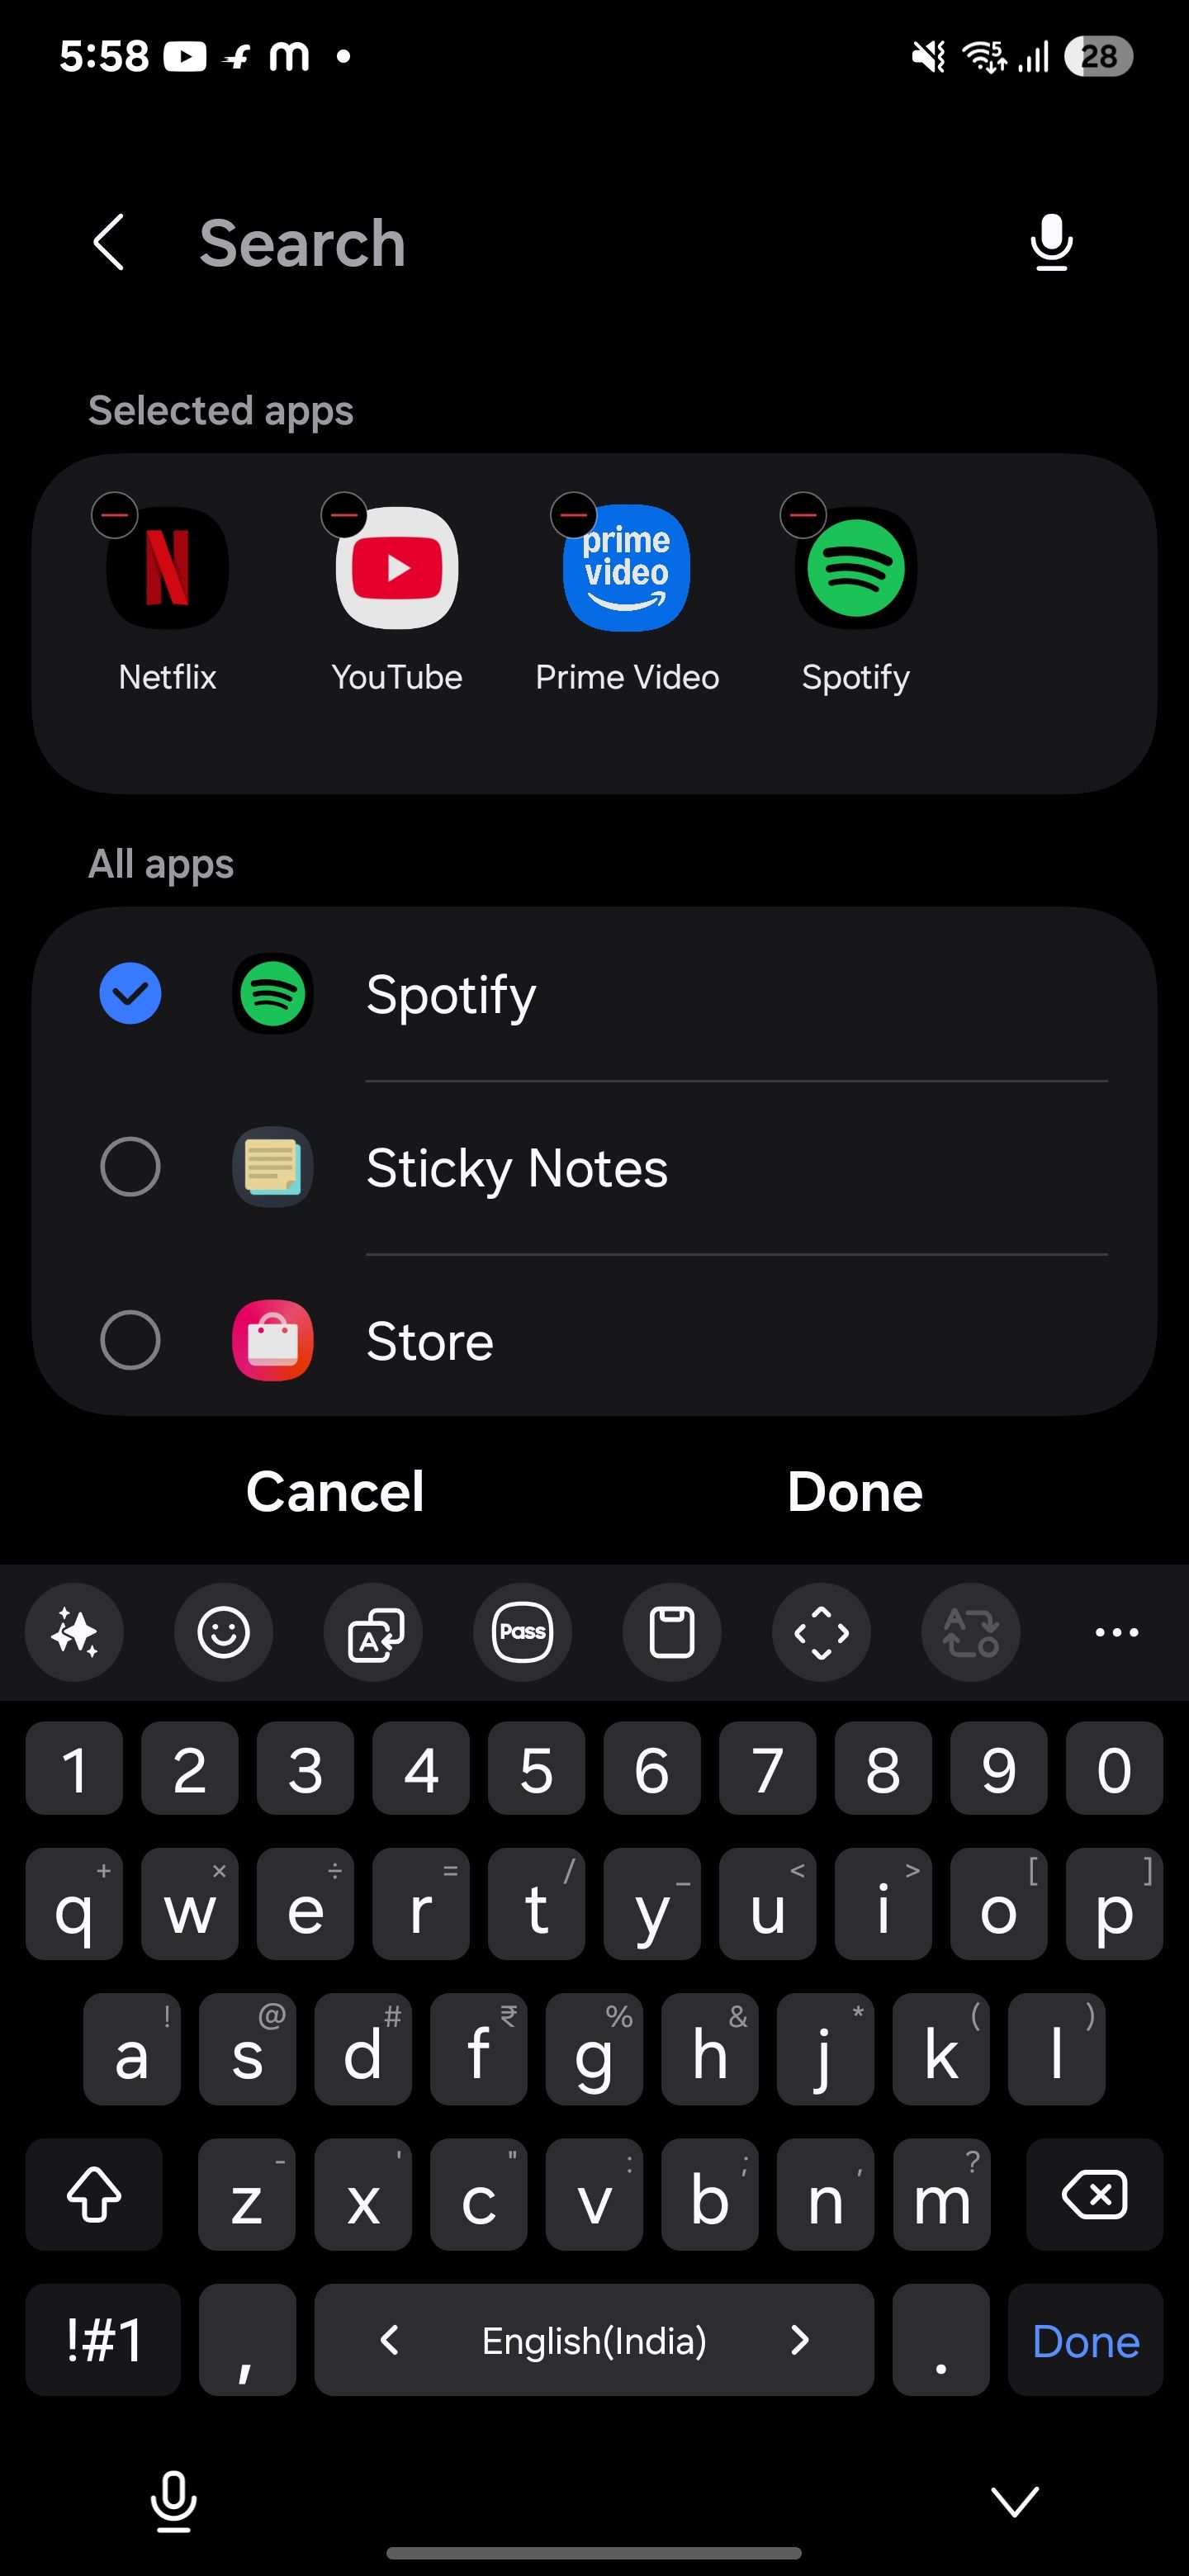
To set up a similar routine, go to Modes and Routines and tap the “+” icon to create a new one. In the If section, hit “+” to add a trigger. Search for App opened and pick the media apps you want for your entertainment mode, like Netflix, YouTube, or Spotify.
In the Then section, tap “+” again to set your actions. Turn on Do not disturb to block notifications, set Screen orientation to Auto Rotate, Media volume high, and Brightness to 100%. Now, you’re all set for the ultimate viewing and listening experience.
These are just a few of the automated routines I use to simplify things, but there’s so much more you can do! You can mix and match different triggers and actions in the Routines feature to suit your needs and lifestyle. Play around with it and see what works best for you.


Leave a Comment
Your email address will not be published. Required fields are marked *